Page non traduite
Cette page n'est pas encore disponible en français. Le contenu est affiché en anglais.
Genetec Security Center integration
This guide describes how to prepare PERCEPT body cameras, add them to Genetec Security Center, retrieve edge recordings, and validate the deployment. It also covers scale and optional LTE/VPN deployment considerations.
This guide was written using a PERCEPT BC100 body camera; the same integration principles apply to the PERCEPT BC200, although product-specific settings and terminology should be verified against the applicable user manual.
This guide was written and validated using PERCEPT firmware 10.7.2.7 and Genetec Security Center 5.11.3. It should also apply to newer compatible versions, but confirm compatibility and any changed interface labels with the deployed versions before rollout.
Note
This guide assumes that you are familiar with the PERCEPT body camera and have access to the appropriate user manual. It focuses on the Genetec Security Center integration workflow and does not repeat the complete camera configuration and operating instructions.
Refer to the PERCEPT BC100 user manual or PERCEPT BC200 user manual as needed for device-specific instructions, terminology, and configuration details. Follow the user manual when a setting or procedure is not described in this guide.
Recommended deployment
The recommended deployment uses two video streams:
- A low-bitrate live stream for on-demand viewing over Wi-Fi or LTE.
- A high-bitrate recording stream stored on the camera, then transferred to the Genetec Archiver through a docking station over wired Ethernet.
This approach reduces wireless bandwidth use while retaining high-quality recordings.
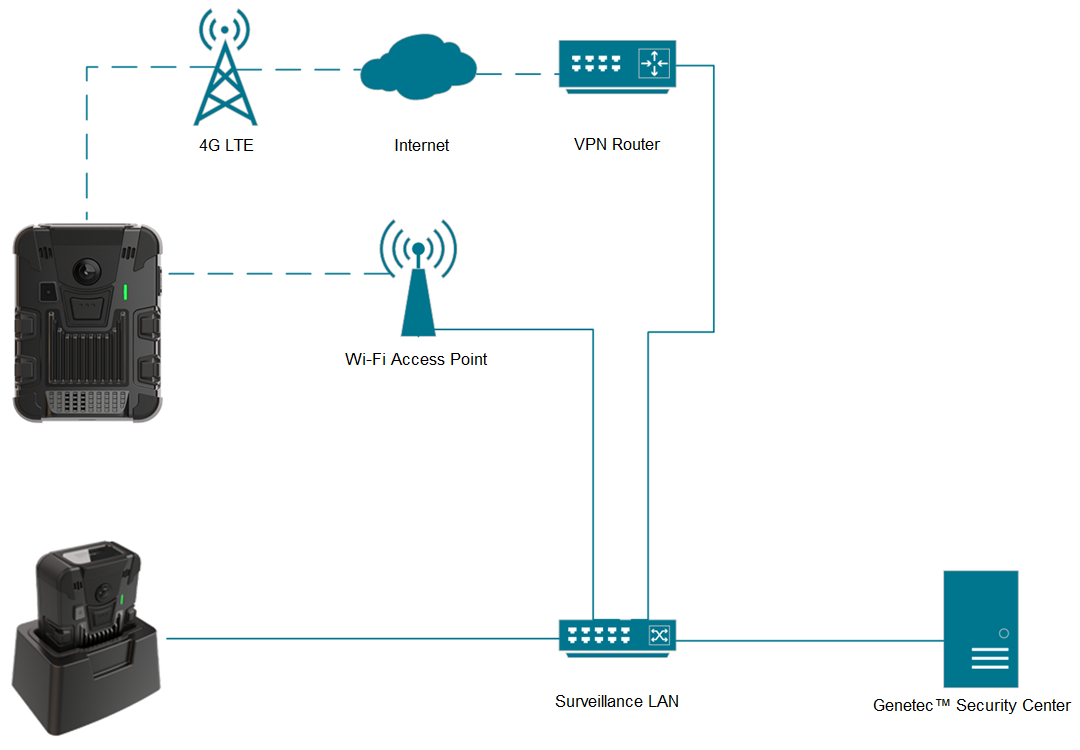
The deployment can provide on-demand live audio and video, two-way audio, local edge recording, automated edge-storage transfer, NTP time synchronization, firmware updates, and switching between docking, Wi-Fi, and LTE connections. Audio is not transferred to the Genetec Archiver as part of edge-storage transfer.
Functional scope
| Functionality | Notes |
|---|---|
| On-demand live audio and video | Use Wi-Fi or LTE only when live viewing is required. |
| Two-way audio | Push-to-talk behavior can vary by Genetec version. |
| Local recording and edge-storage transfer | Video is transferred to the Genetec Archiver; transferred audio is not supported. |
| Firmware updates | Use a dedicated Super user account. |
| Network switching | Docking, Wi-Fi, and LTE connections can be used with optional VPN access. |
Conseil
Validate one camera from configuration through Genetec enrollment, live streaming, recording, and edge-storage transfer before onboarding the fleet. Make one camera work end to end before onboarding 100 cameras.
Camera preparation
Configure the camera for network connectivity, video streaming, local recording, time synchronization, and ONVIF access before adding it to Genetec Security Center. The following settings support the recommended deployment model and should be validated on one camera before deployment at scale.
Network and docking configuration
Each camera should retain a consistent address when connecting through Wi-Fi, a docking station, or VPN. Use DHCP reservations on the video network and VPN infrastructure where possible; fixed device addresses can prevent the camera from joining other networks before it connects through VPN.
For cellular deployments, configure data usage to match the intended operating model. A typical configuration permits on-demand live streaming while blocking recorded-media transfer, firmware updates, troubleshooting files, and unnecessary metadata over cellular.
When VPN is enabled, network interfaces are selected automatically in this order: docking-station LAN, Wi-Fi, then LTE/cellular. If LAN and Wi-Fi connections are unavailable, the camera can switch to VPN over LTE. Each interface should use a reserved address so Genetec can continue to reach the camera after a network change.
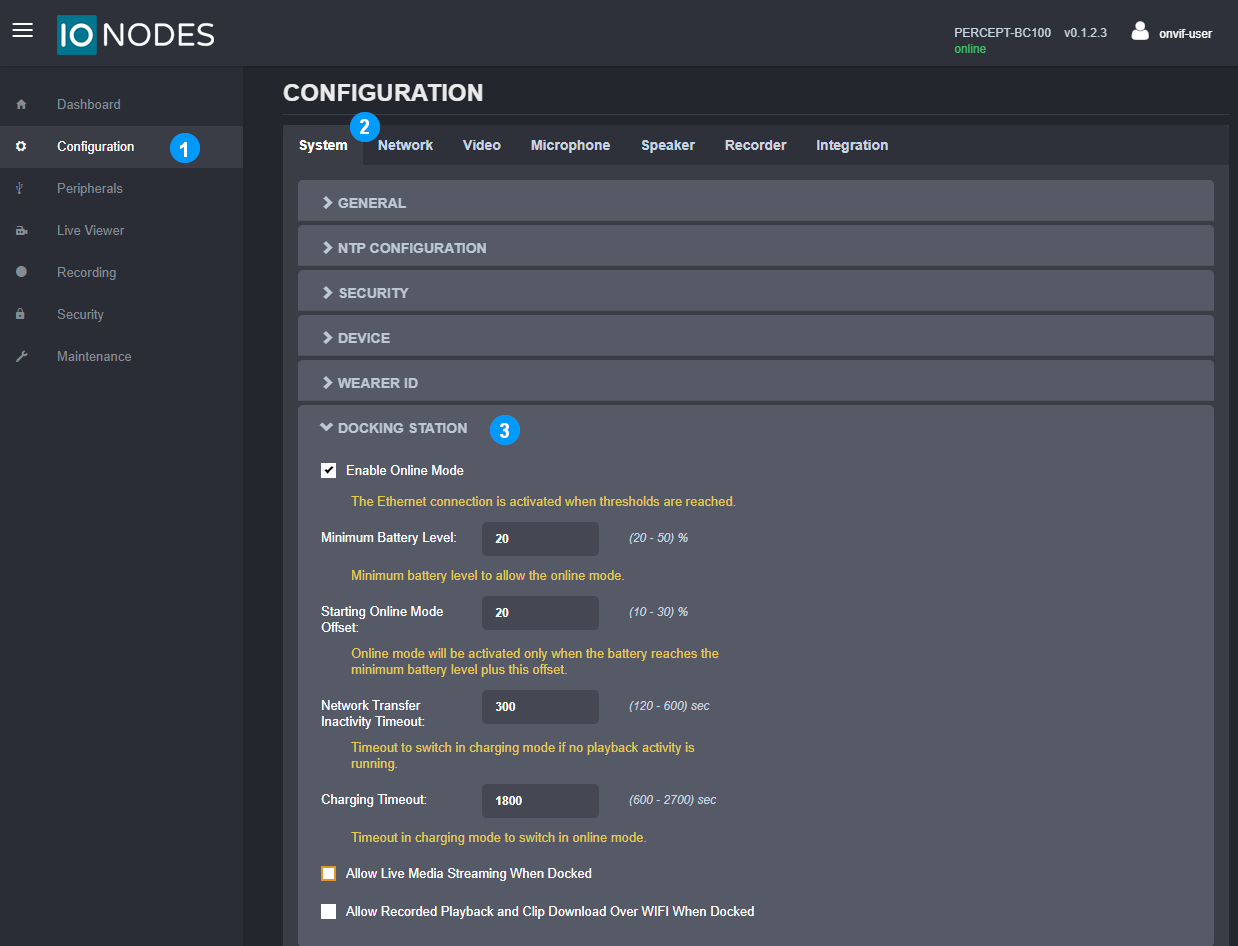
When docking stations are used for recording transfer:
- Open the Configuration page.
- Select the System tab.
- Expand the Docking Station section and enable Online Mode, disable Allow Live Media Streaming When Docked when live streaming is not required, and disable Allow Recorded Playback and Clip Download Over Wi-Fi When Docked so recordings are transferred over wired Ethernet.
Avertissement
Edge-storage transfers can create significant network traffic when multiple cameras dock at once. Configure the Genetec Archiver transfer concurrency and throughput limits for the available network capacity.
Video configuration
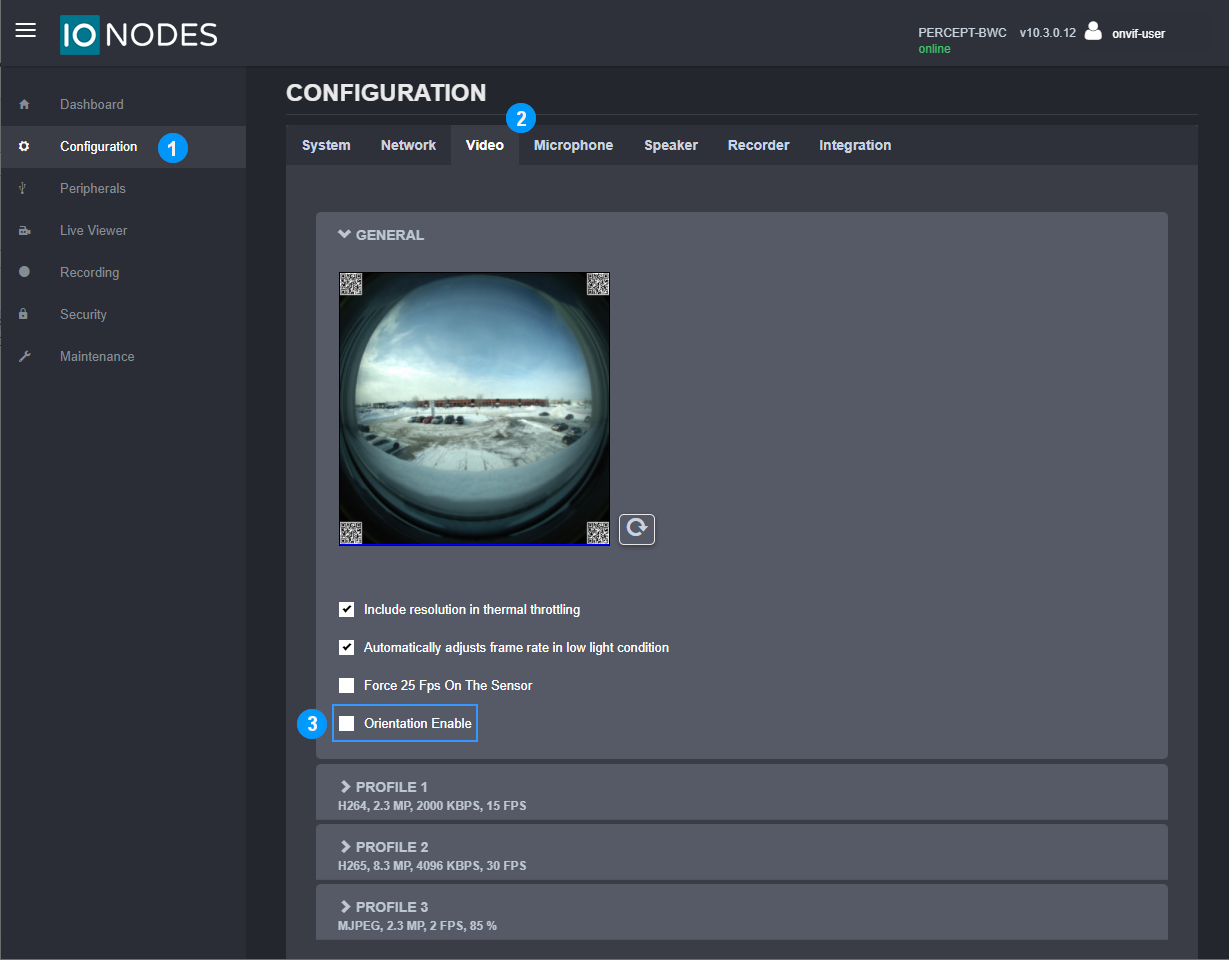
Genetec Security Center does not support the camera's orientation metadata. Disable it before enrollment:
- Open the Configuration page.
- Select the Video tab.
- Uncheck Orientation Enable.
Configure the required video profiles before adding the camera to Security Center. The camera exposes enabled profiles to Genetec during enrollment.
- Open the Configuration page.
- Select the Video tab.
- Enable and configure the required video profiles.
The following profiles are recommended as a starting point. Adjust them for the available bandwidth, retention requirements, and Genetec infrastructure.
| Profile | Purpose | Codec | Resolution | Frame rate | Target bit rate |
|---|---|---|---|---|---|
| 1 | Recording | H.264 | 6 MP | 30 fps | 8000 kbps |
| 2 | Live viewing | H.264 | 1 MP | 10 fps | 800 kbps |
| 3 | Camera web interface | MJPEG | 2.3 MP | 1 fps | Fixed quality |
Profile 3 is intended for the camera web interface and cannot be used for local edge recording. Enable Profile 1 and/or Profile 2 for recordings stored on the camera.
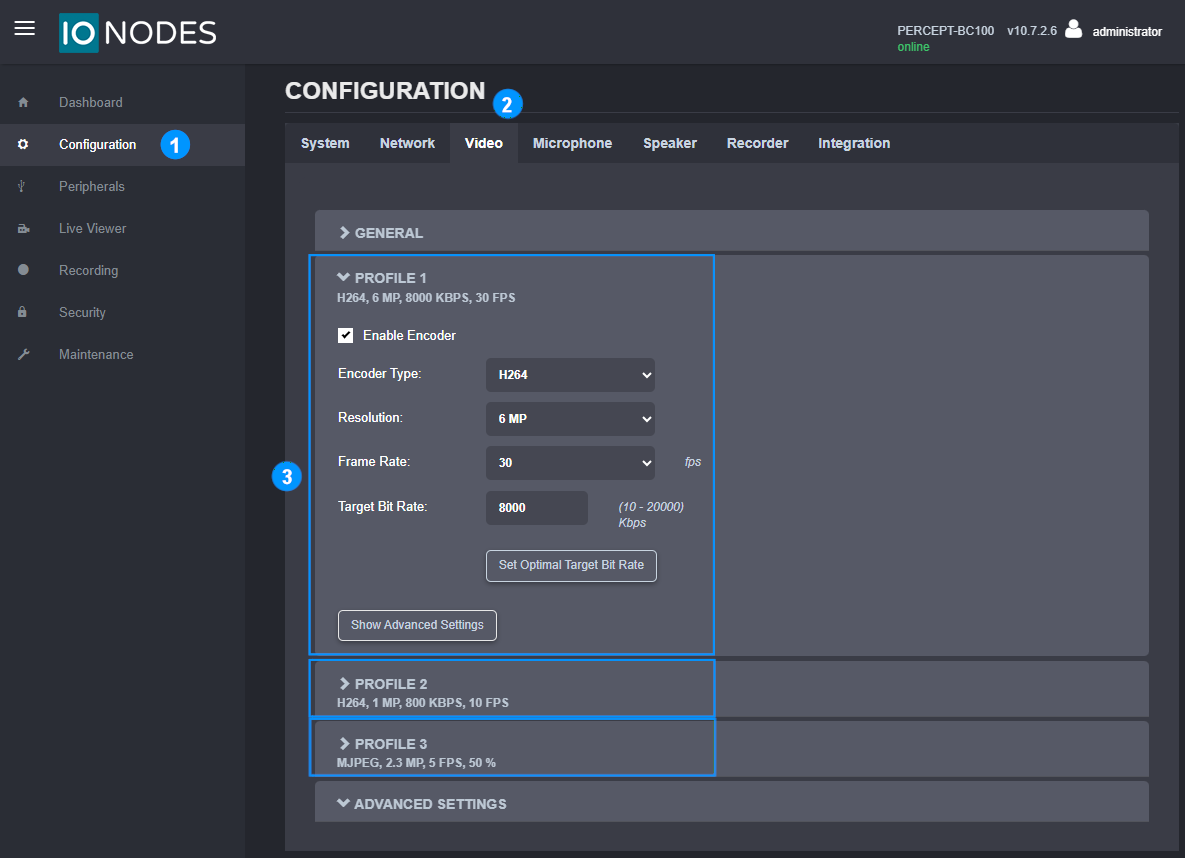
Changing a profile's codec requires a camera reboot. After enrollment, configure resolution, frame rate, and bit rate in Genetec Config Tool.
Conseil
Use H.264 when viewing streams in Genetec Web Client without allocating Media Gateway transcoding resources.
Genetec Web Client does not support push-to-talk. If the profiles use H.265, Genetec Media Gateway transcoding is required for Web Client playback.
Local recording
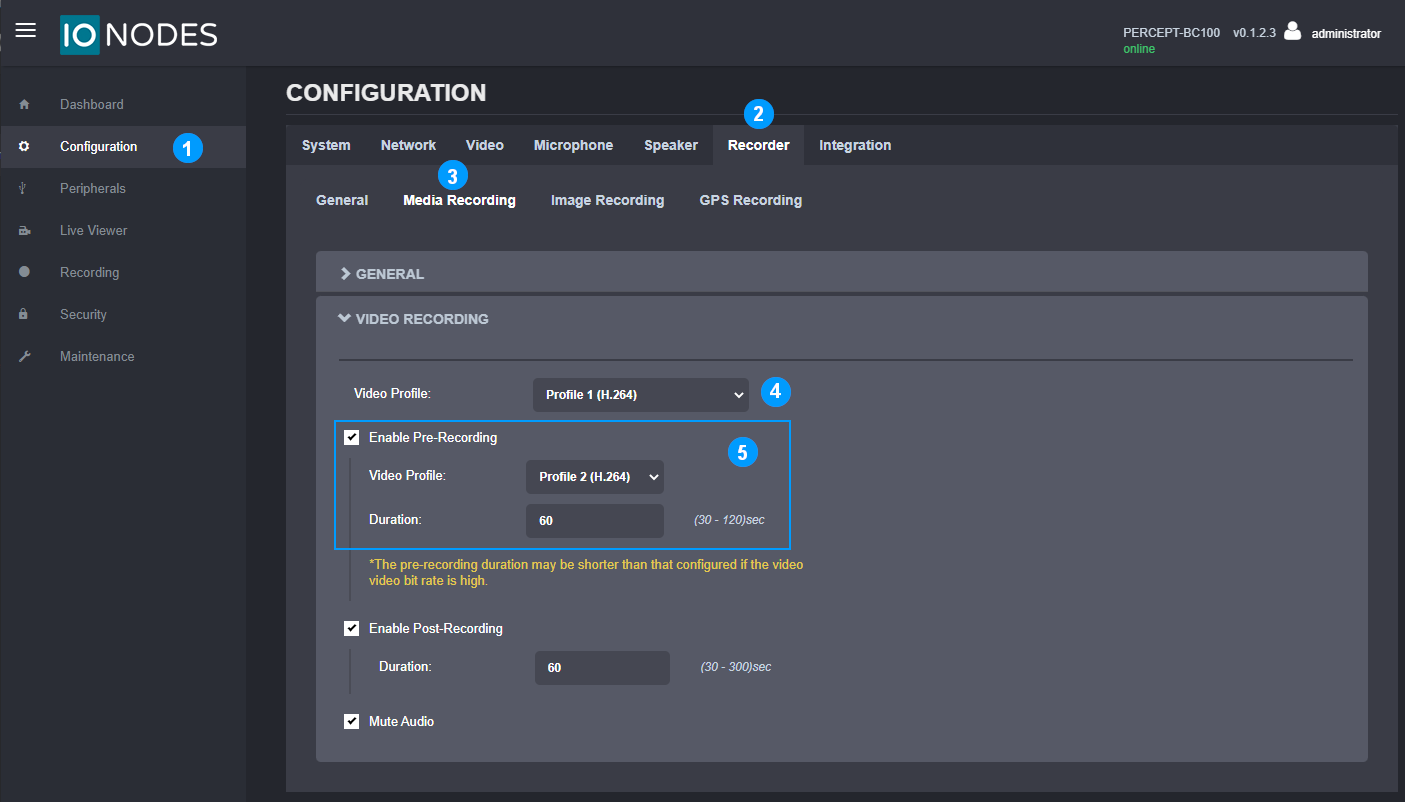
Configure local recording before deployment:
- Open the Configuration page.
- Select the Recorder tab.
- Select the Media Recording subtab and the Video Recording section.
- Select the recording video profile, typically Profile 1.
- Configure pre- and post-recording as required. When pre-recording is enabled, use the low-bitrate live profile to reduce battery and thermal impact.
To encrypt locally recorded media:
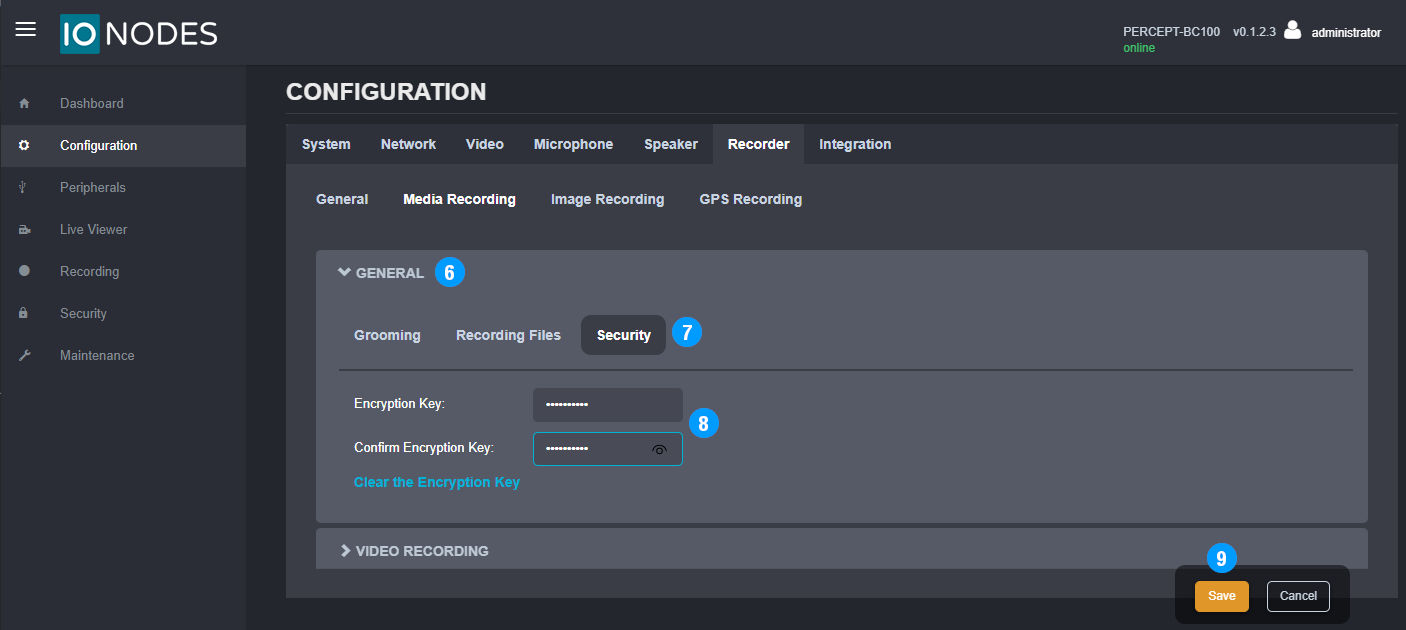
- In Configuration > Recorder > Media Recording, expand the General subtab.
- Select Security.
- Enter and confirm the encryption key, then save it securely.
Dedicated ONVIF user
Create a dedicated camera user for Genetec enrollment rather than using the default administrator account:
- In the camera web interface, open Security.
- Select Create User.
- In the New User dialog, enter the user name.
- Enter and confirm the password.
- Assign the Super user role.
- Select Create User.
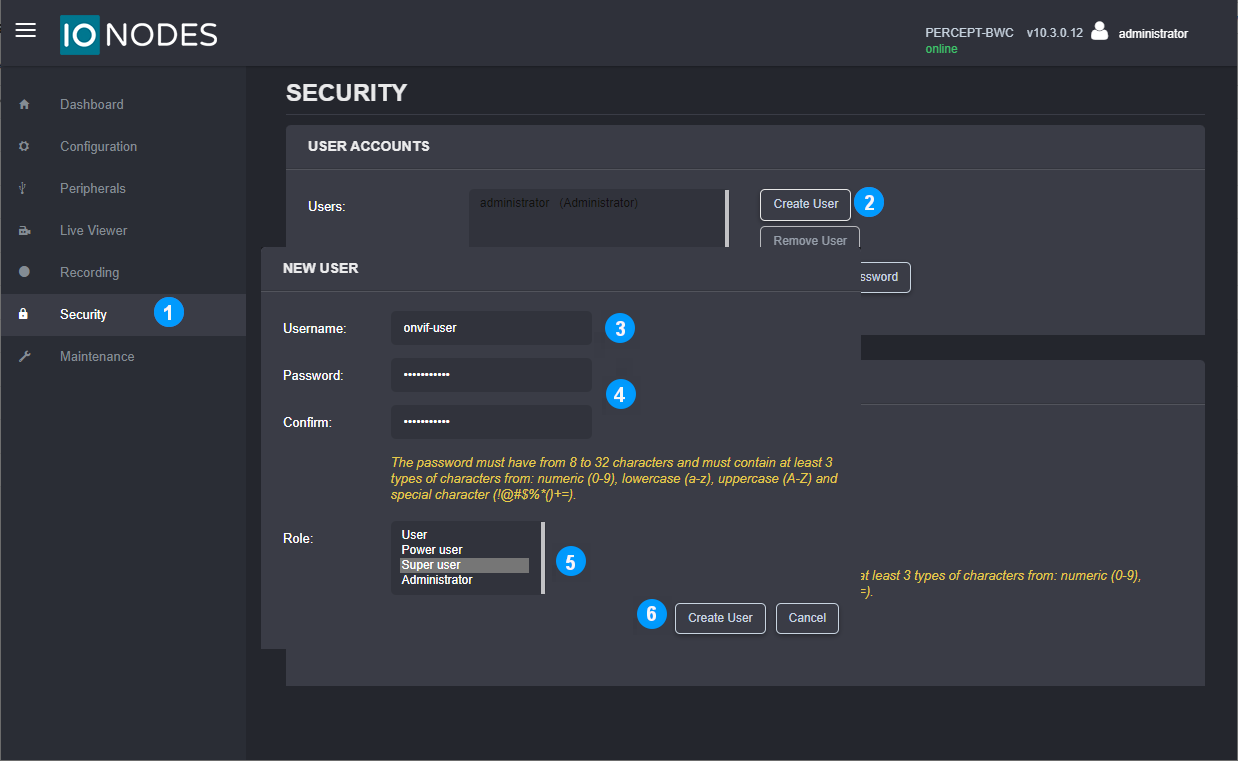
Keep this account separate from the administrator account used to configure the camera.
Camera enrollment in Genetec Security Center
In Genetec Config Tool:
- Select Tasks.
- Select Video.
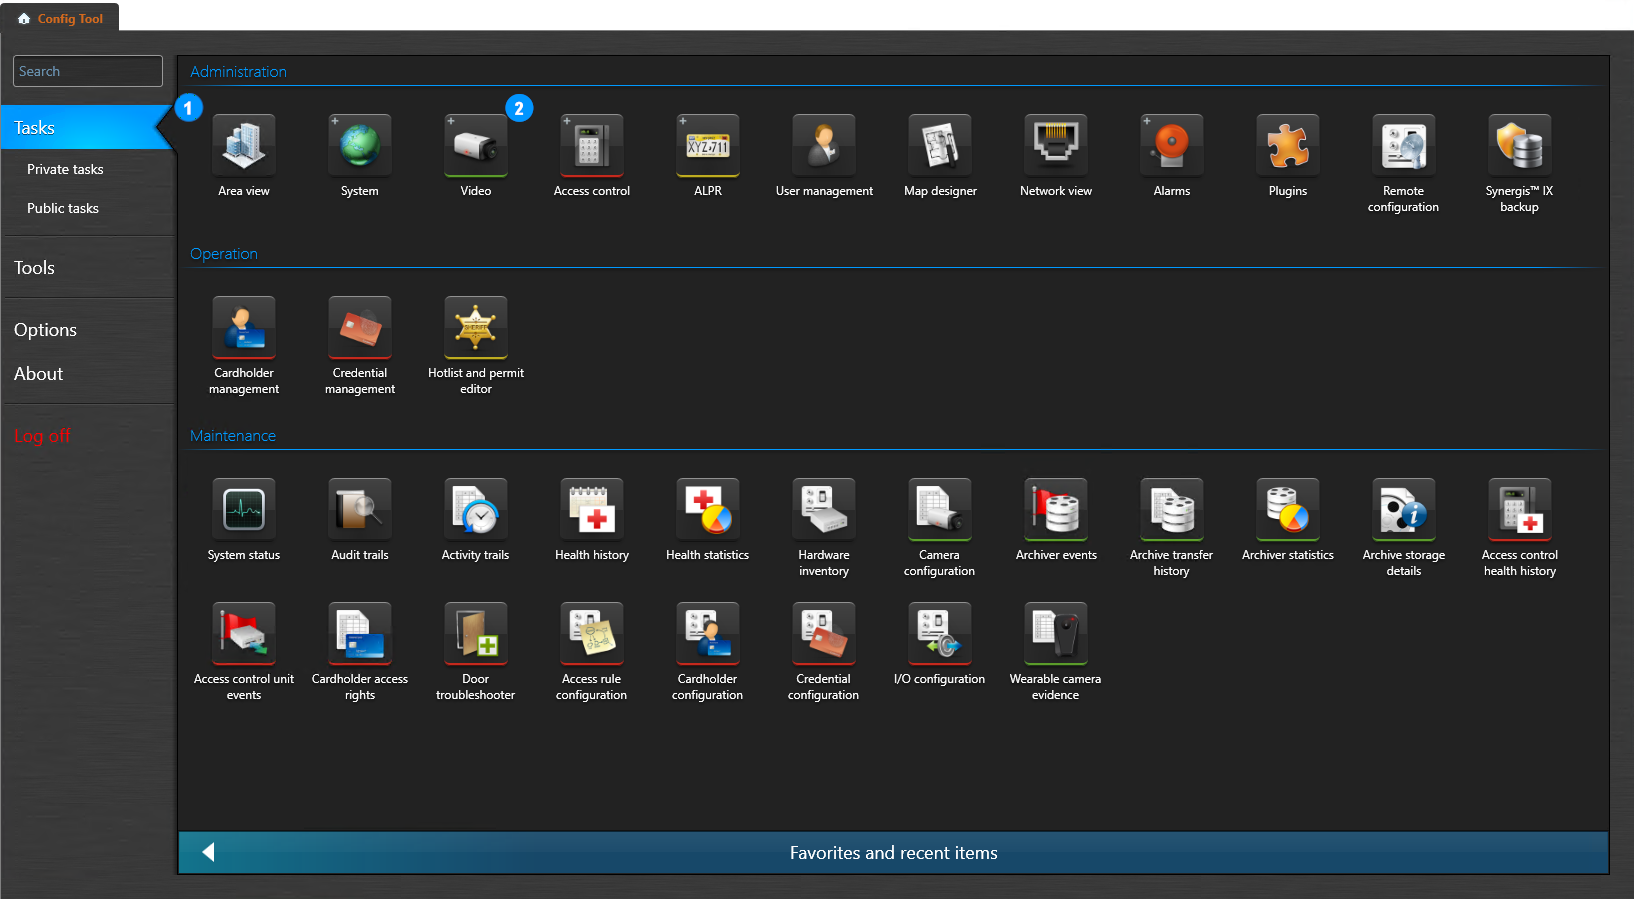
To add the camera:
- On the Video task, open the Roles and units tab.
- Select + Video unit.
- In Manual add, select ONVIF.
- Enter the camera IP address.
- Select Specific credentials and enter the dedicated ONVIF user credentials.
- Select Add or Add and close.
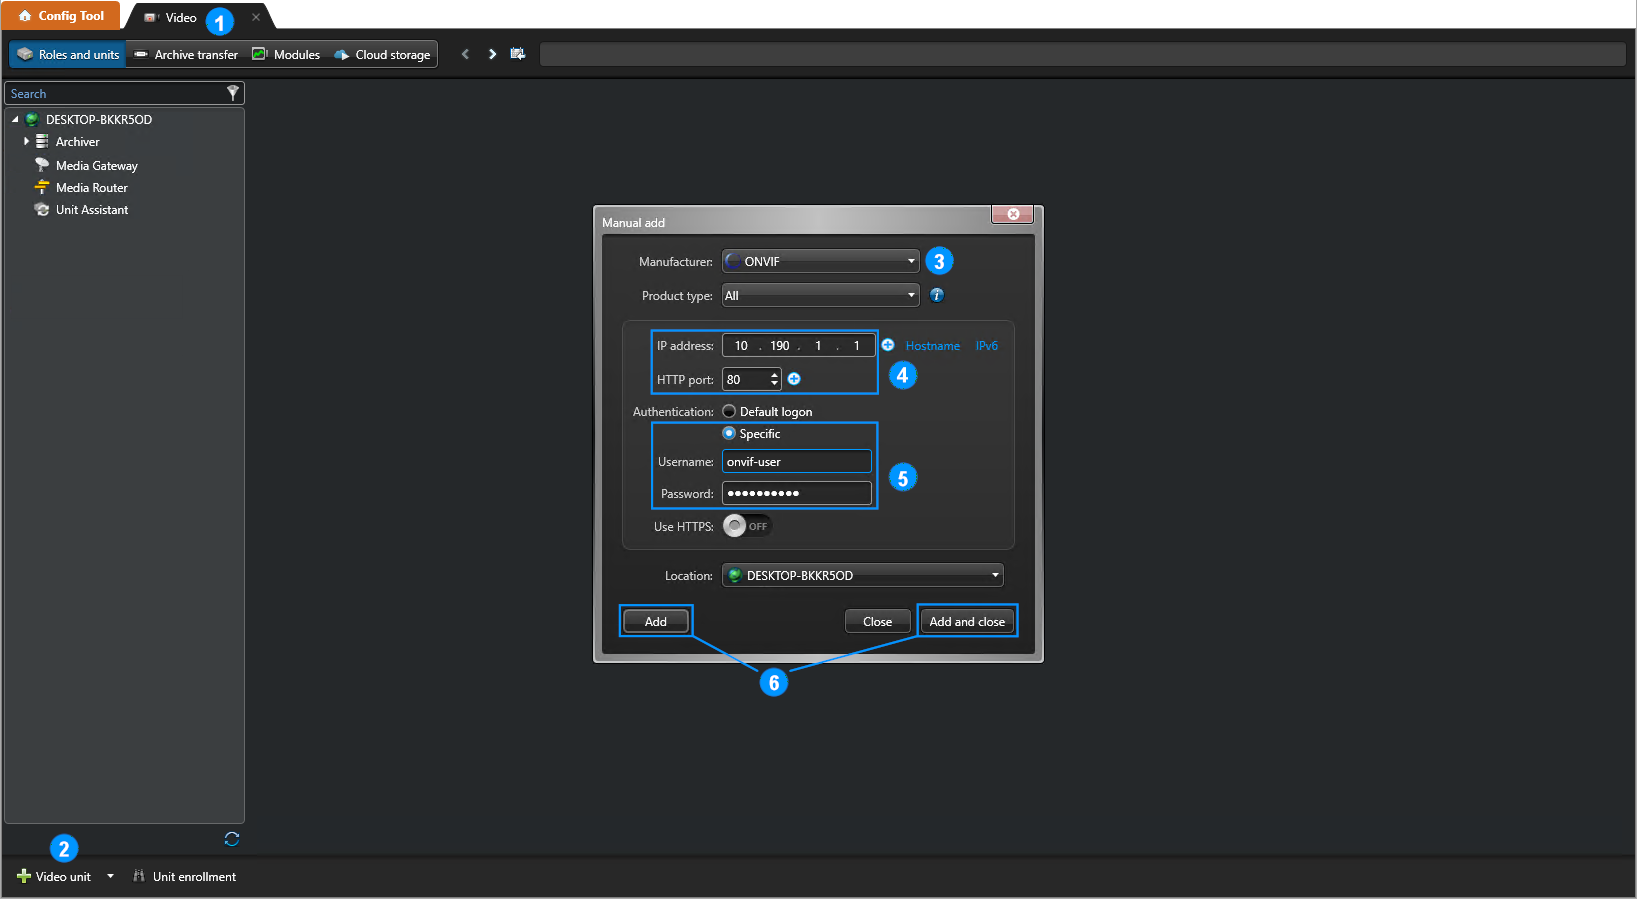
The camera may also be added through the unit-enrollment discovery workflow using ONVIF.
Enrolled camera configuration
Identity
- Expand the Archiver and select the newly added camera.
- Select the Identity tab.
- Update the camera name and description.
- Apply the changes.
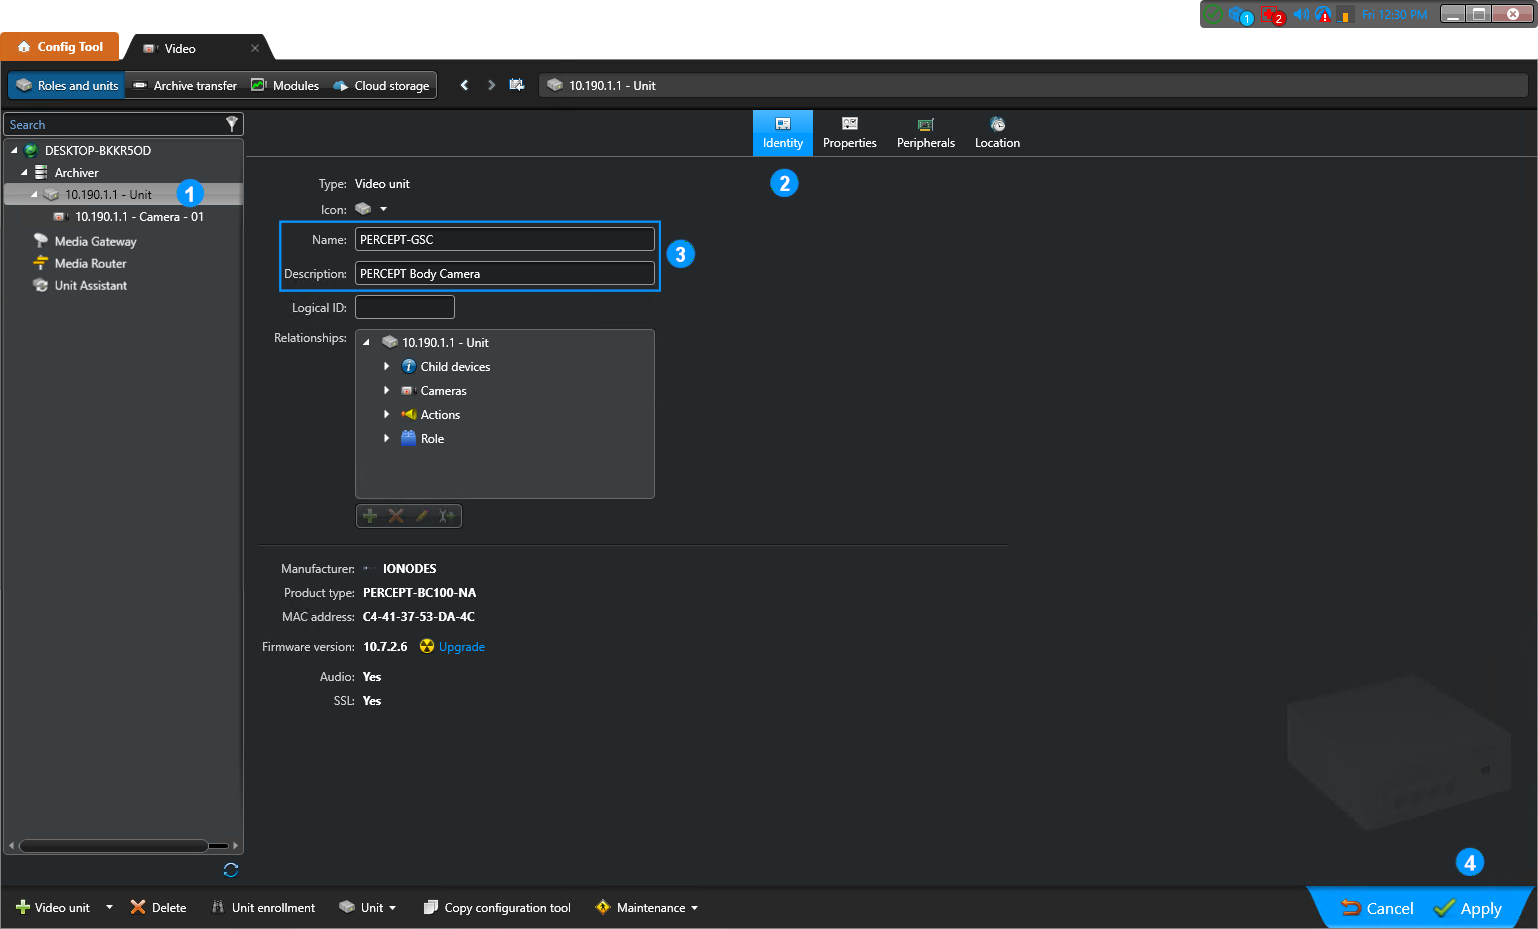
Peripherals
- With the newly added camera selected, open the Peripherals tab.
- Select all unused button inputs.
- Disable the selected inputs.
- Apply the peripheral changes.
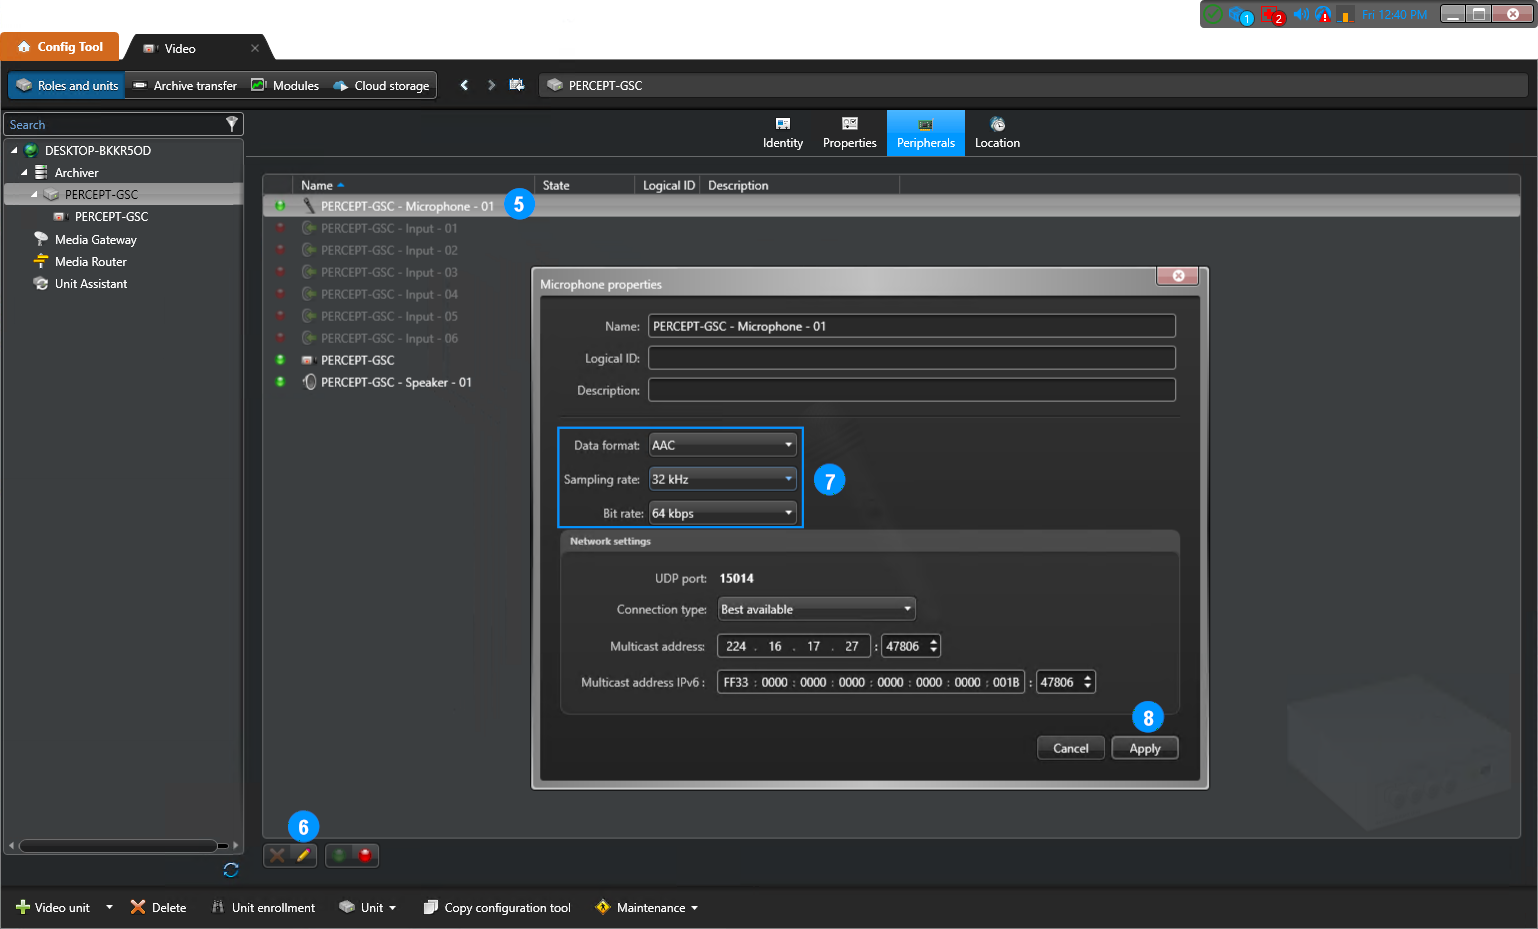
- Select Microphone - 01.
- Open the microphone properties.
- Configure AAC, 32 kHz, and 64 kbps as a low-bitrate starting point.
- Apply the microphone settings, then apply the peripheral settings.
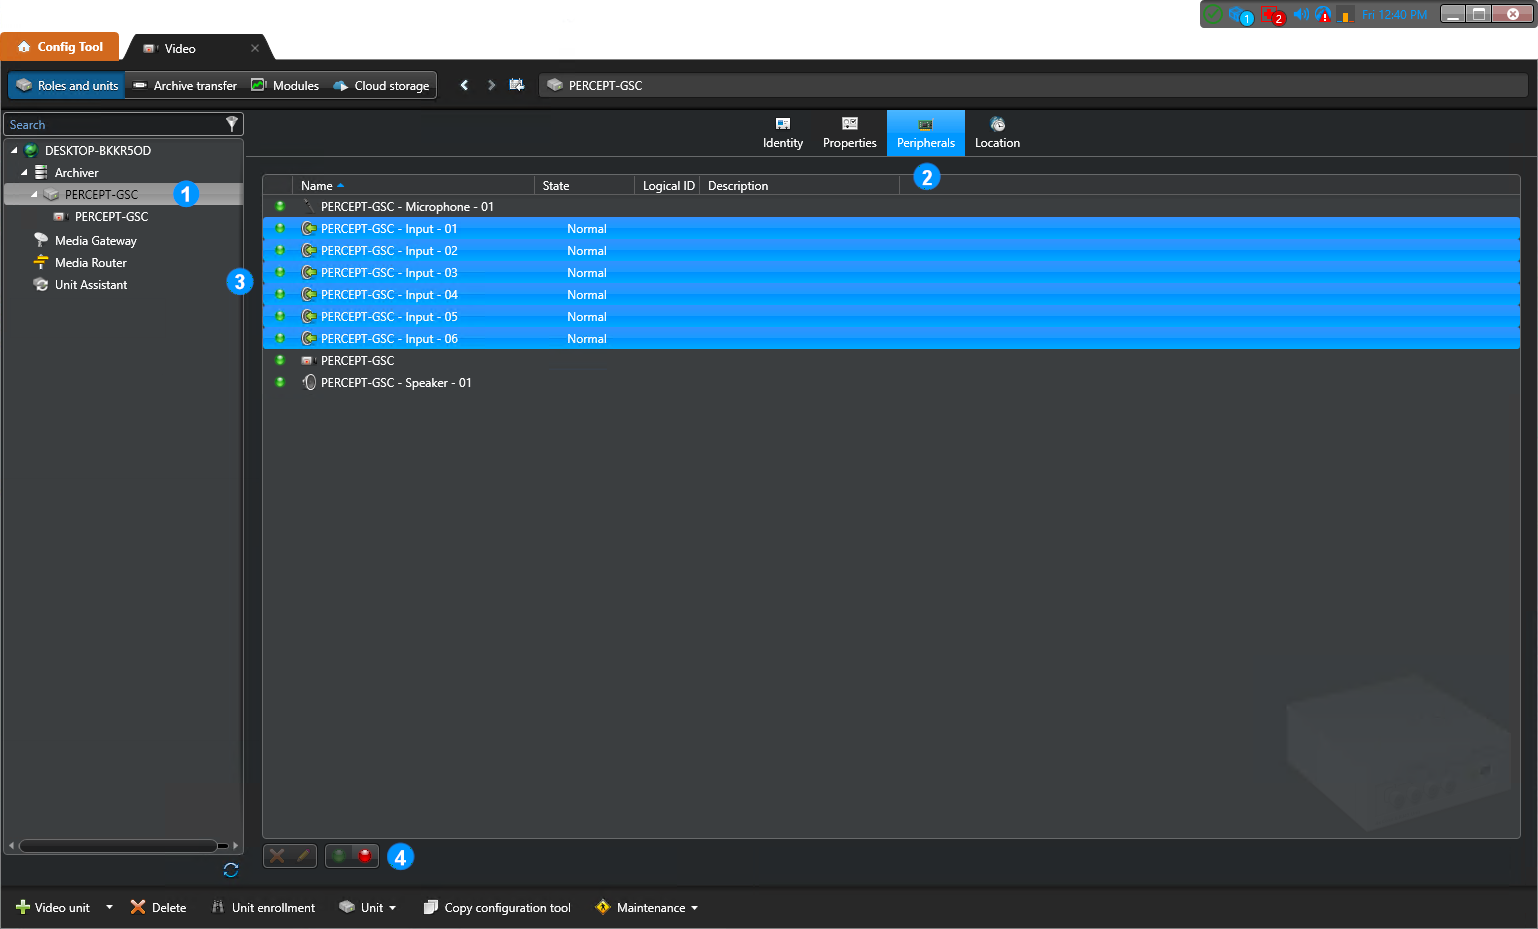
Video and analytics
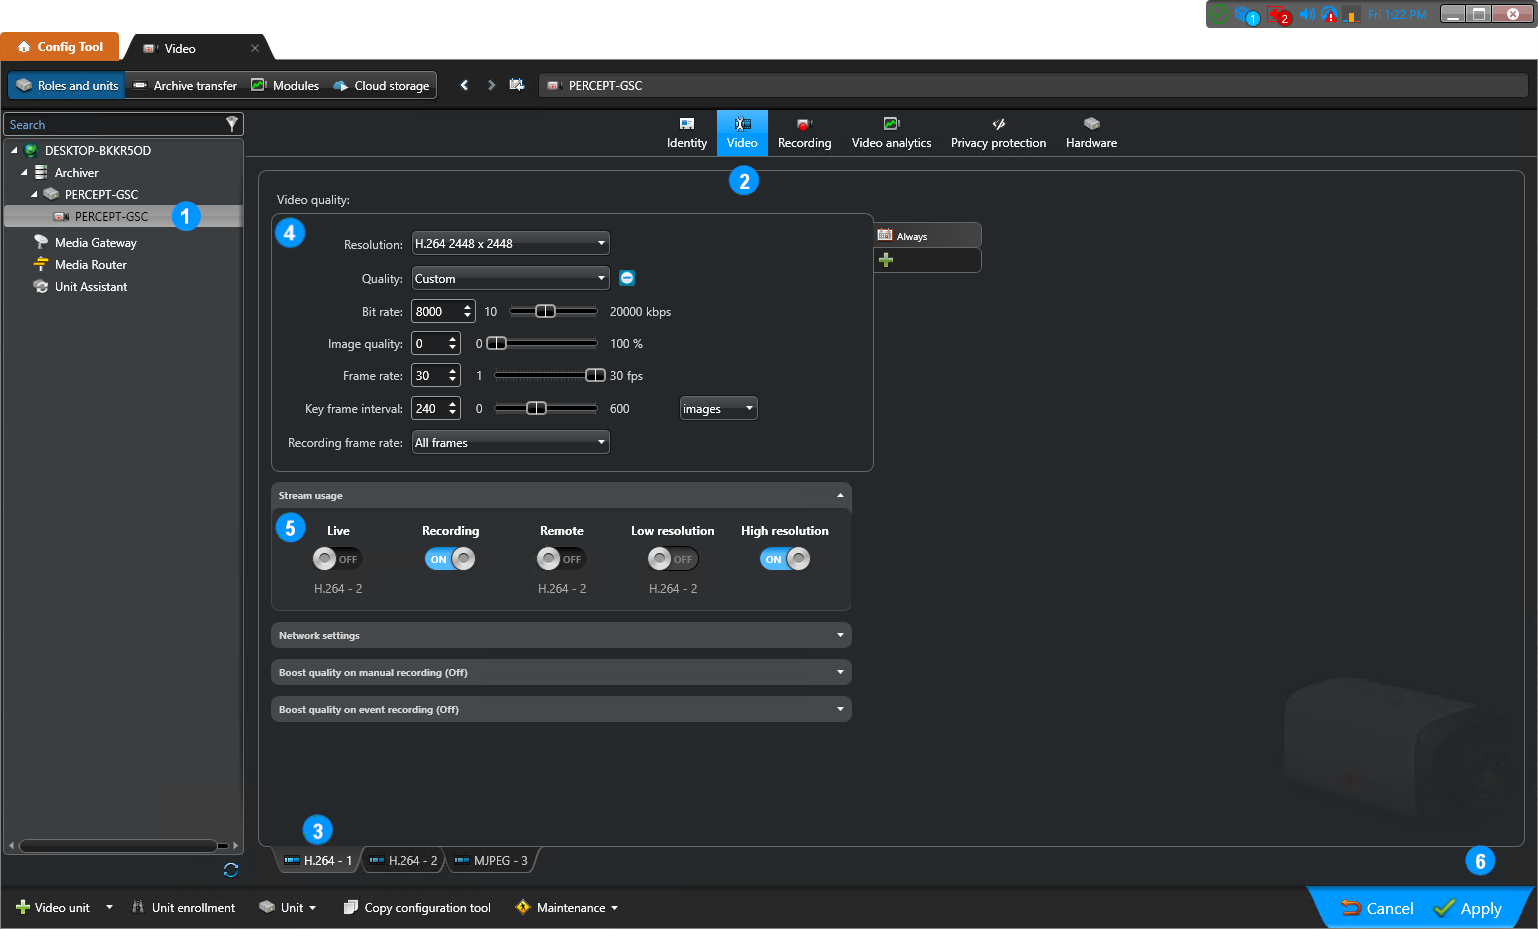
- Expand the camera and select its camera device.
- Select the Video tab.
- Select the primary H.264 - 1 stream.
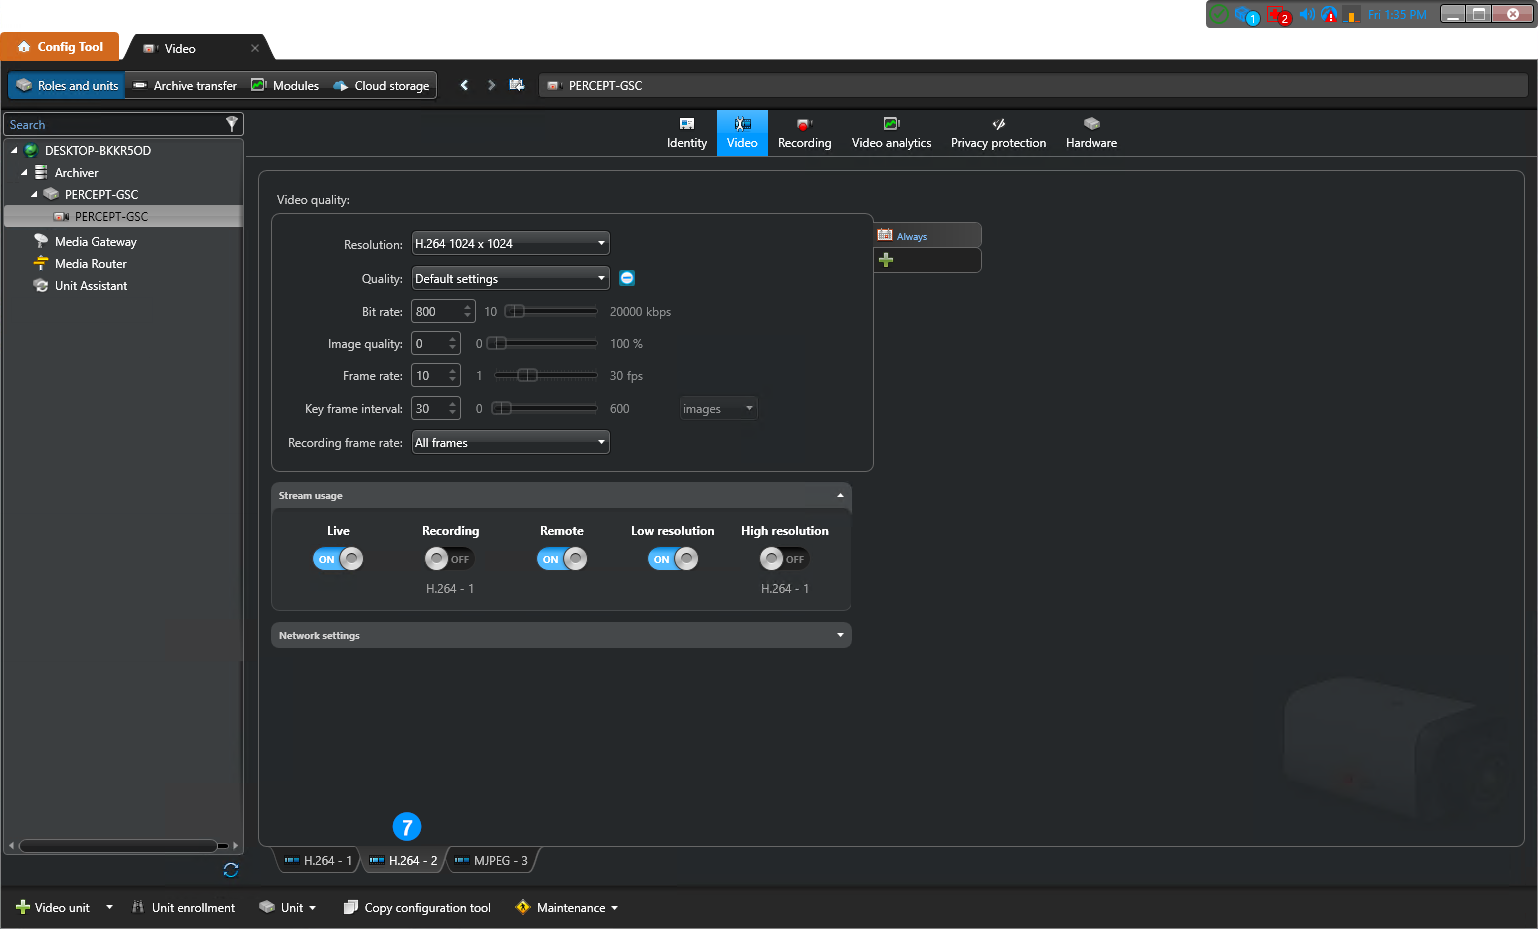
- Enrollment can reset this stream to its highest supported settings, so restore the Profile 1 resolution and bit rate configured on the camera.
- Assign the primary stream to Recording and High resolution usage only.
- Apply the changes.
- Select the secondary H.264 - 2 stream. Verify that its Profile 2 settings remain applied, then assign it to all other stream-usage types.
To configure video analytics:
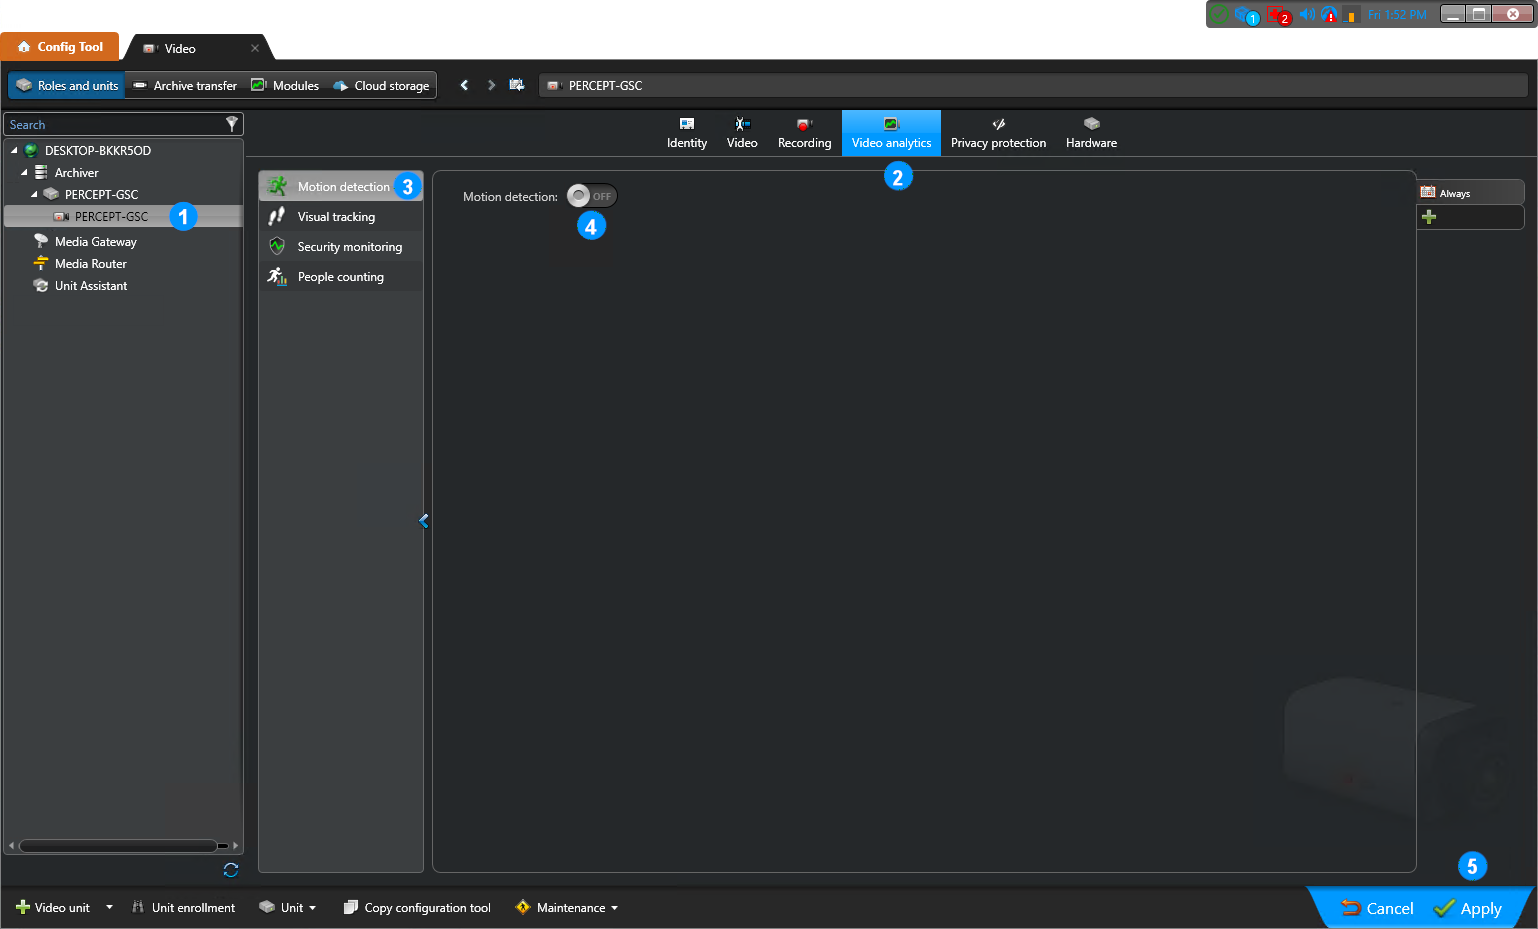
- Expand the camera and select its camera device.
- Select the Video analytics tab.
- Select the Motion detection subtab.
- Disable motion detection unless the deployment specifically requires it.
- Apply the changes.
Panomorph lens dewarping
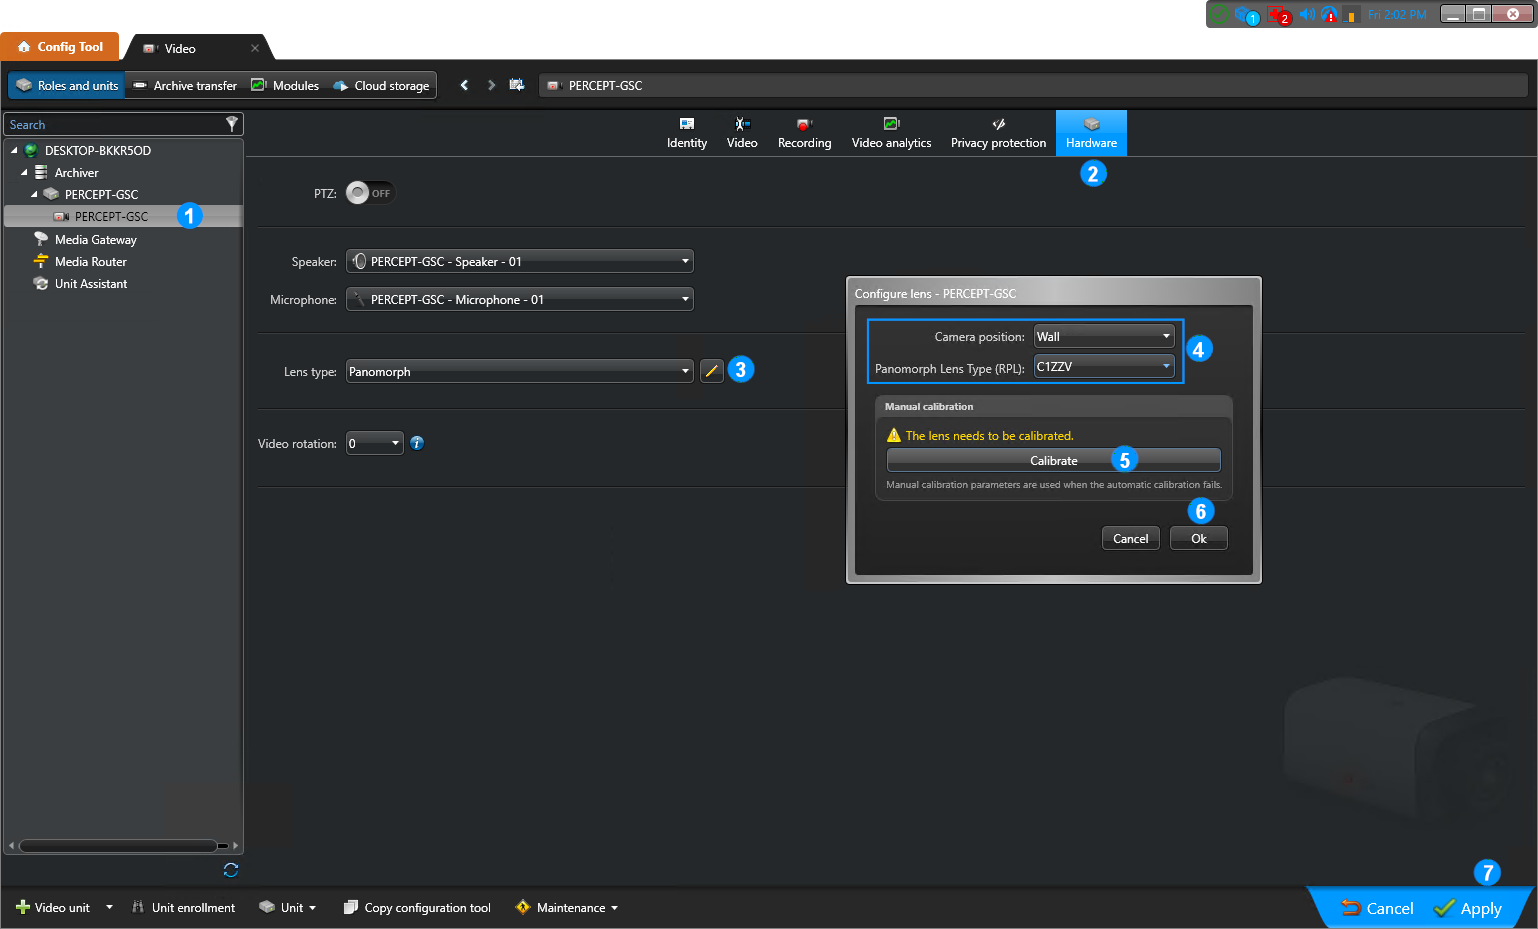
Configure Panomorph lens dewarping to enable dewarping and virtual PTZ controls in Security Desk:
- Expand the newly added camera and select its camera device.
- Select the Hardware tab.
- Set Lens type to Panomorph, then select the edit icon to open Configure Lens.
- Set Camera position to Wall and Panomorph Lens Type (RPL) to C1ZZV.
- Select Calibrate.
- Select OK.
- Apply the changes.
Note
Panomorph dewarping is optional. When it is disabled, Genetec displays the full hemispherical image and virtual PTZ controls can still be used to pan and zoom without dewarping.
Recording and edge storage
Choose the recording model that matches the deployment.
Continuous recording
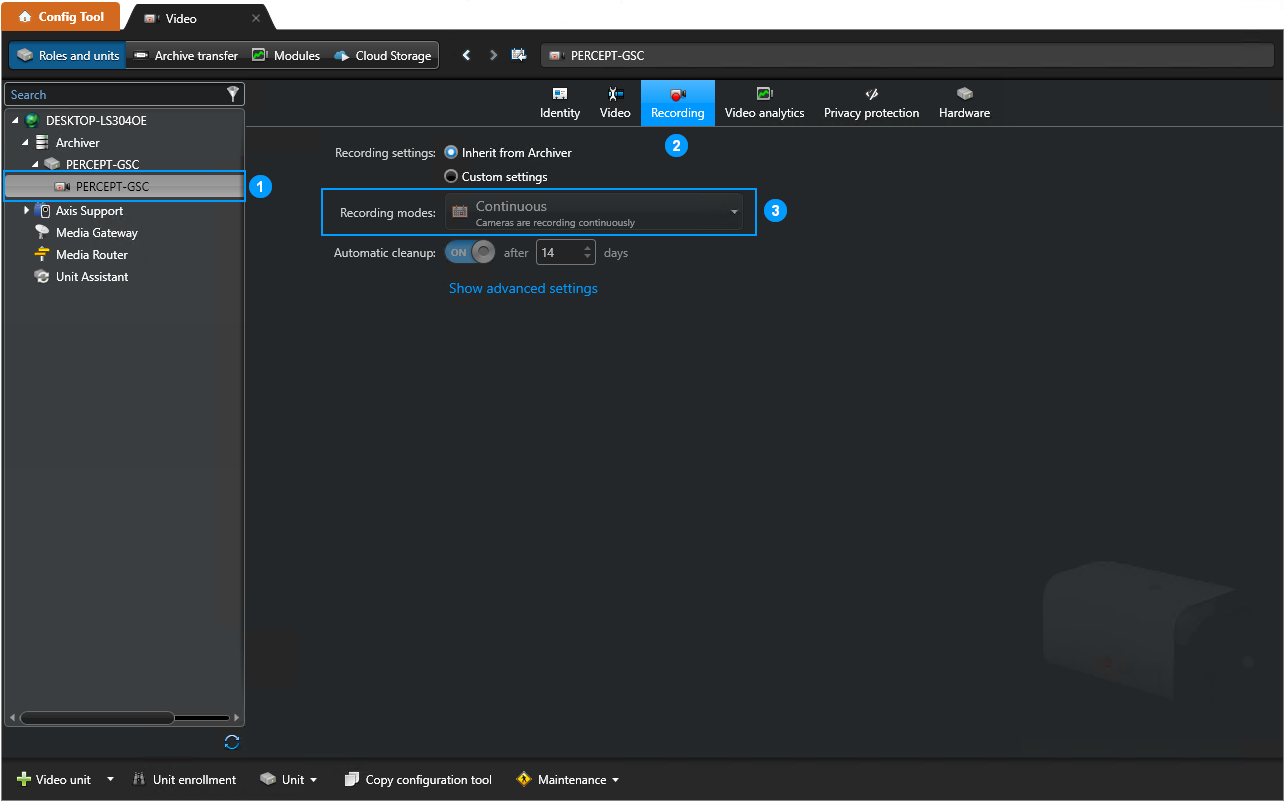
Use continuous recording when cameras normally operate within a known Wi-Fi coverage area and Genetec should request the recording stream while the camera is connected:
- Select the camera device.
- Select the Recording tab.
- Select Custom settings if required, then configure the required recording mode.
Edge storage only
Use edge-storage-only recording when cameras should record away from base and transfer recordings after returning:
- Expand the camera and select its camera device.
- Select the Recording tab.
- Set Recording modes to Off.
- Apply the changes.
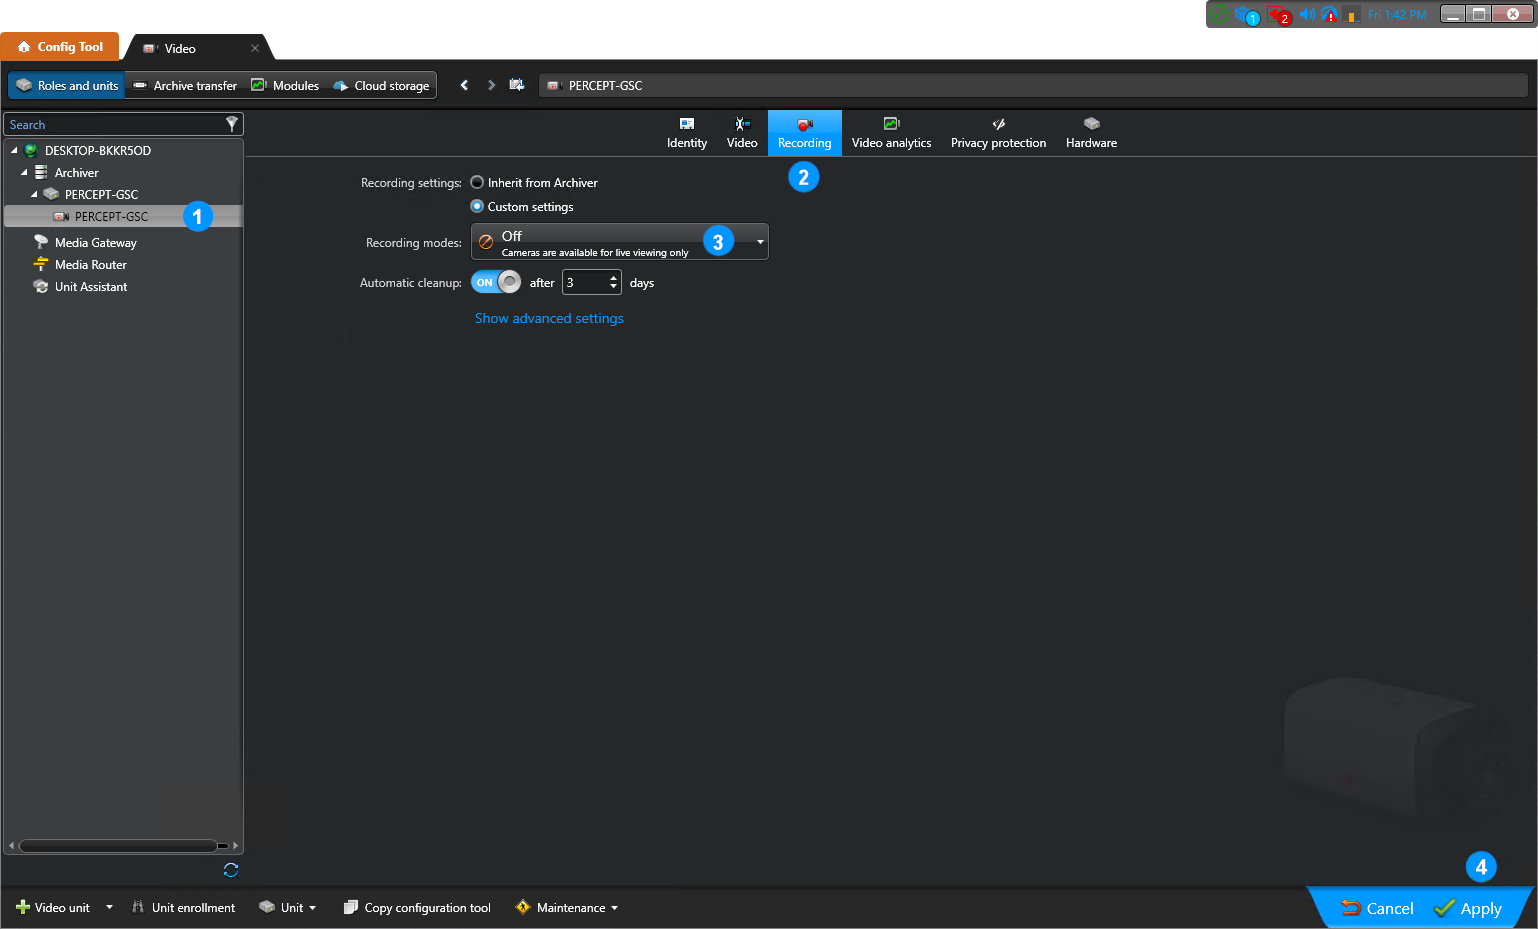
Users start and stop recording from the body camera, and Genetec retrieves the local recordings through archive transfer.
Other recording modes are available in Genetec. Do not use motion-based recording for wearable-camera deployments. Manual and scheduled custom modes may be appropriate for specific operating procedures.
Manual recording can be triggered from Genetec Security Desk when that recording mode is enabled.
Edge-storage transfer
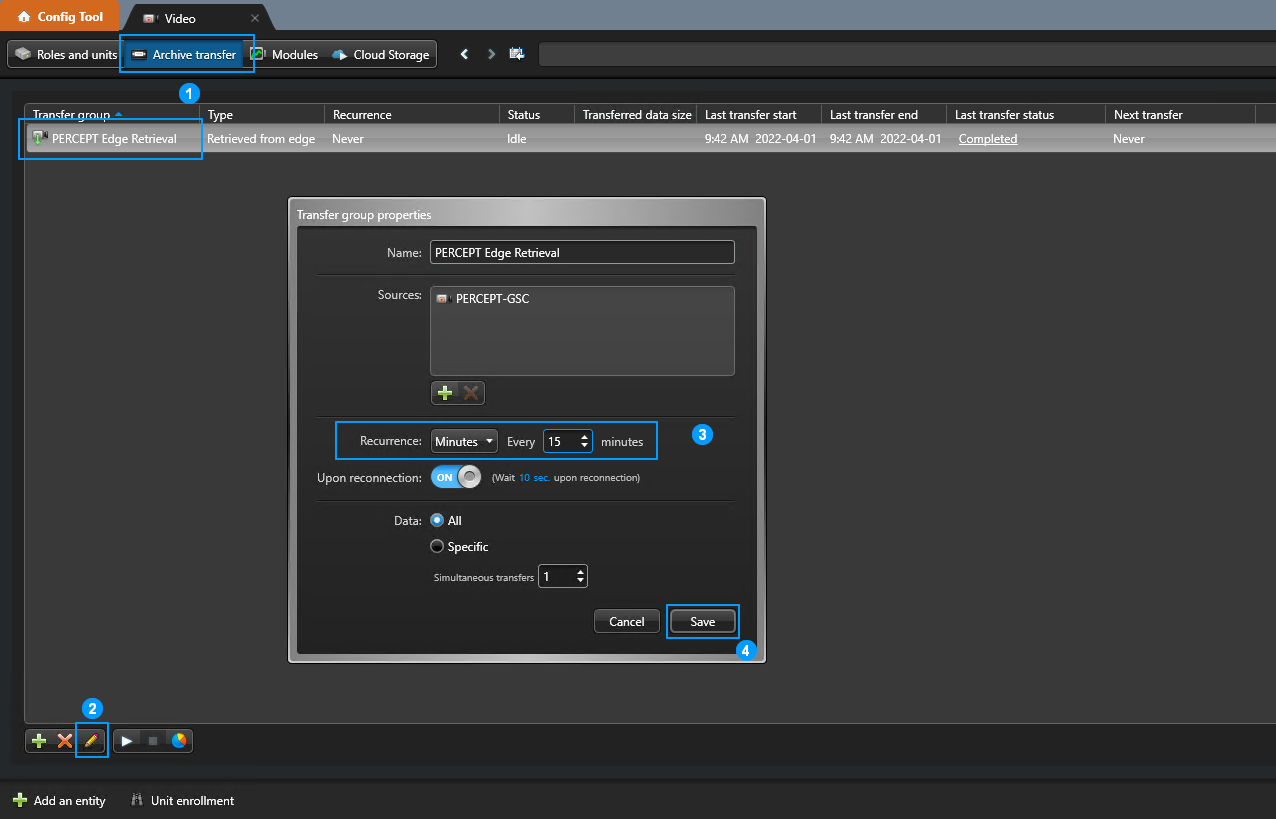
- In the Genetec Video task, open the Archive transfer tab.
- Select + to create an archive transfer group.
- Select Retrieve from edge.
- Enter a descriptive transfer-group name.
- Configure a recurrence that matches the expected docking or return-to-base schedule.
- Select + and select the PERCEPT cameras as sources.
- Save the transfer group.
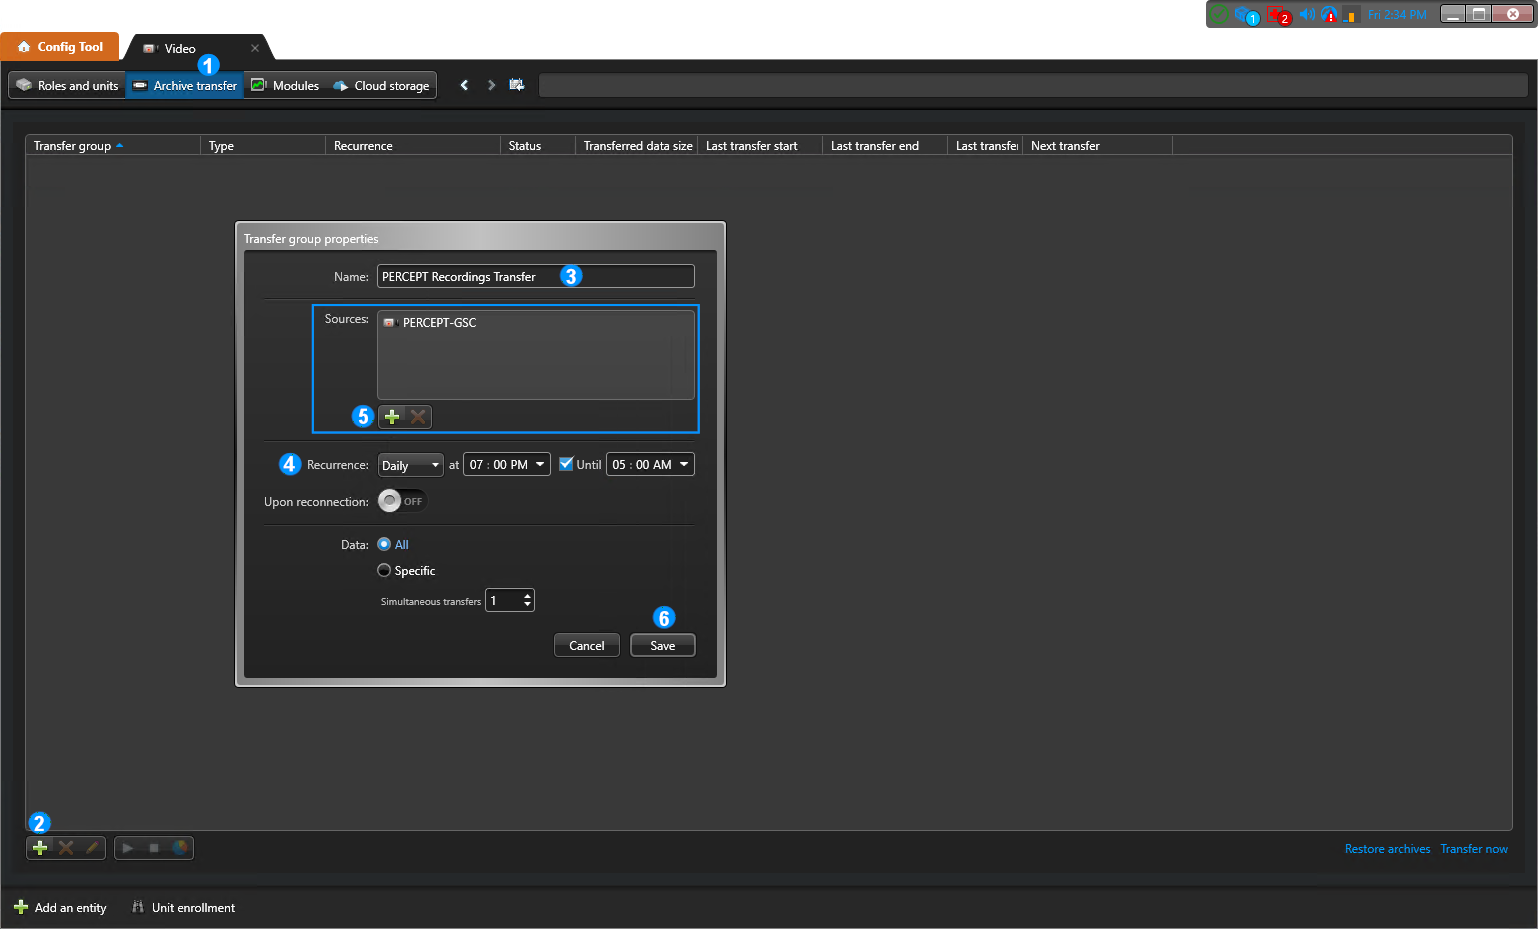
Genetec transfers only recordings for timestamps not already archived. It does not delete recordings from the camera after transfer.
For docked cameras, schedule periodic transfer attempts during expected docking periods. This avoids transfer attempts over Wi-Fi and spreads load across shifts or camera groups.
For deployments that transfer recordings as soon as a camera reconnects, enable Upon reconnection in the transfer-group properties.
Deployment validation
Complete the following checks before deploying cameras at scale or over LTE/VPN.
Live streaming validation
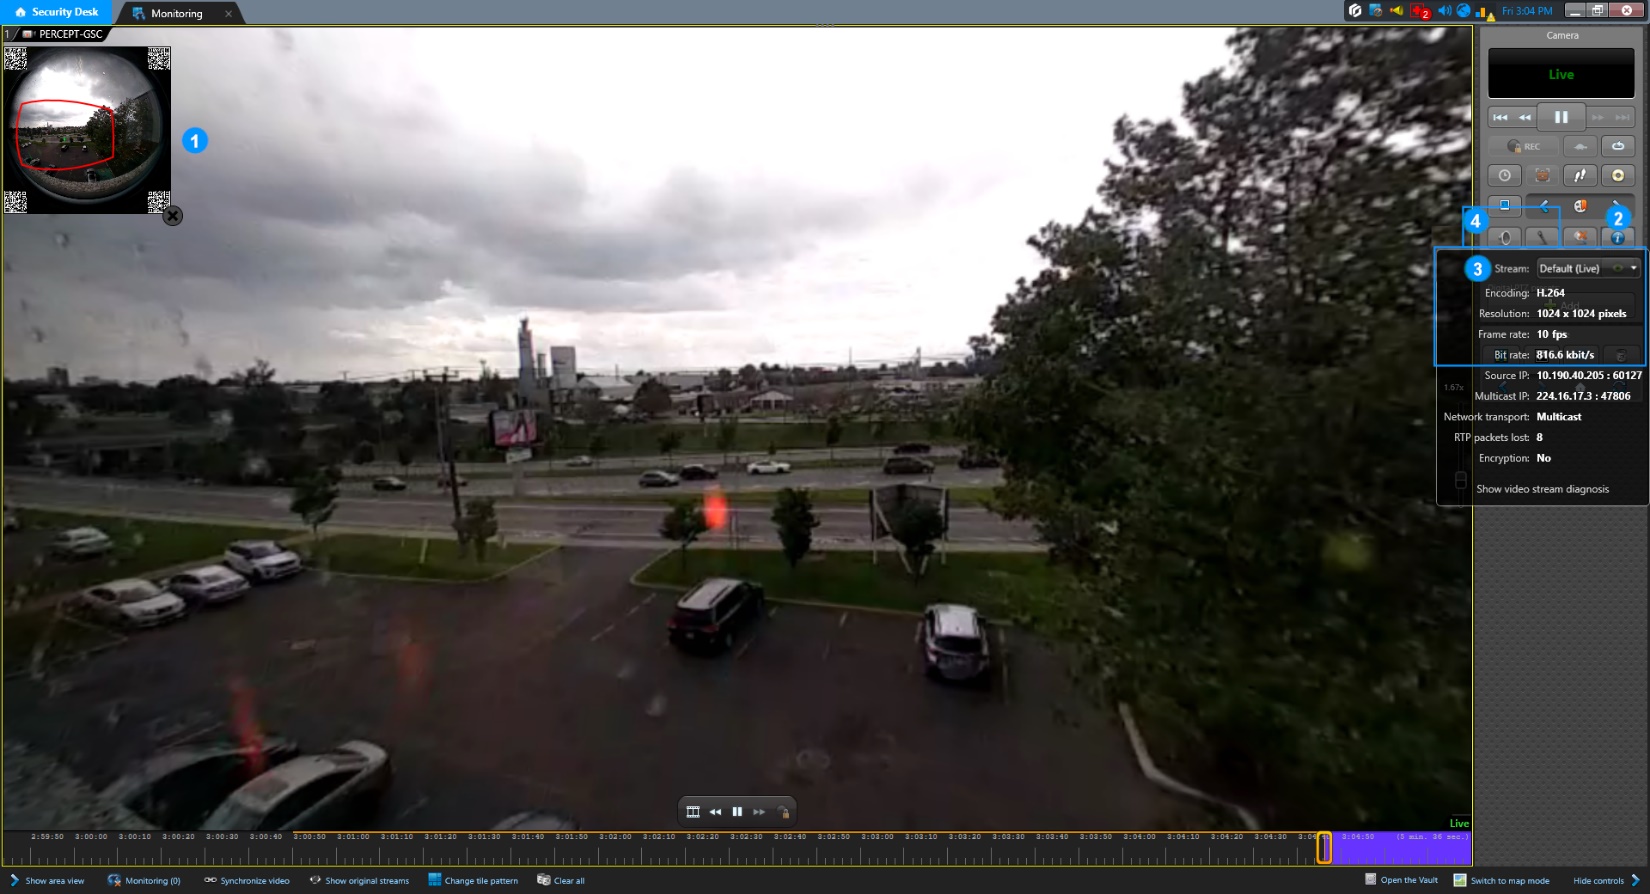
In Genetec Security Desk, open the camera from the Monitoring tab and confirm that the on-demand live video stream starts.
- When Panomorph is configured, pan and zoom the scene to confirm that the image dewarps.
- Select Show stream.
- Verify that the resolution, frame rate, and bit rate match the configured low-bitrate live profile.
- Enable listening and talking to verify two-way audio.
After closing all client views, confirm that the camera stops streaming. The camera status LED should return to the idle state.
Note
Some Genetec versions have known push-to-talk issues. If audio does not play through the camera speaker, confirm that the supported Genetec updates are installed.
Edge-storage transfer validation
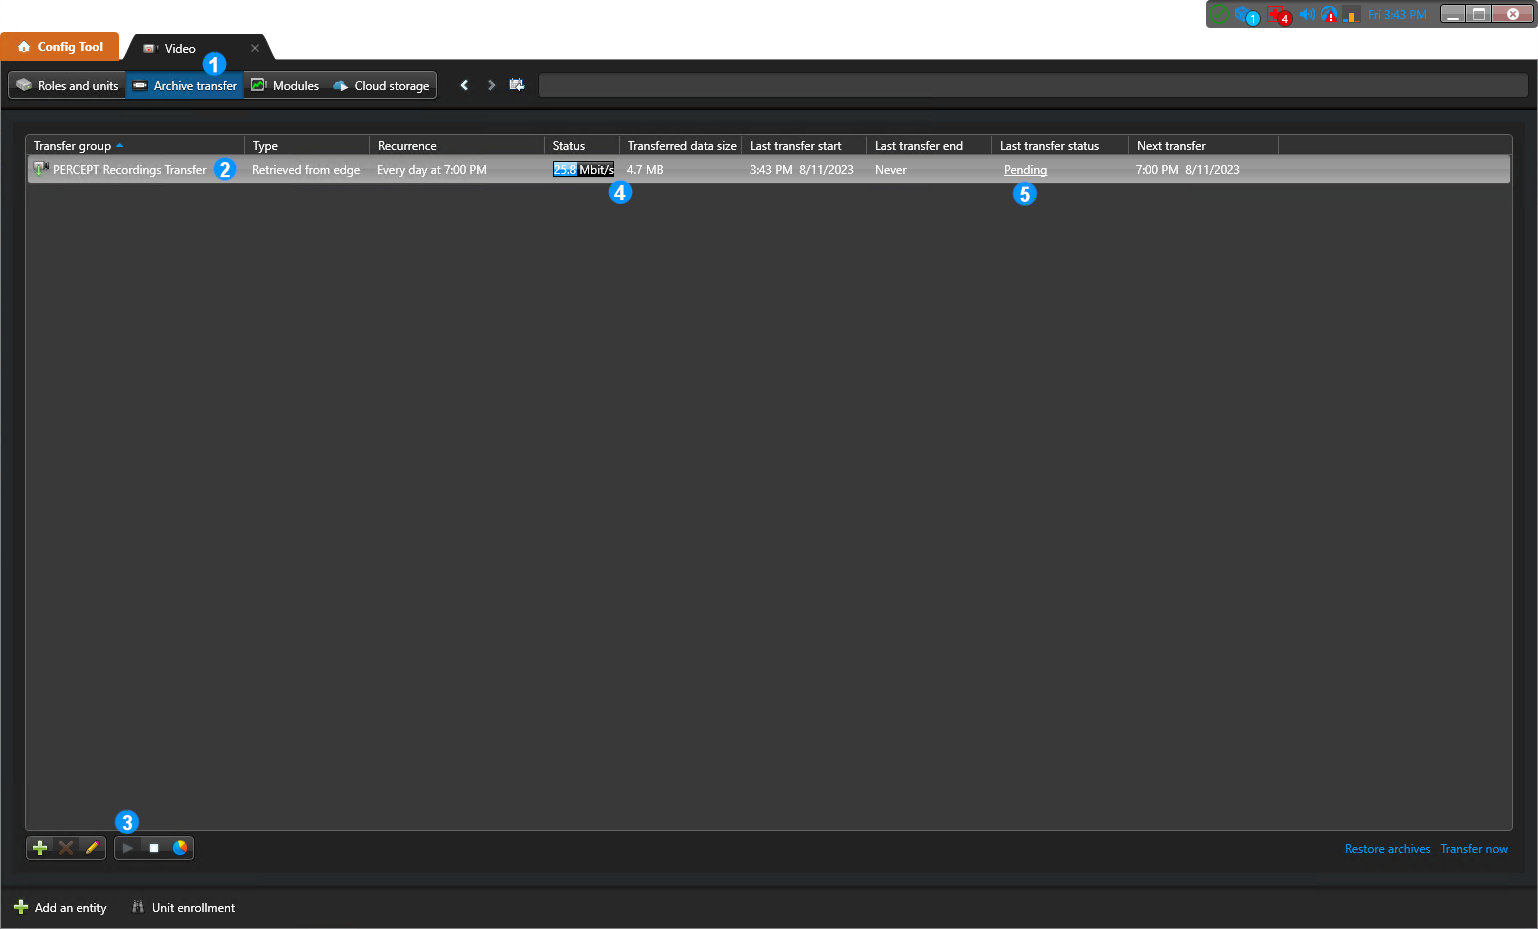
Create a recording on the camera. Dock the camera if wireless playback is blocked. To run a transfer manually in Genetec Config Tool:
- Open Video > Archive transfer.
- Select the transfer group.
- Select Start transfer for selected transfer groups.
- Monitor the transfer throughput and size.
- Confirm that Last transfer status is Completed.
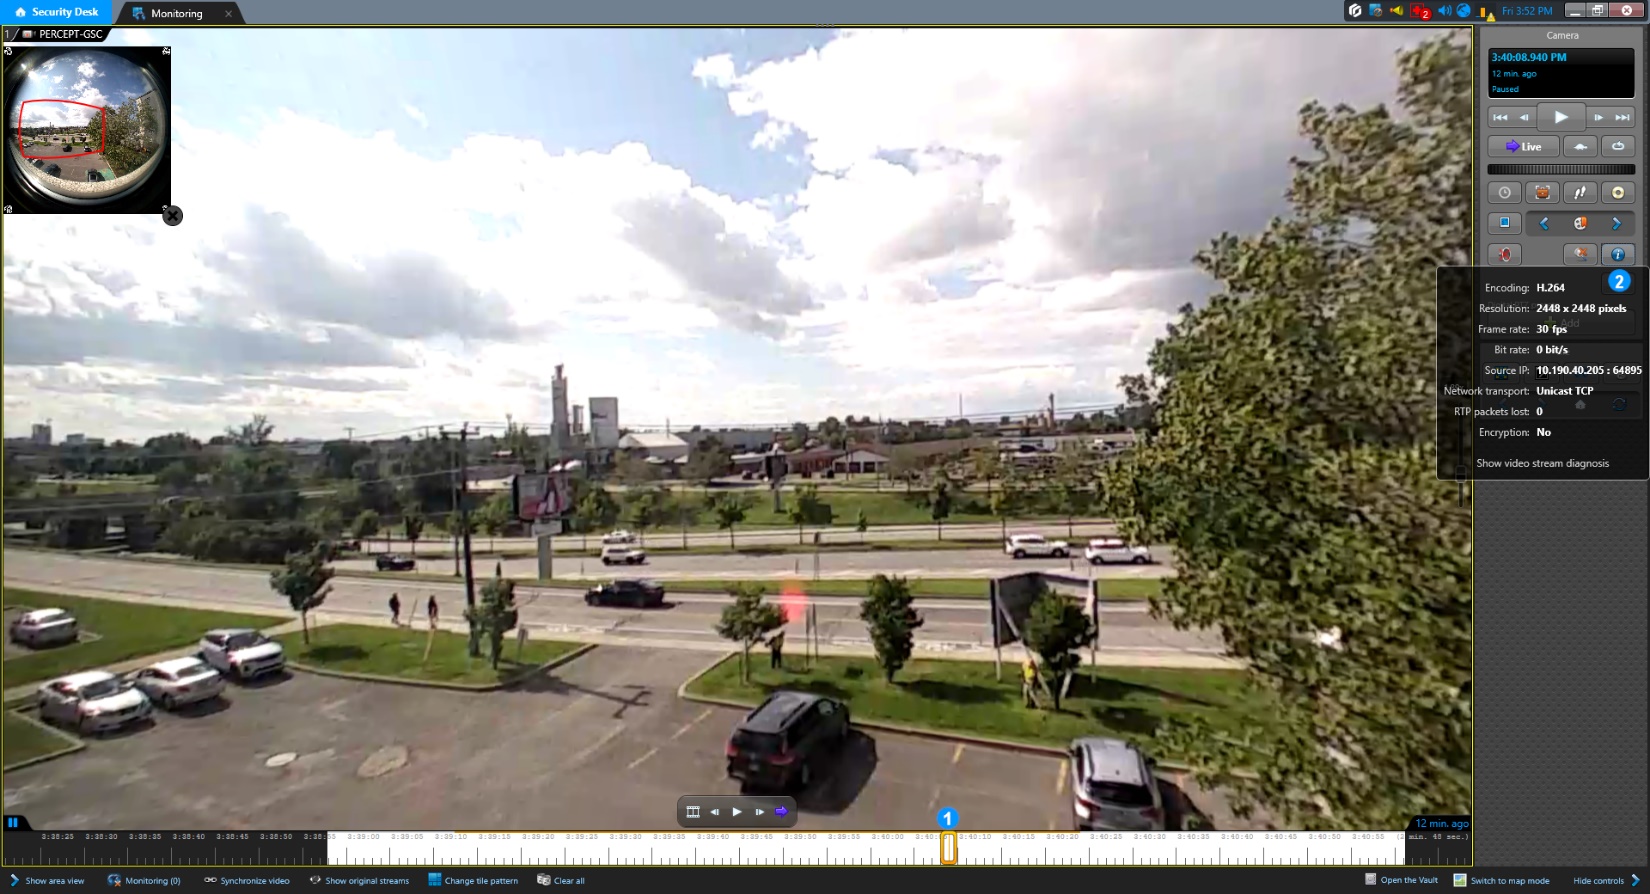
In Security Desk, open the archived recording and verify that it uses the configured high-bitrate recording profile.
Network-interface switching validation
For deployments using Wi-Fi, docking, LTE, or VPN:
- Move the camera between the required network interfaces.
- Confirm that the camera reconnects as expected.
- Confirm that the expected reserved address is maintained through VPN.
- Verify that live streaming and edge-storage transfer follow the intended data-usage policy.
If a live view is active when the camera changes interfaces, clear and restart the view if it does not reconnect automatically. Some Genetec Security Center versions do not automatically restart a live stream after a network-interface change.


Deployment at scale
Once the baseline is validated, IONConfigTool can export the configuration and import it to additional cameras. Users and credentials, network settings, and media-at-rest encryption keys are not included in that transfer and must be configured separately on each camera.
Group cameras by shift, location, or docking schedule when creating Genetec archive-transfer groups. This limits simultaneous transfers and makes troubleshooting easier.
Time synchronization
Time synchronization ensures that recordings transferred from camera storage have accurate timestamps. Configure this only when the deployment requires a shared NTP source.
To configure NTP on the camera:
- Open the Configuration page.
- Select the System tab.
- In NTP Configuration, enter the address of the NTP server used by the Genetec environment.
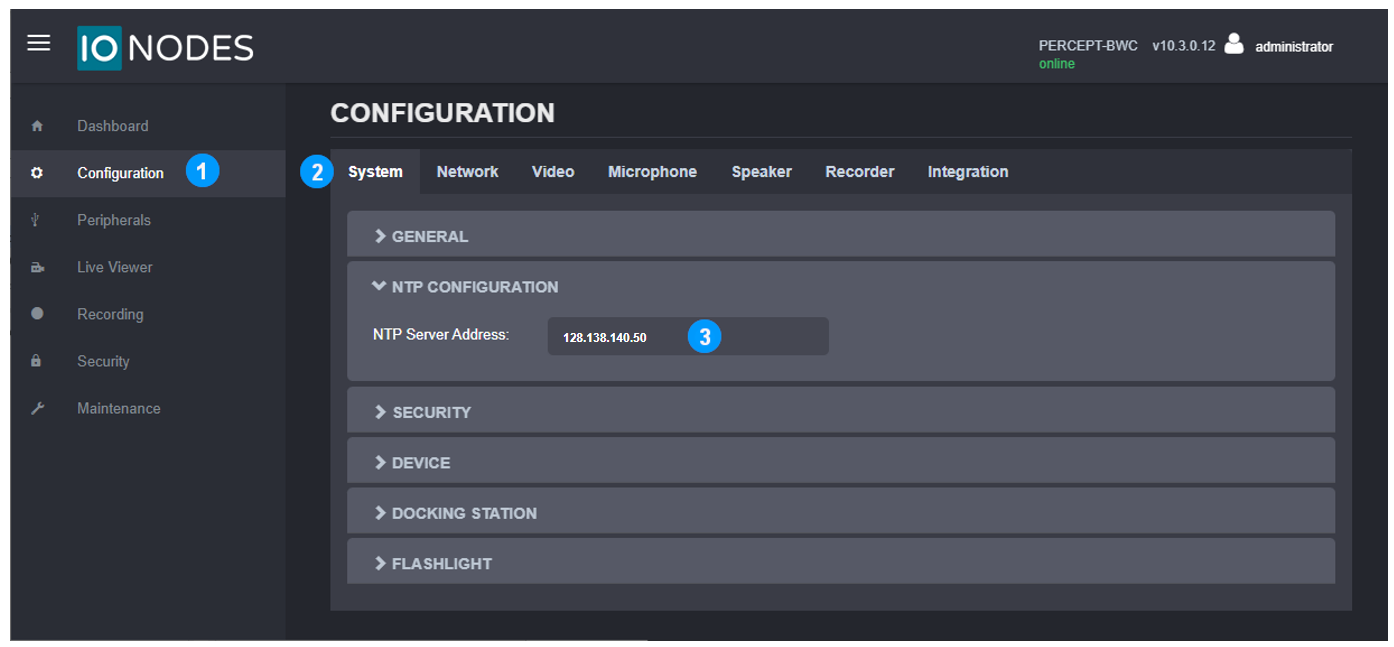
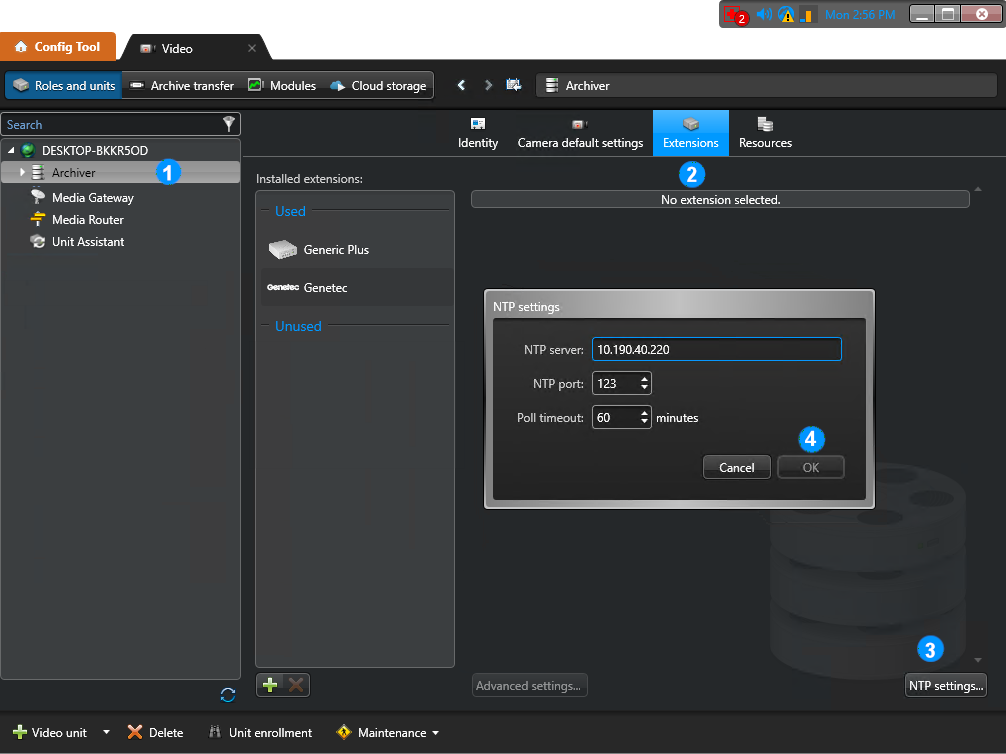
NTP settings can also be pushed from the Genetec Archiver extension settings:
- Select the Archiver where the camera is or will be enrolled.
- Open the Extensions tab.
- Select NTP settings.
- Enter the NTP server address, then select OK and Apply.
LTE and VPN
LTE and VPN are optional for deployments that require remote live viewing or access to the Genetec video network outside the local LAN.
The camera supports L2TP/IPsec with a pre-shared key. VPN is always on and connects whenever the camera can reach the VPN server. The VPN server must provide enough encrypted tunnel capacity and bandwidth for the planned camera count, have a public static address or appropriate forwarding, and support a stable address assignment for each camera.
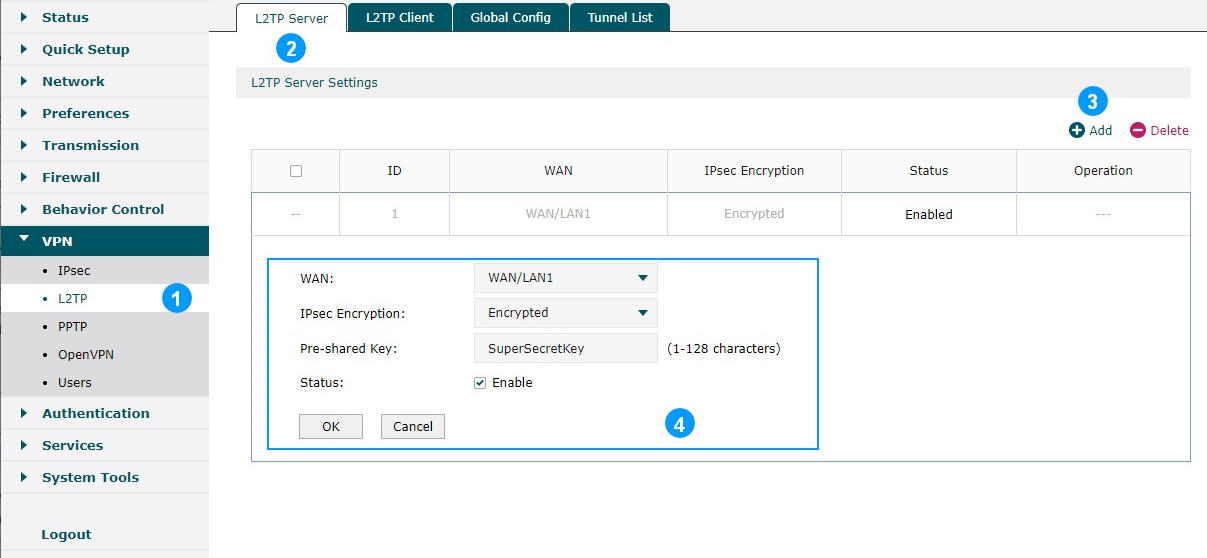
L2TP server configuration
- Add an L2TP server to the VPN router.
- Select the WAN port that receives incoming camera connections.
- Enable encryption and choose a pre-shared key.
- Enable the L2TP server.
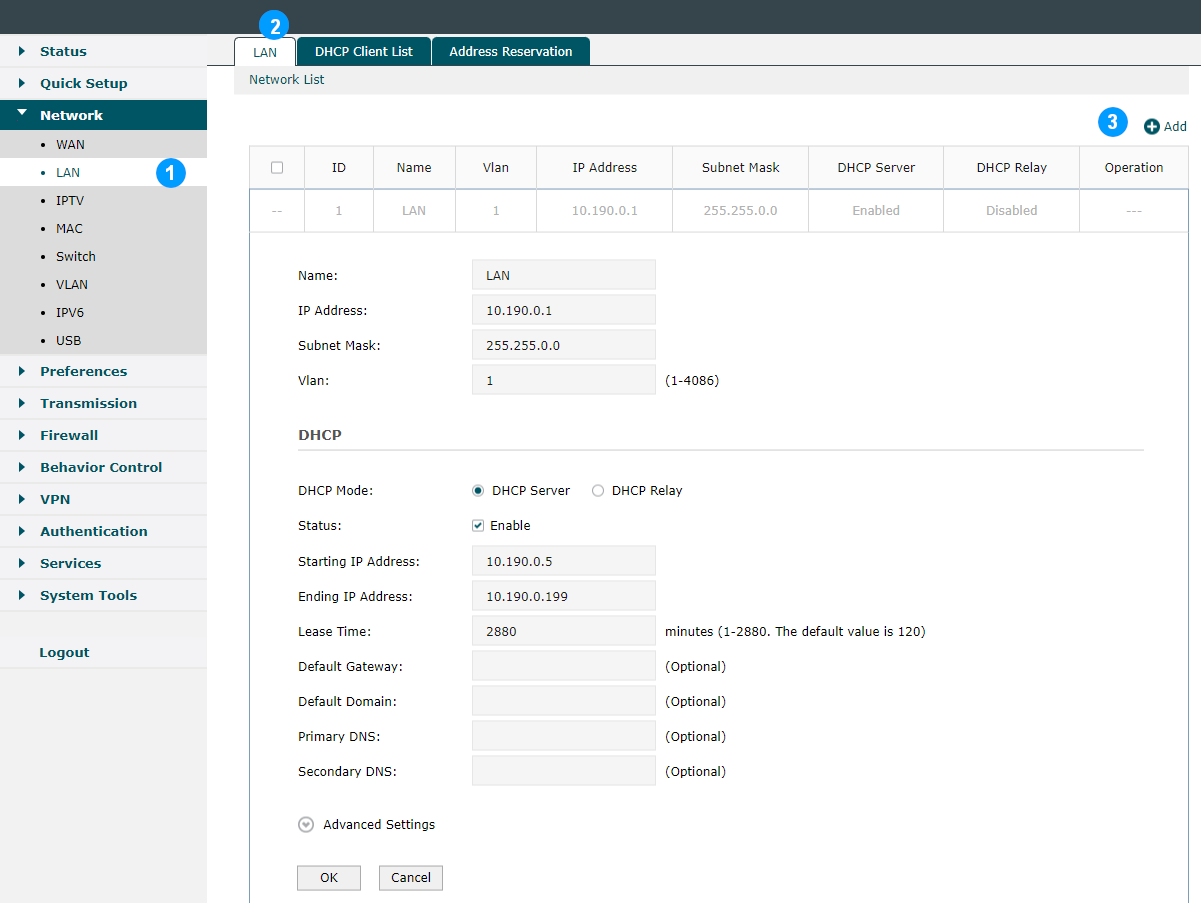
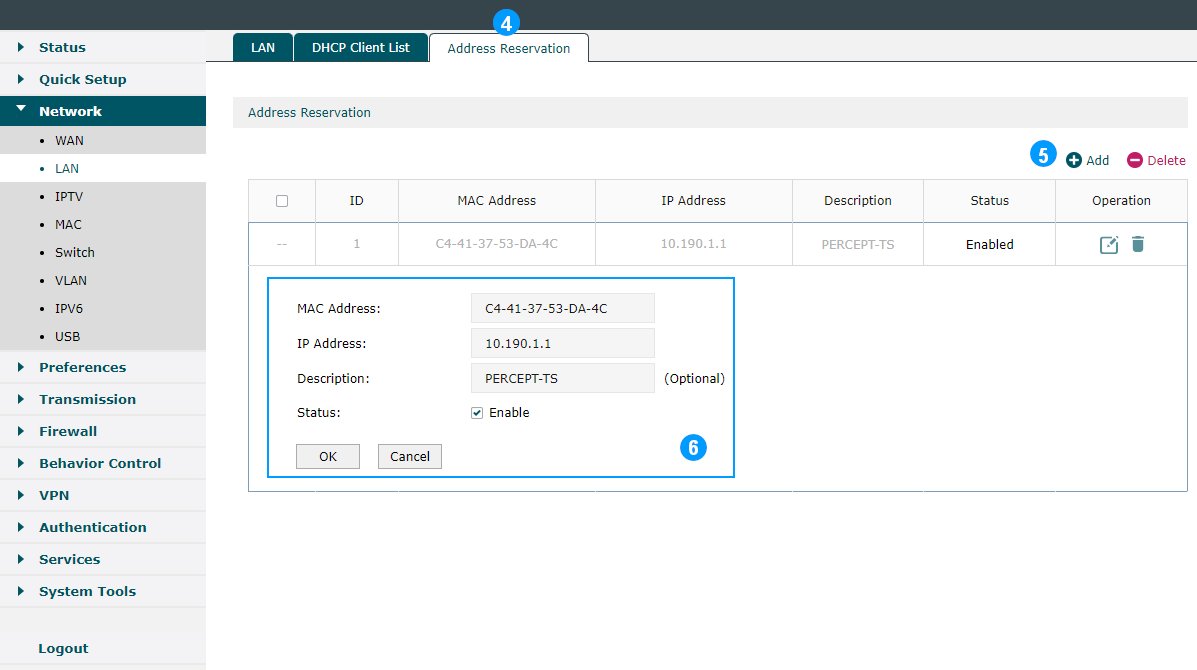
LAN IP address reservation
- Configure the router's LAN network and DHCP server.
- Open the LAN Address Reservation settings.
- Add each camera's MAC address and the desired LAN IP address.
VPN address reservation and user creation
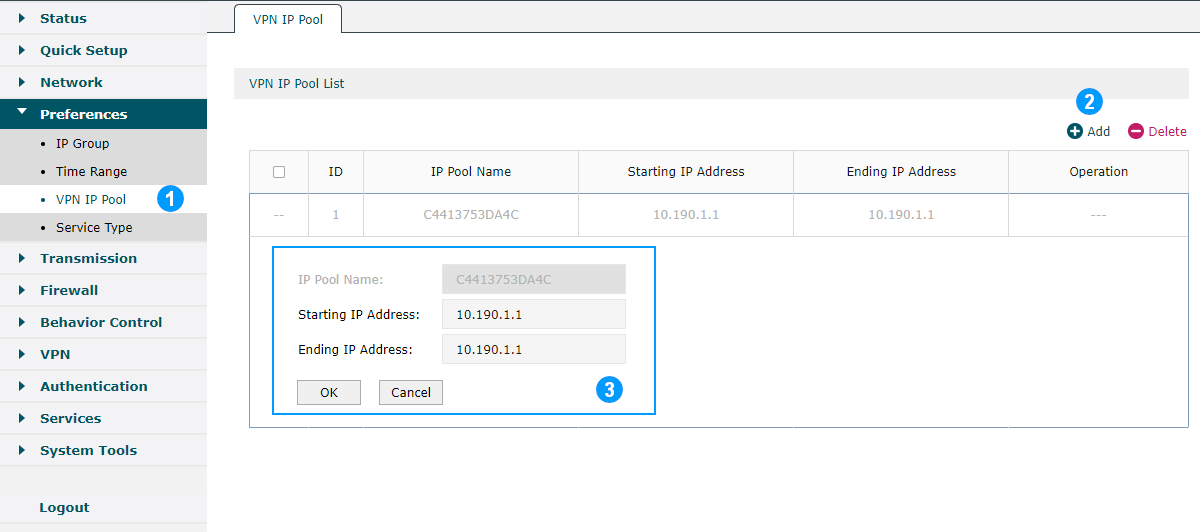
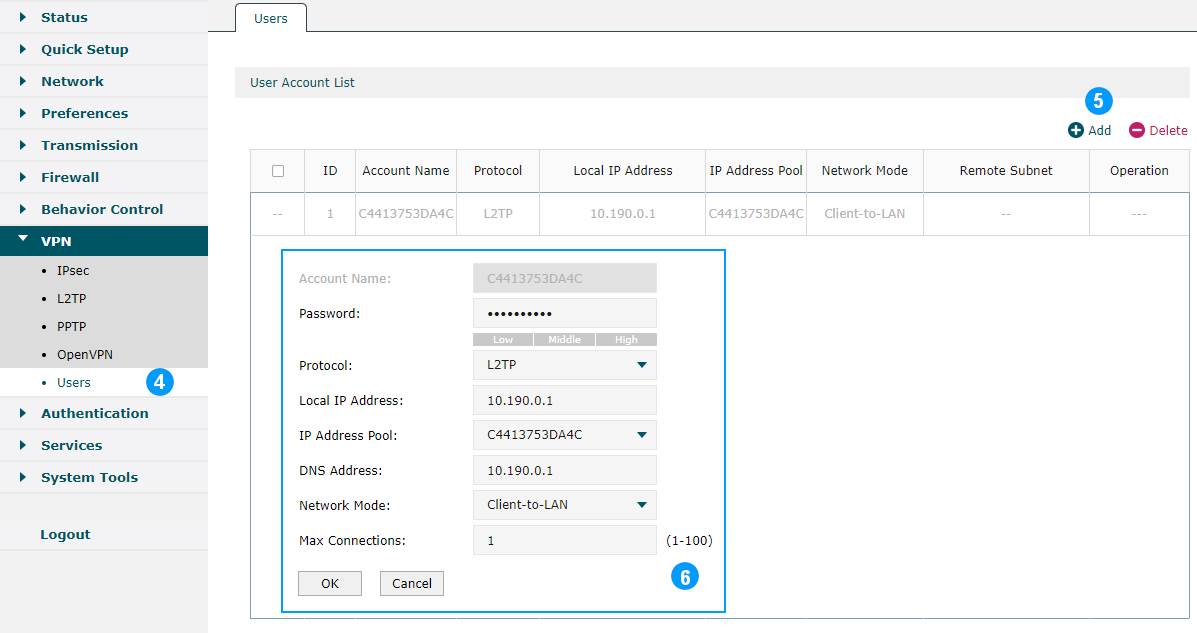
Assign a predictable VPN address to each camera by creating a single-address VPN pool and a dedicated VPN user:
- Create a VPN IP pool whose starting and ending addresses match the camera's reserved LAN address.
- Create a VPN user with a unique account name and password.
- Set the protocol to L2TP.
- Set the local IP and DNS address to the VPN router's LAN address.
- Assign the camera's VPN IP pool.
- Set Network Mode to Client-to-LAN and Max Connections to 1.
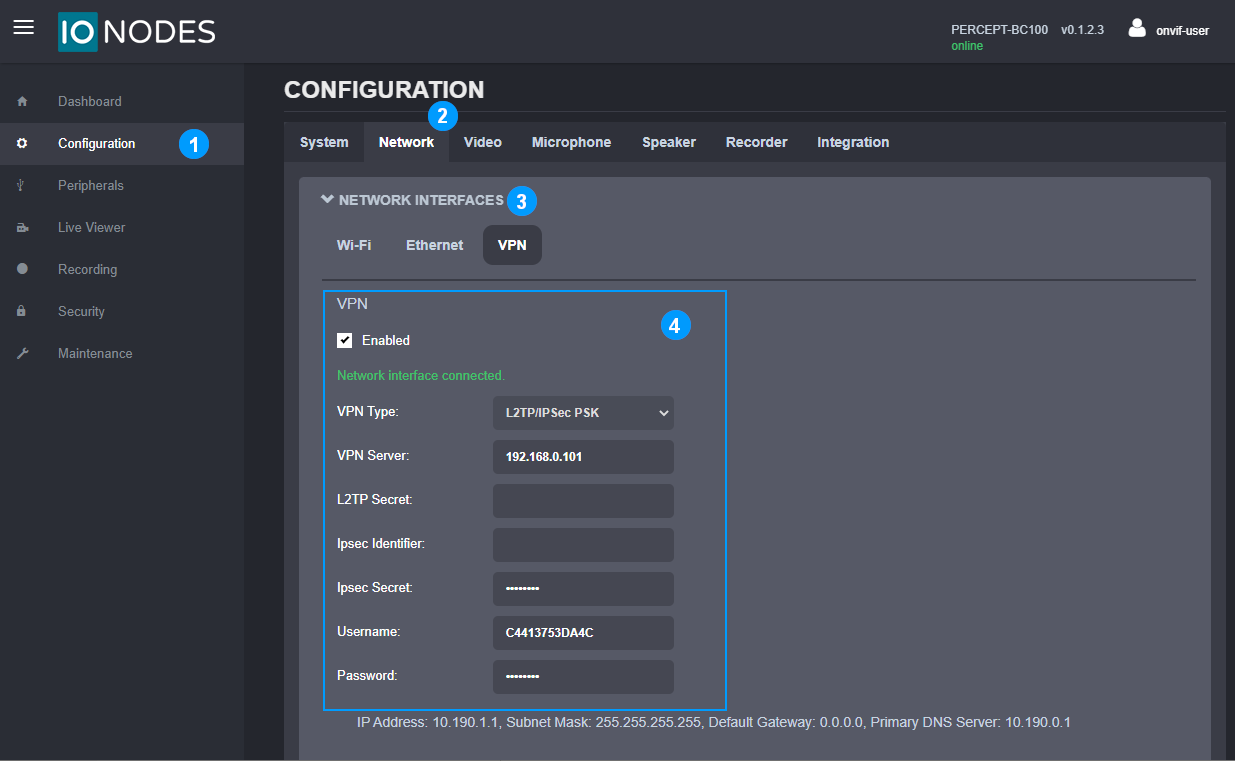
Camera VPN configuration
- Open the camera Configuration page.
- Select the Network tab.
- Expand Network Interfaces and select the VPN subtab.
- Enable VPN.
- Enter the VPN server's public address, IPsec secret, camera-specific user name, and password.