Page non traduite
Cette page n'est pas encore disponible en français. Le contenu est affiché en anglais.
March Networks Command integration
This guide covers the integration of PERCEPT body cameras with March Networks Command VMS. It includes camera preparation, Smart Deploy enrollment, Panomorph configuration, encoder setup, recording models, edge-storage synchronization, docking-station behavior, and video viewing.
This guide was written using a PERCEPT BC100 body camera; the same integration principles apply to the PERCEPT BC200, although product-specific settings and terminology should be verified against the applicable user manual.
This guide was written and validated using PERCEPT firmware 15.2.1.4, Smart Deploy 6.11.0, and NVR version 6.10.0. It should also apply to newer compatible versions, but confirm compatibility and any changed interface labels with the deployed versions before rollout.
Before you begin
This guide assumes that you are familiar with the PERCEPT body camera and have access to the appropriate user manual. It focuses on the March Networks Command integration workflow and does not repeat the complete camera configuration and operating instructions.
Refer to the PERCEPT BC100 user manual or PERCEPT BC200 user manual as needed for device-specific instructions, terminology, and configuration details. Follow the user manual when a setting or procedure is not described in this guide.
Recommended deployment
The recommended deployment uses:
- A PERCEPT BC100 body camera.
- A PERCEPT docking station.
- A Wi-Fi access point.
- A LAN connected to March Networks Command.
- A March Networks Command server or NVR.
The camera can stream directly to Command over Wi-Fi, or it can record locally and transfer recordings through Wi-Fi or the docking station's wired Ethernet connection.
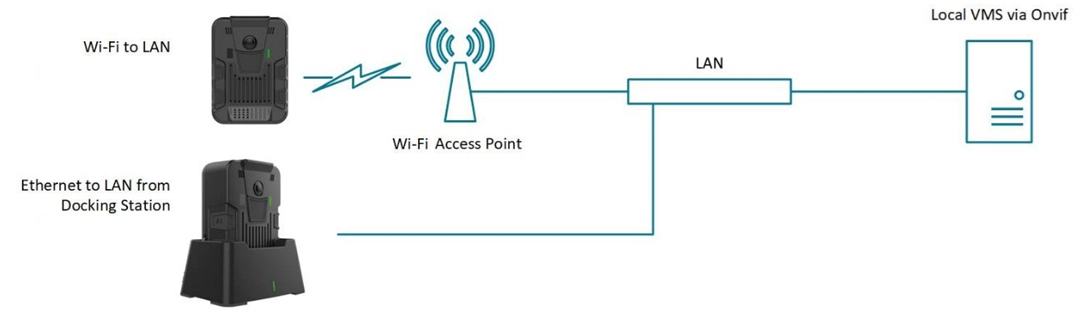
For a camera that normally operates away from its base, use local recording and synchronize recordings after the camera returns. For a camera that remains within Wi-Fi coverage, Command can request a recording stream continuously according to its recording schedule.
Camera preparation
Configure network connectivity before enrollment. The camera should obtain a predictable address on Wi-Fi and docking-station Ethernet, using static addressing or DHCP reservations. Only one of the Wi-Fi and Ethernet interfaces is active at a time, and both interfaces expose the same camera MAC address.
Conseil
Validate one camera end to end before deploying a fleet. Reset a previously used camera before integration when possible so old settings do not affect the result.
Dedicated ONVIF user
Create a dedicated account for Command instead of using the administrator account:
- Open the camera Web UI and select Security.
- Select Create User.
- Enter the user name.
- Enter and confirm the password.
- Assign the Super user role.
- Select Create User.
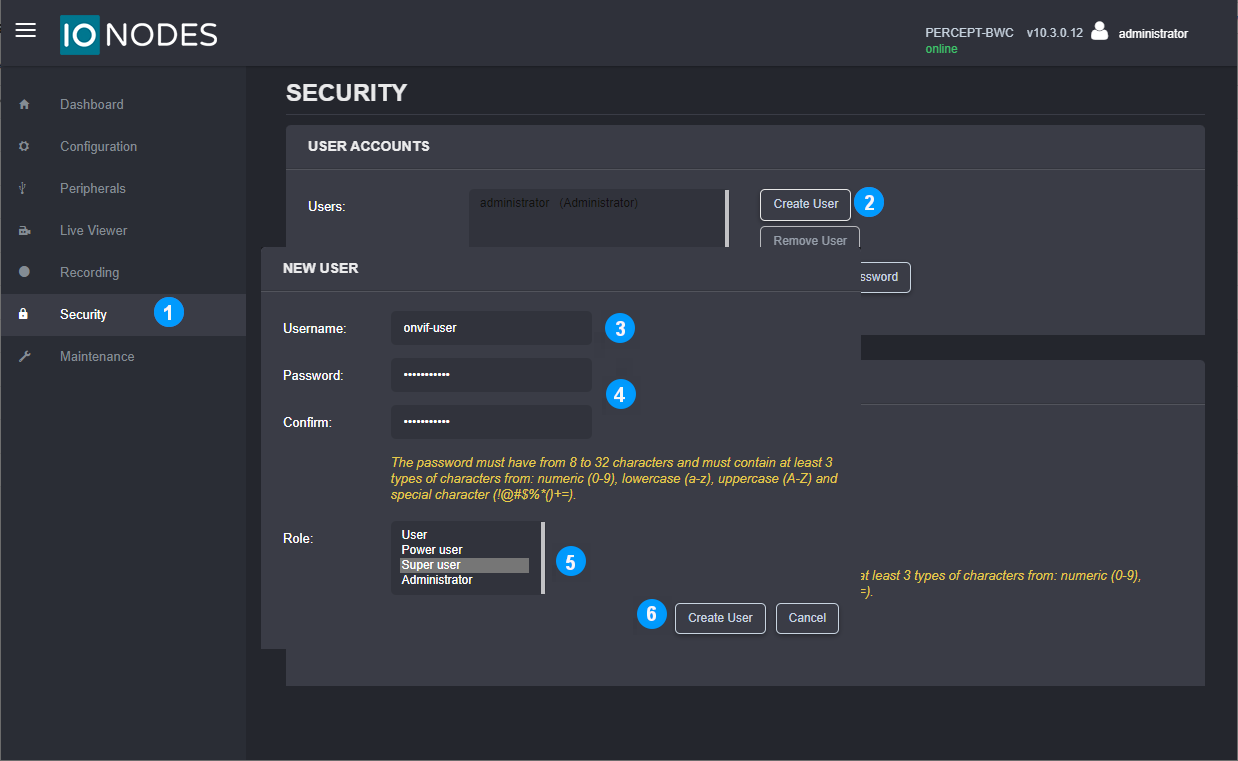
The Super user role provides the permissions required by the integration, while keeping the Command credentials separate from the administrator account.
Video profiles
The camera exposes two H.264/H.265 encoder profiles and one MJPEG profile to Command:
- Open Configuration.
- Select Video.
- Enable and configure the required video profiles.
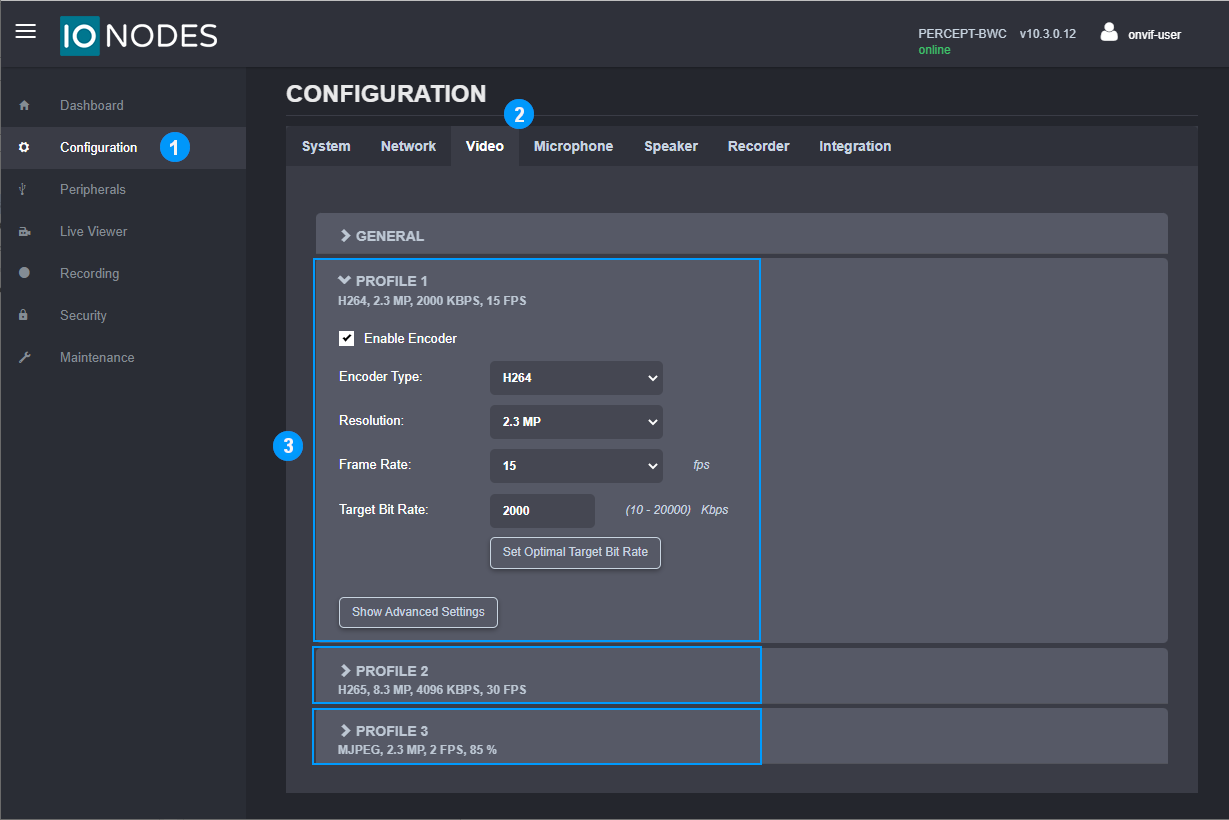
Profile 3 uses MJPEG and is not recommended for Command because of its high bitrate. Enabling a profile or changing its encoder type requires a camera reboot.
Local recording
Configure the profile used for recordings stored on the camera:
- Open Configuration.
- Select Recorder.
- Select the Media Recording subtab.
- Select the video profile used for edge or onboard recording.
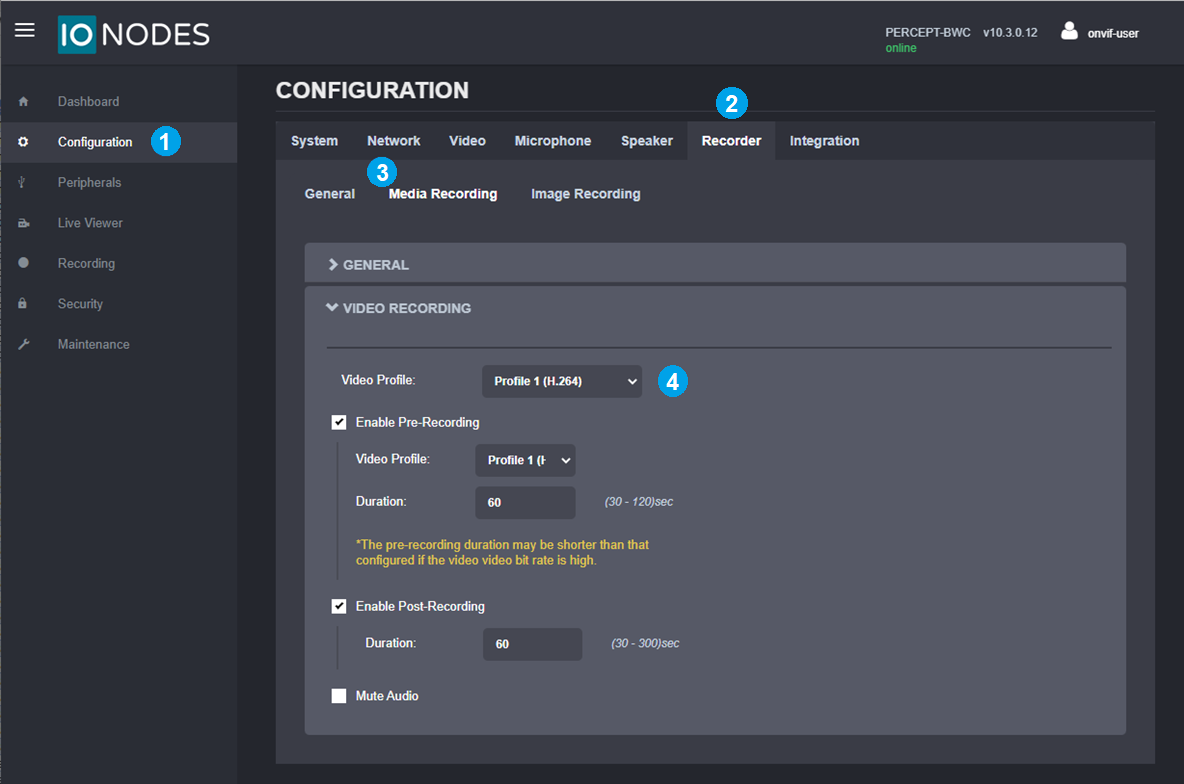
Profile 3 cannot be used for local recording. Enable Profile 1 and/or Profile 2 when local recording is required.
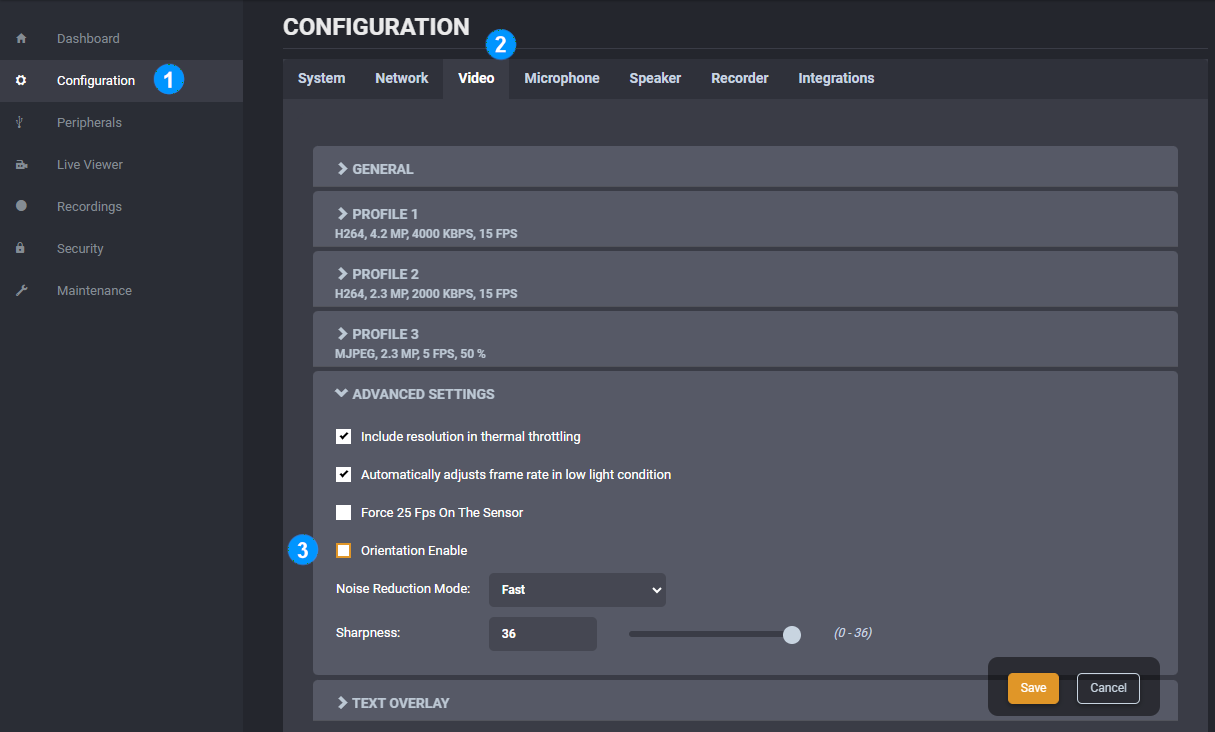
Orientation metadata
March Networks Command does not support the camera's orientation metadata. Disable it to prevent incorrect Panomorph rendering:
- Open Configuration.
- Select Video.
- In Advanced Settings, clear Orientation Enable.
Docking-station data transfer
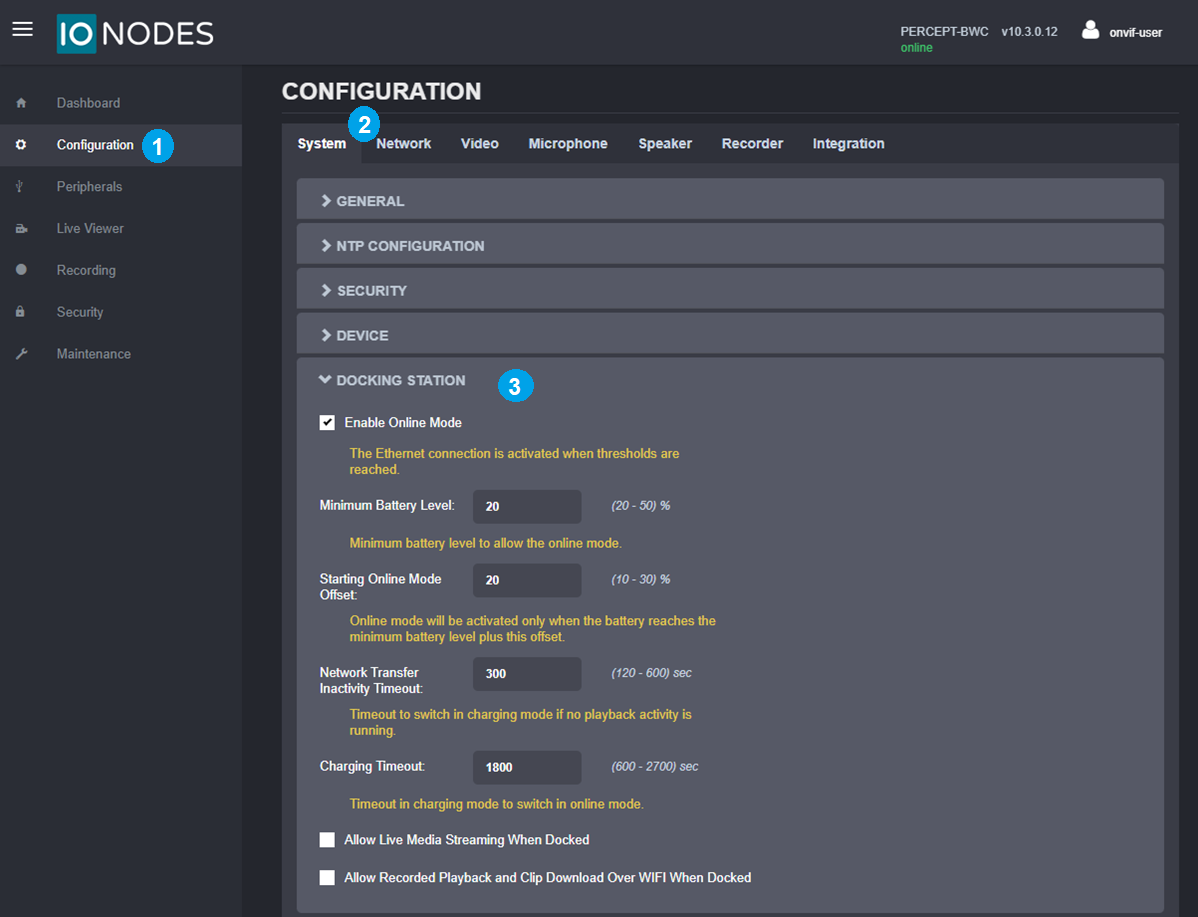
When the docking station will transfer recordings to Command:
- Open Configuration.
- Select System.
- Expand the Docking Station section.
- Enable Online Mode.
Avertissement
Edge-storage transfer can create a bandwidth surge of more than 200 Mbps when a camera starts offloading. Ensure that the network can handle the transfer load.
Note
For advanced settings related to docking-station behavior, refer to the PERCEPT Docking Station user manual.
Camera enrollment
Smart Deploy
- In March Networks Smart Deploy, open SETUP.
- In Device Management, select Cameras & Data Channels.
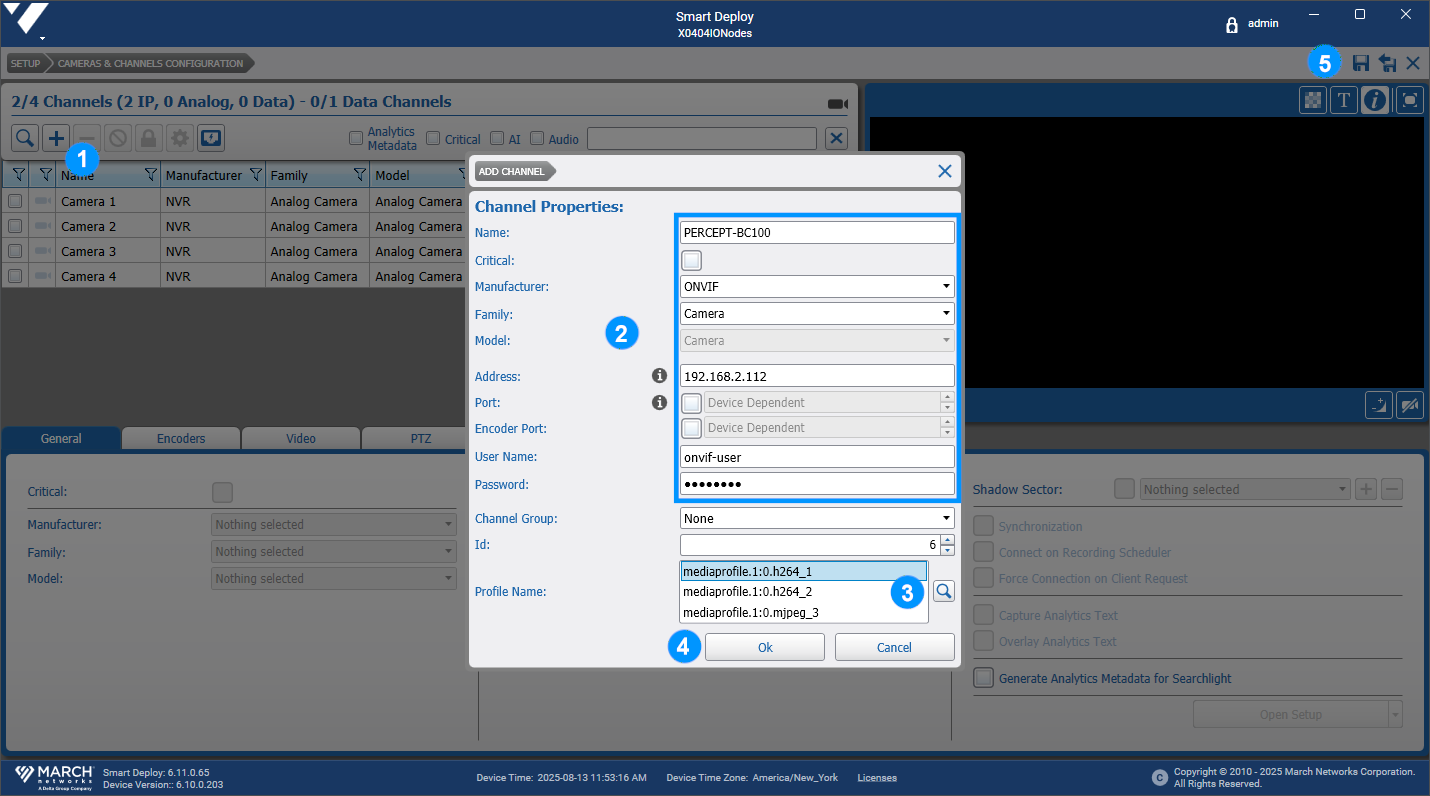
Camera channel
- In Cameras & Channels Configuration, select Add.
- In the Add Channel dialog, enter a display name, set Manufacturer to ONVIF, then enter the camera IP address and dedicated ONVIF user credentials.
- Select the magnifier icon to query the camera's media profiles and select the appropriate media profile.
- Select OK, then select Save.
Command configuration
Panomorph dewarping
Panomorph dewarping is optional. When it is enabled, configure it as follows:
- In Cameras & Channels Configuration, select the new camera.
- In the General tab, set Lens Type to Immervision Panomorph, Lens Model to RPL Number C1ZZV, and Mounting Options to Wall, then select Save.
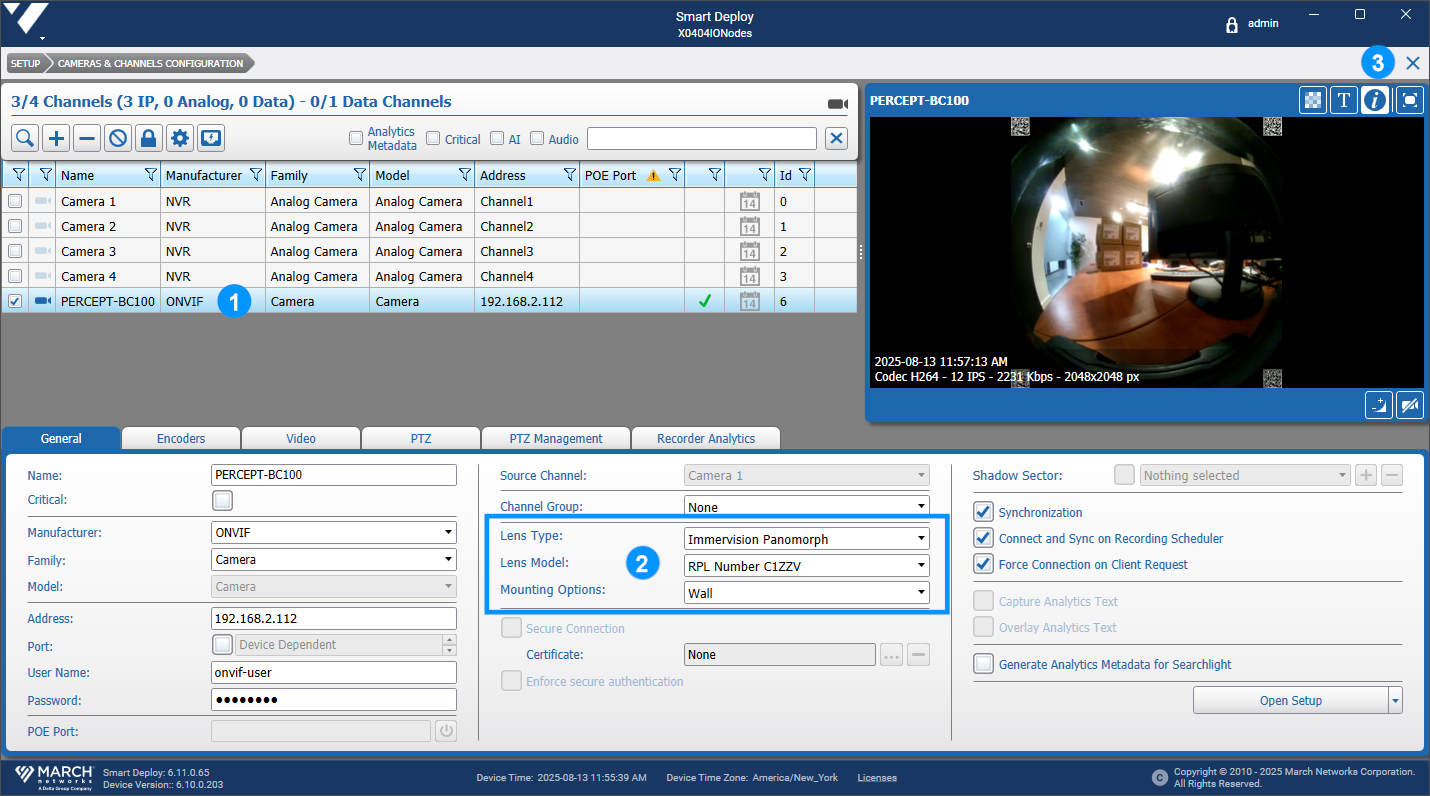
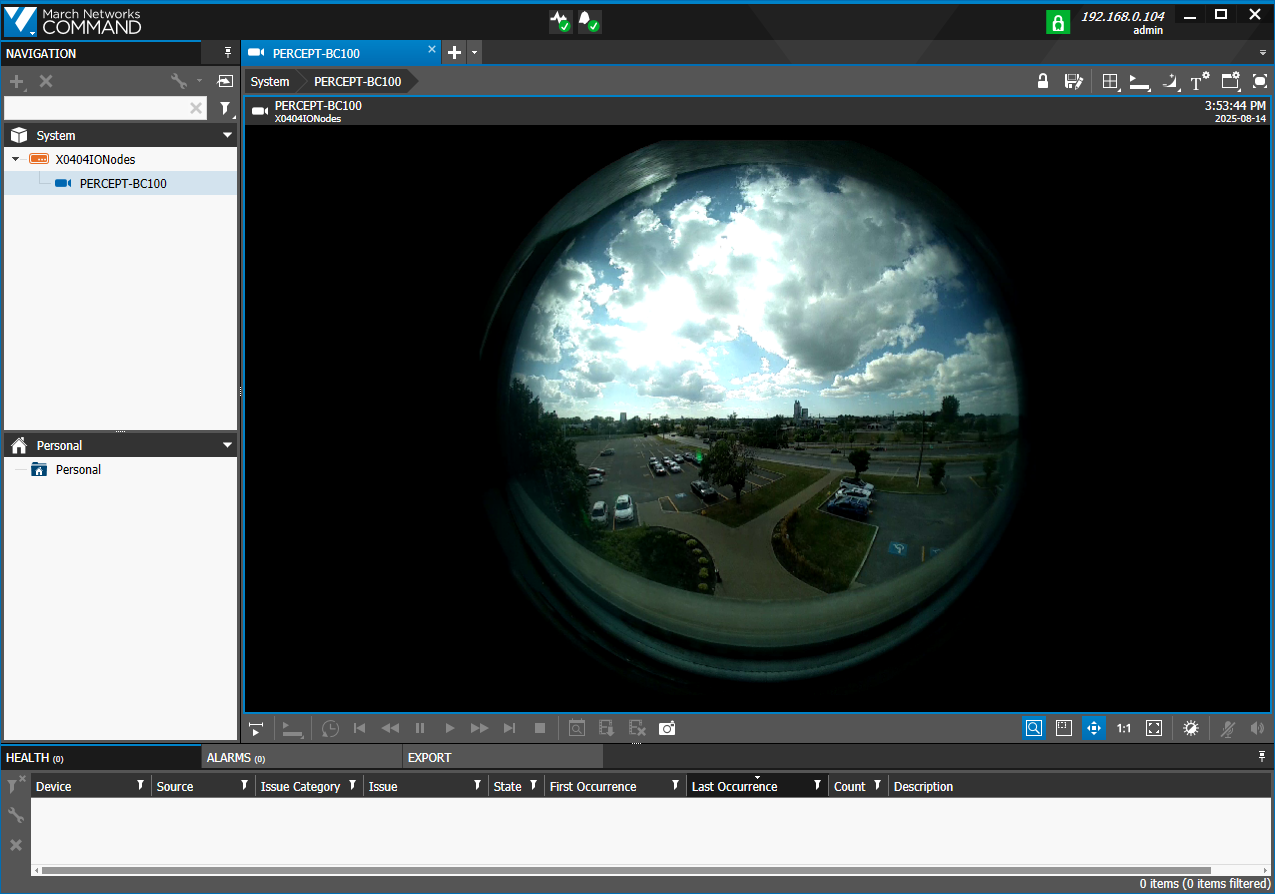
When dewarping is disabled, Command displays the full hemispherical image. Orientation metadata must remain disabled when Panomorph dewarping is enabled.
Encoder profiles
- In Cameras & Channels Configuration, select the new camera.
- Open the Encoders tab.
- Set Profile Name to the desired profile, set Transport Protocol to the protocol appropriate for the deployment, and add additional encoder profiles if required.
- Select Save.
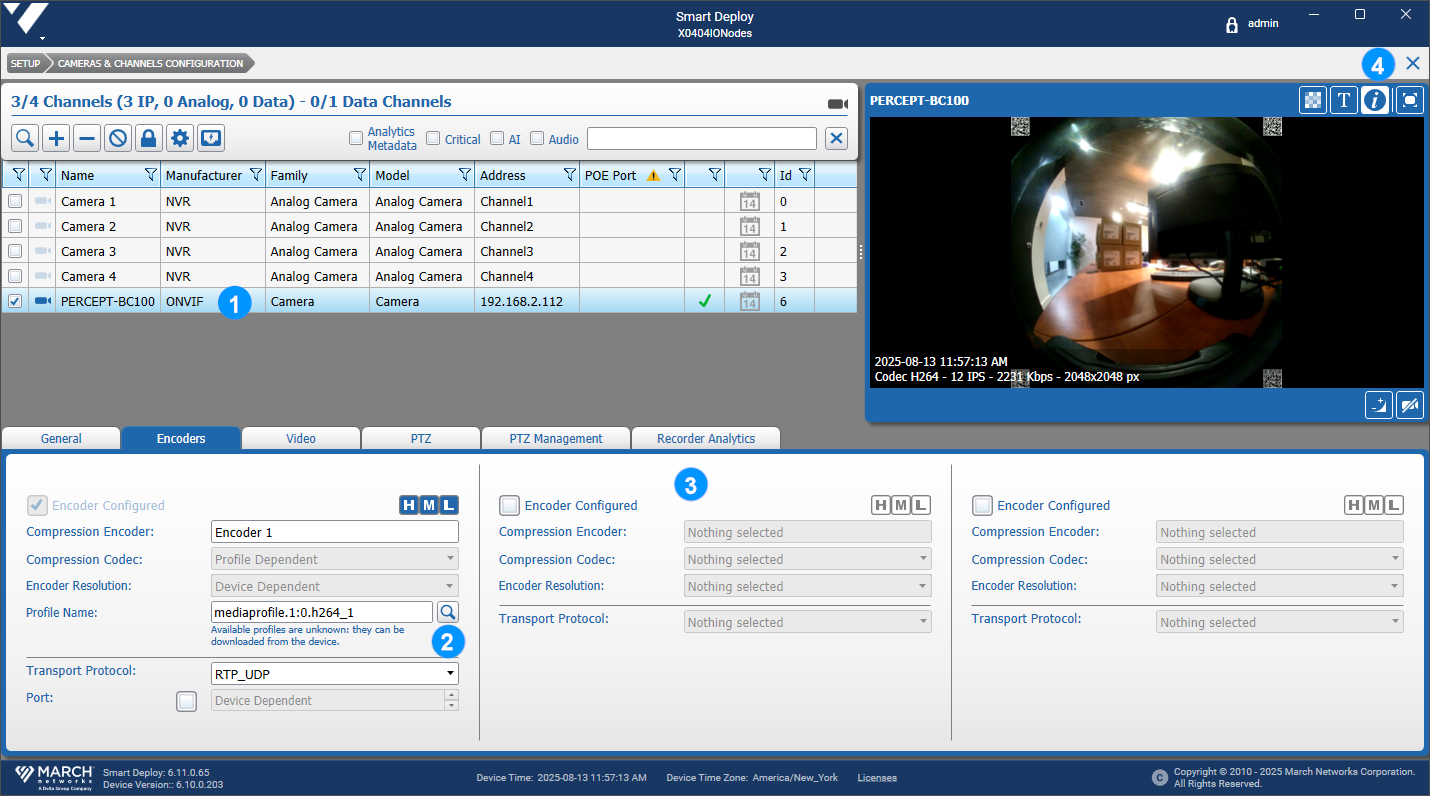
Use a lower-bitrate profile for live viewing and a higher-bitrate profile for recorded evidence. Adjust the values for the available bandwidth and storage capacity.
Recording models
Command recording behavior depends on the deployment. Choose one of the following models.
Continuous recording
Use continuous recording when the camera normally operates within known Wi-Fi coverage and Command should request the recording stream while the camera is connected:
- In Smart Deploy, select Recording Management, select Recording Settings.
- Select the new camera.
- Enable Recording.
- Select the required recording schedule.
- Enable Continuous Recording and clear On Condition Recording.
- Select Save.
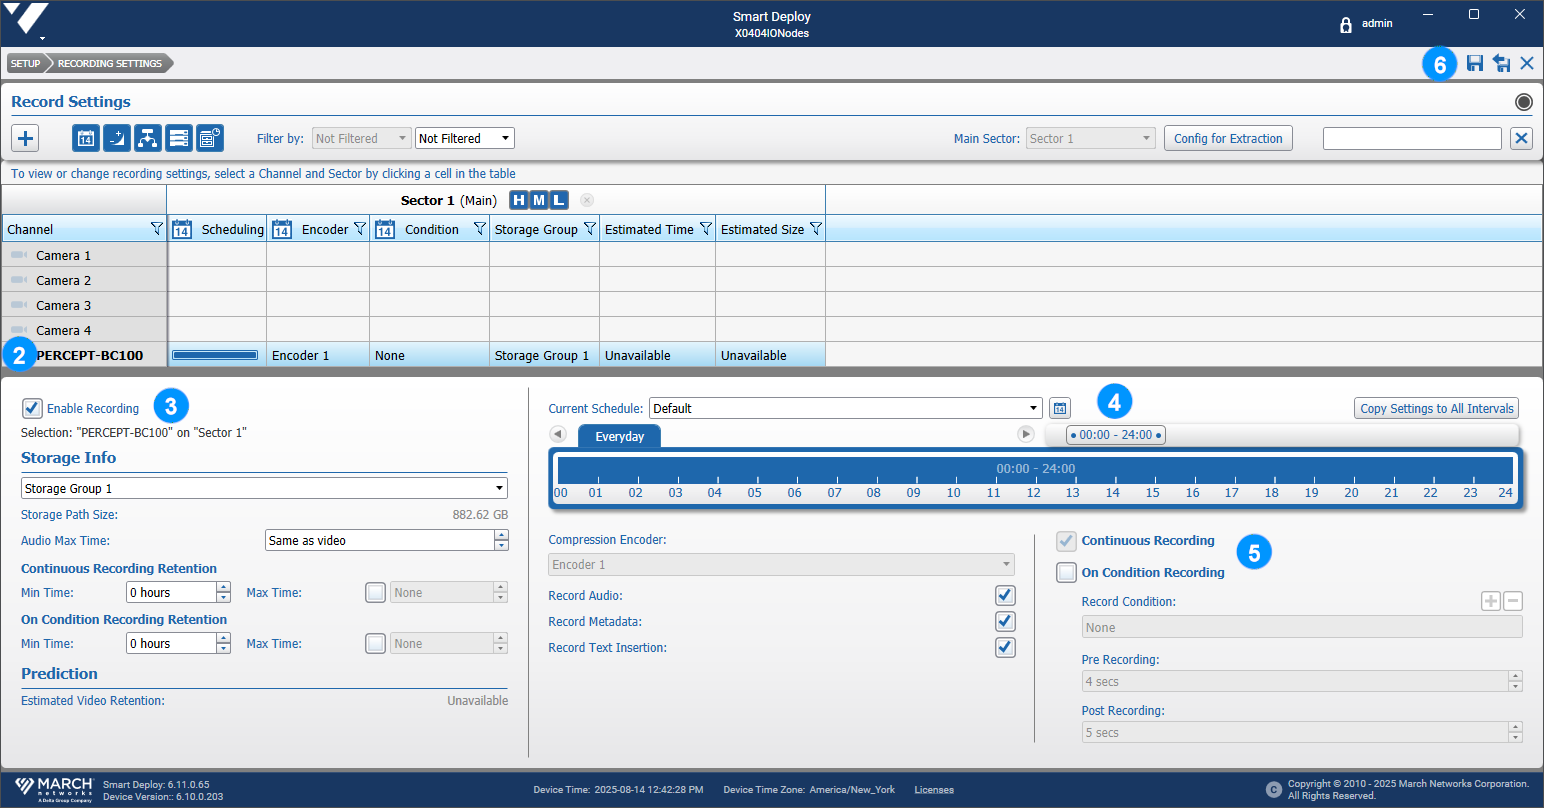
When continuous recording is enabled, Command requests the recording stream whenever the camera is within Wi-Fi range.
Edge-storage synchronization without live recording
Use this model when wearers record while away from base and recordings should transfer after docking. Command only synchronizes recordings while continuous recording is enabled and only recordings within the configured schedule are synchronized. To emulate edge-storage-only operation, keep the camera's Wi-Fi disconnected and connect it to the Command network through a docking station.
- In Smart Deploy, select Device Management, select Cameras & Channels Configuration.
- Select the new camera.
- In the General tab, enable Synchronization, Connect and Sync on Recording Scheduler, and Connection on Client Request.
- Select Save.
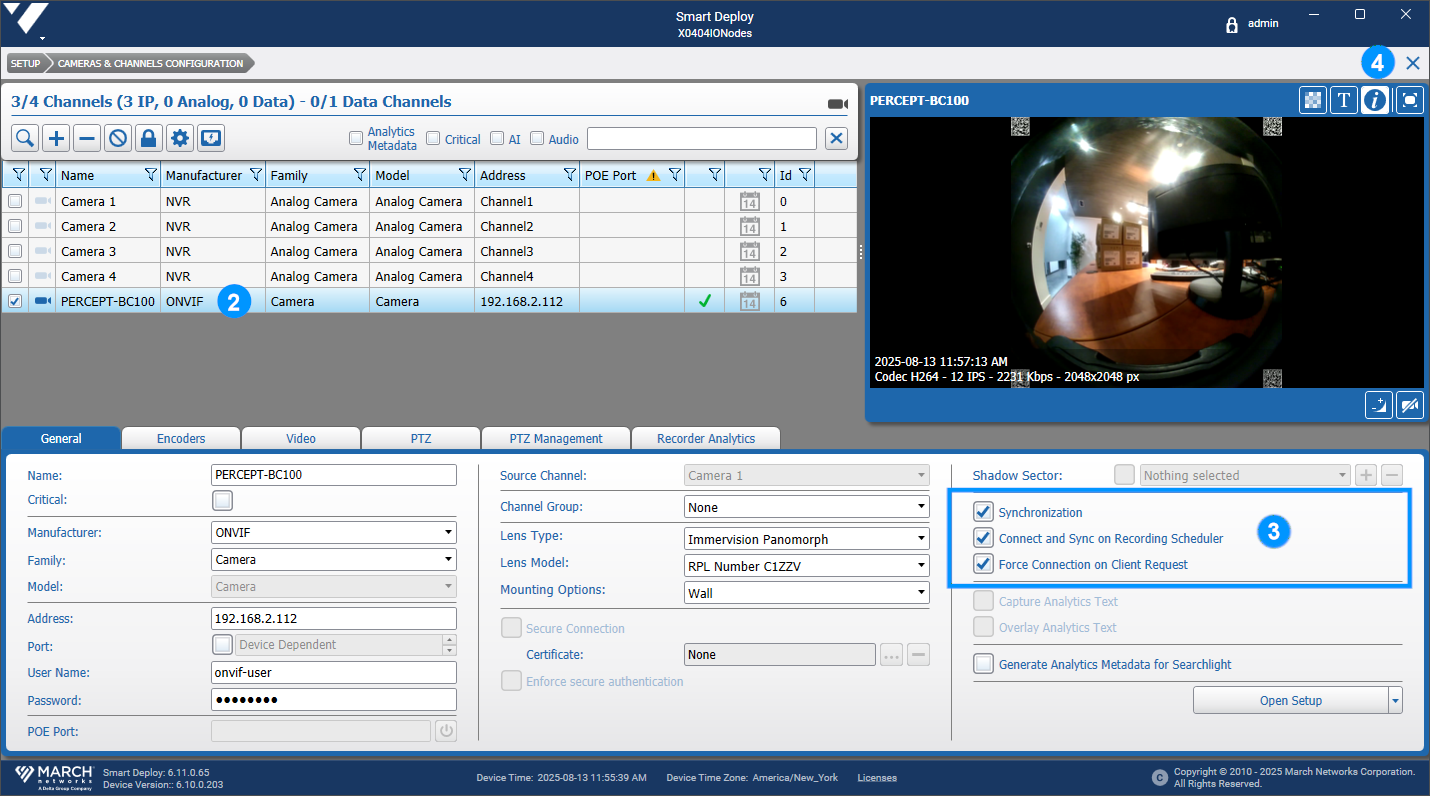
Recordings stored on the camera, including recordings manually triggered by the wearer, can then transfer when the docked camera connects to Command.
Continuous recording with synchronization
Use this model when Command should continuously request the camera stream and also synchronize recordings stored on the camera:
Note
Before enabling this model, configure continuous recording and edge-storage synchronization without live recording as described above.
- On the camera Web UI, select Configuration and select System.
- In the Device section, enable Start Recording On Boot and Record Permanently.
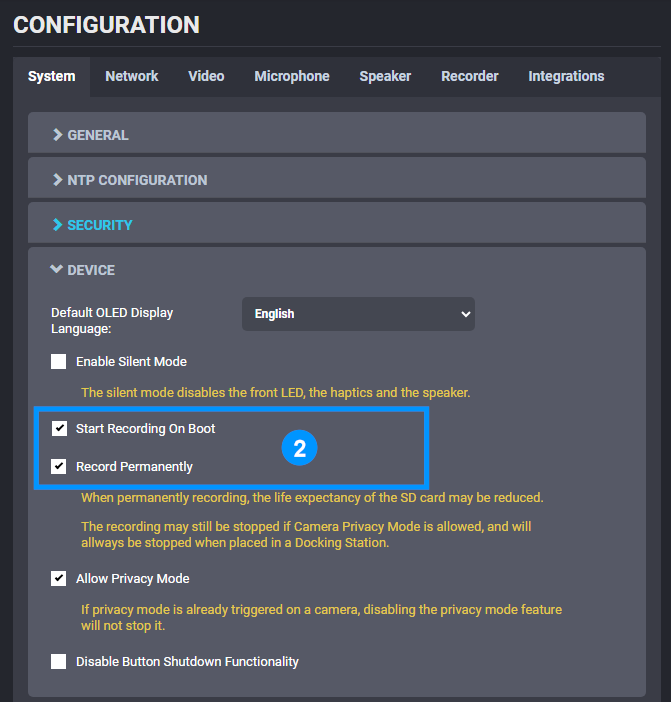
This keeps local recording active so recordings remain available for synchronization when Command requests them.
Docking-station considerations
By default, edge-storage transfer over Wi-Fi is enabled. When docking-station Ethernet should carry transfers, block media playback over wireless connections:
- Open the camera Configuration page.
- Select Network.
- In the Streaming section, enable Prevent Media Playback Over a Wireless Connection.
- Select Save.
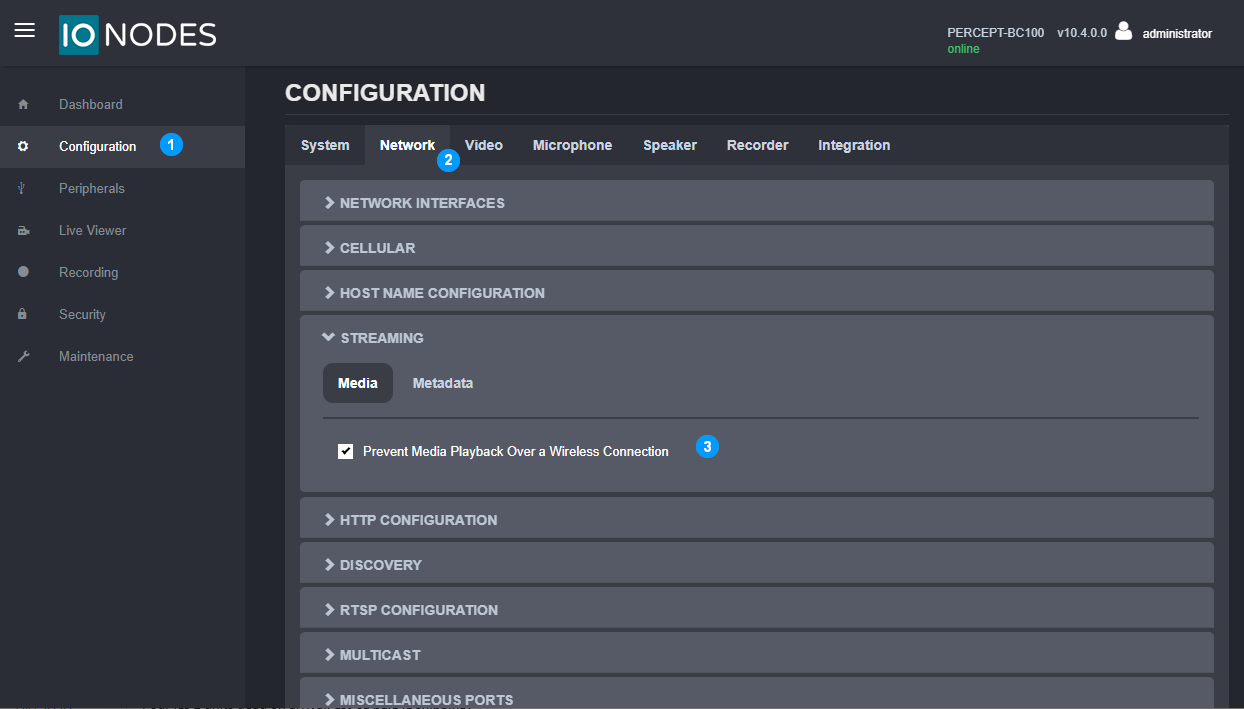
With this setting enabled, the camera ignores Command data-transfer requests while connected over Wi-Fi. Transfers occur after the camera connects through the docking station.
Video in Command
Command can display live and recorded footage from the camera. When Panomorph dewarping is enabled, use the virtual PTZ controls to zoom and move through the scene.
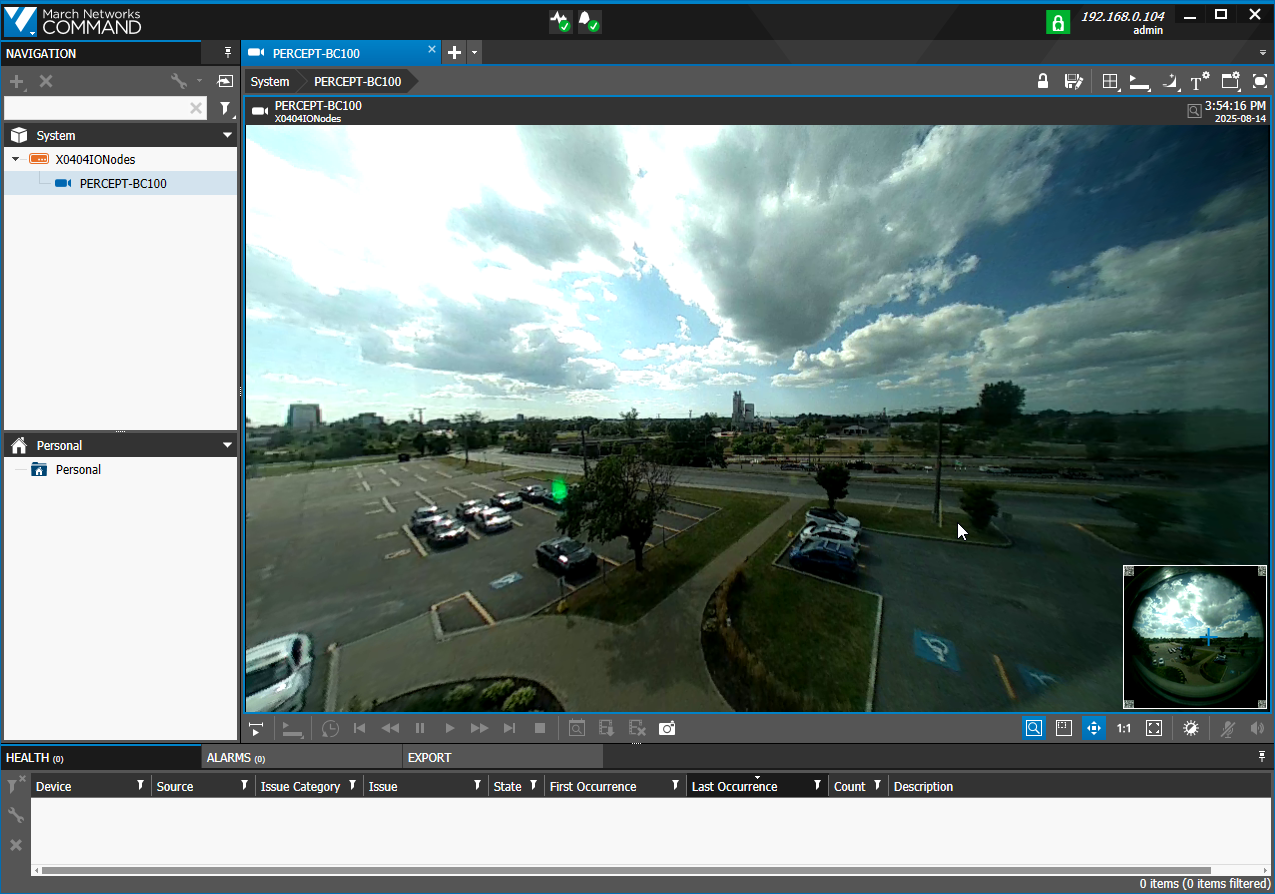
When Panomorph support is disabled, or the virtual PTZ is fully zoomed out, Command displays the full hemispherical image.
Integration validation
Validate one camera before deploying the fleet:
- Confirm that Command can query the camera's ONVIF media profiles.
- Confirm that the expected live stream opens in Command.
- If Panomorph is enabled, confirm that the image dewarps and the virtual PTZ controls navigate the scene.
- Confirm that continuous recording follows the configured schedule when that model is used.
- Trigger a local recording and confirm that edge-storage synchronization transfers it after the camera connects through the configured network path.
- If wireless playback is blocked, confirm that transfer succeeds through the docking station's wired Ethernet connection.
- Confirm that the transferred recording is available in Command.
Note
Adapt recording schedules, encoder profiles, transport protocols, and docking behavior to the site's network capacity and operating model.