Page non traduite
Cette page n'est pas encore disponible en français. Le contenu est affiché en anglais.
Milestone XProtect integration
This guide provides a shared workflow for integrating PERCEPT body cameras with Milestone XProtect. It covers the recommended deployment model, XProtect enrollment, stream and audio configuration, edge-storage transfer, wearer events, alarms, and validation.
This guide was written using a PERCEPT BC100 body camera; the same integration principles apply to the PERCEPT BC200, although product-specific settings and terminology should be verified against the applicable user manual.
This guide was written and validated using PERCEPT firmware 10.7.2.5 and XProtect Expert 2022 R3. Edge Storage transfer requires XProtect Professional+ or higher; Essential+ and Express+ do not support it. It should also apply to newer compatible versions, but confirm compatibility and any changed interface labels with the deployed versions before rollout.
Note
This guide assumes that you are familiar with the PERCEPT body camera and have access to the appropriate user manual. It focuses on the Milestone XProtect integration workflow and does not repeat the complete camera configuration and operating instructions.
Refer to the PERCEPT BC100 user manual or PERCEPT BC200 user manual as needed for device-specific instructions, terminology, and configuration details. Follow the user manual when a setting or procedure is not described in this guide.
Recommended deployment
The recommended Milestone deployment uses:
- A PERCEPT body camera.
- A PERCEPT docking station.
- A Wi-Fi access point.
- An optional VPN router for remote Wi-Fi or LTE access.
- A LAN connected to Milestone XProtect.
- A Milestone XProtect server.
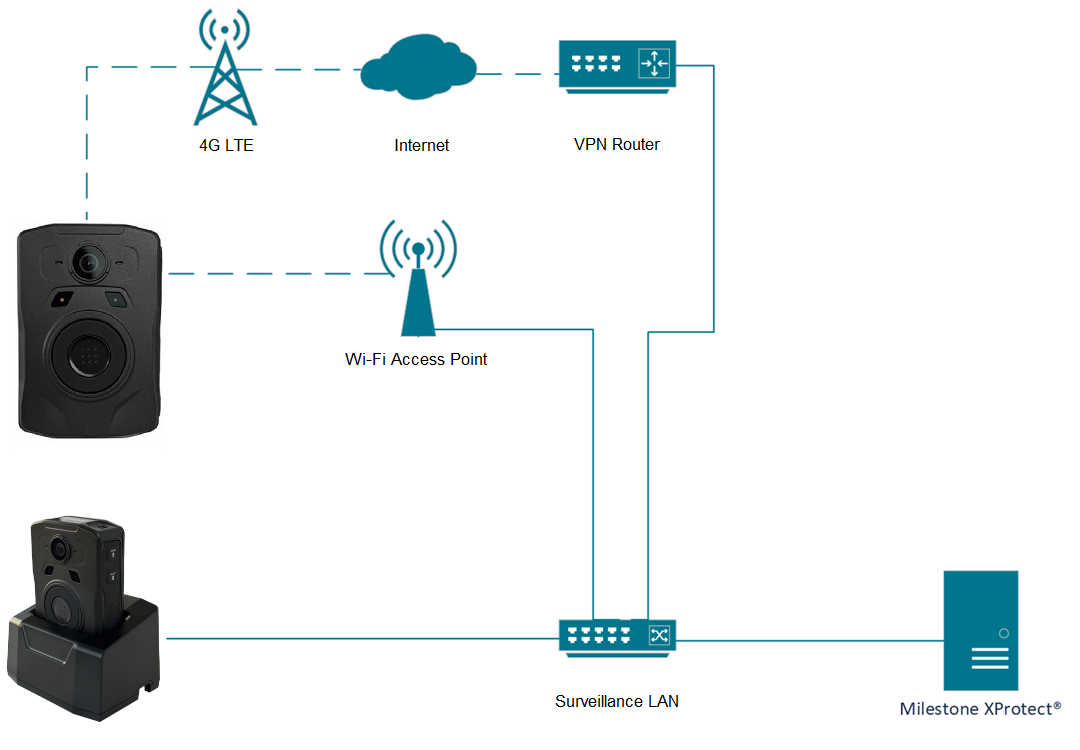
For most deployments:
- Use a low-bitrate live stream for on-demand viewing over Wi-Fi or LTE.
- Record the high-bitrate stream locally on the camera.
- Transfer recorded media to the XProtect Recording Server through the docking station's wired Ethernet connection.
This keeps live bandwidth under control while preserving higher-quality evidence on edge storage.
Functional scope
| Functionality | Notes |
|---|---|
| On-demand live audio and video | Recommended over Wi-Fi or LTE to control bandwidth. |
| Two-way audio in Smart Client and Web Client | Audio is client-driven rather than always-on. |
| High-bitrate local recording | Stored on camera edge storage. |
| Edge-storage transfer to XProtect Recording Server | Requires XProtect Professional+ or higher. |
| Wearer-generated events and alarms | Can be surfaced in XProtect rules and alarms. |
| Time synchronization | Use a shared NTP source for the camera and VMS. |
| Firmware updates from Management Client | Use a dedicated Superuser ONVIF account. |
| Automatic network switching | Docking, Wi-Fi, and LTE can be used with optional VPN access. |
Conseil
Configure and validate one camera end to end before deploying the fleet. Once the baseline works, use IONConfigTool to clone the configuration and re-enter users, credentials, network settings, and encryption keys manually.
Camera preparation
Complete the camera-side preparation in the appropriate user manual before moving into XProtect. Configure the network interfaces, video profiles, orientation metadata, local recording, media encryption, time synchronization, and dedicated ONVIF account required by the deployment.
The Milestone-specific choices are:
- Leave camera interfaces on DHCP unless fixed addresses are required by the site.
- Reserve addresses on the LAN DHCP server and, when used, on the VPN server so each camera remains predictable across Wi-Fi, dock Ethernet, and VPN paths.
- Prefer docking-station Ethernet for playback and clip transfer.
- Use Wi-Fi for local live access and LTE only when remote live access is required.
- Enable Online Mode on the docking station.
- Disable live media streaming while docked unless required.
- Enable Prevent Media Playback Over a Wireless Connection when recorded media should offload only through the dock.
For LTE data usage, allow live streaming only when required, block recorded clips, system-information files, and firmware updates, and set GPS and system-resource sampling to 0 when metadata is not needed.
Avertissement
Edge transfer can create bandwidth spikes above 200 Mbps when multiple cameras begin offloading. Tune the XProtect Recording Server and deployment schedule to match the available network capacity.
If remote Wi-Fi or LTE access is used, the VPN design must provide L2TP/IPsec with a pre-shared key, sufficient tunnel capacity and encrypted throughput, a public static IP address or correct port forwarding, and predictable IP reservations for each camera.
Video, recording, and time settings
Disable Orientation Enable before enrollment because XProtect does not use that metadata in this workflow.
Use the camera user manual for the complete profile configuration. The recommended Milestone stream roles are:
- Profile 1, recording stream: high bitrate, used for recorded evidence and edge storage.
- Profile 2, live stream: low bitrate, used for on-demand live viewing.
- Profile 3, web interface: MJPEG, used only by the camera web interface and not for edge recording.
For local recording, use Profile 1 for recorded evidence and Profile 2 for pre-recording when pre-recording is enabled. These are recommended deployment choices; the profile used for local camera recording does not have to match the stream profile configured for recording in XProtect. Set the media encryption key as described in the user manual.
Note
H.264 is recommended when viewing streams in XProtect Web Client without using XProtect Mobile Server resources for transcoding. H.265 can be used when Web Client playback is not required or when transcoding capacity is sufficient.
For time synchronization, point the camera to the same NTP source used by XProtect, or use the Windows host time service when appropriate.
XProtect preparation
Time synchronization
Make sure the XProtect host uses a valid and stable time source.
- On the host PC, open Control Panel > Clock and Region.
- Open the time and date settings.
- Open Internet Time and change the synchronization settings.
- Select a valid time server.
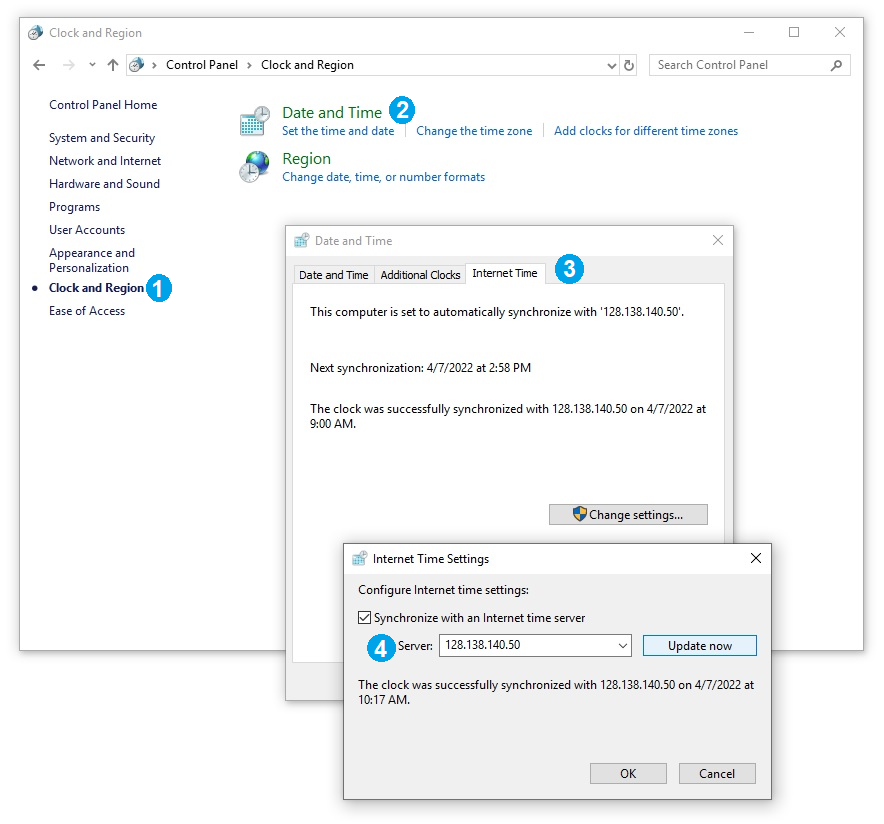
Use the same NTP source for body camera devices whenever it is reachable from the surveillance LAN.
Device groups
Before adding hardware, create device groups that separate PERCEPT cameras and microphones from the rest of the XProtect estate.
- Open Devices > Cameras.
- Add a device group.
- Create the required camera and microphone groups.
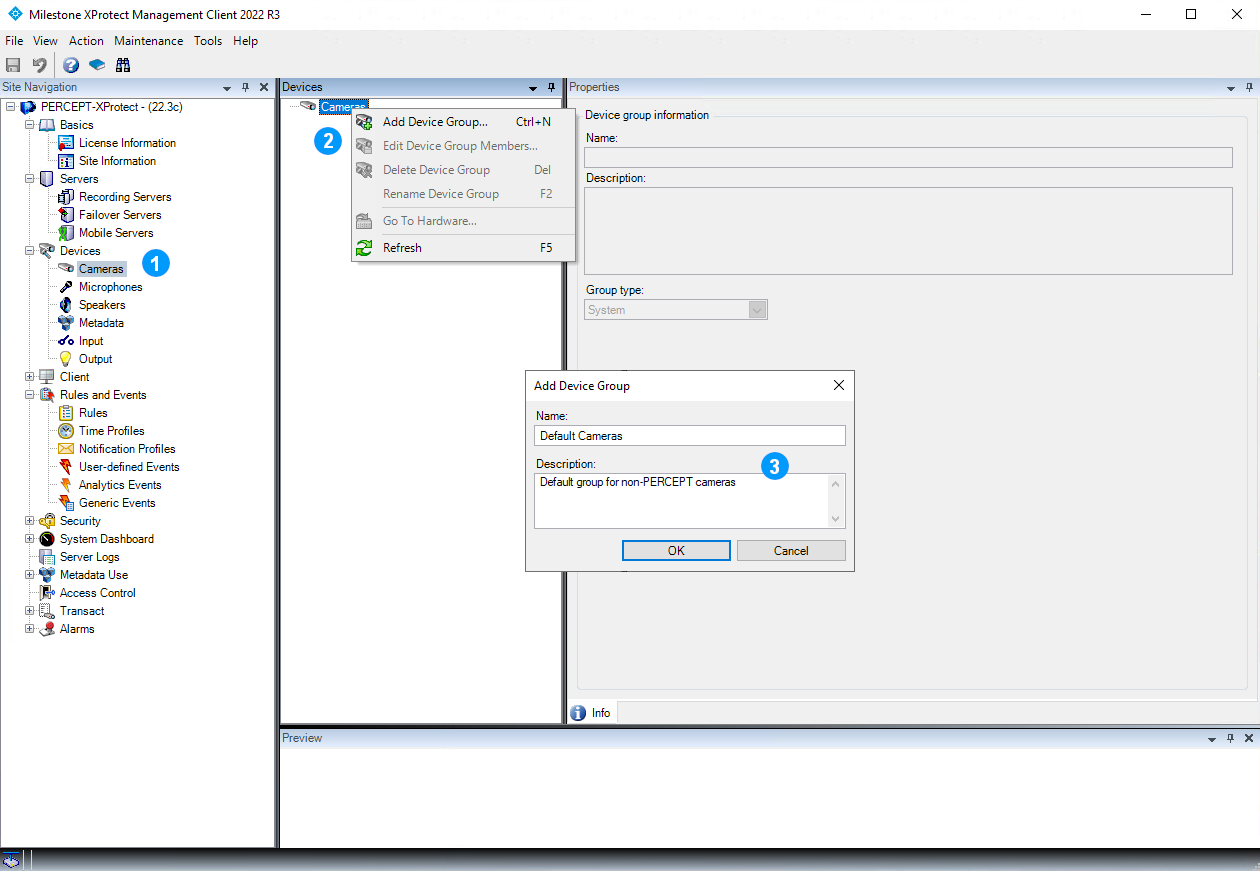
Create at least the following groups:
- A default camera group for non-PERCEPT cameras.
- A dedicated PERCEPT Cameras group.
- A default microphone group.
- A dedicated PERCEPT Microphones group.
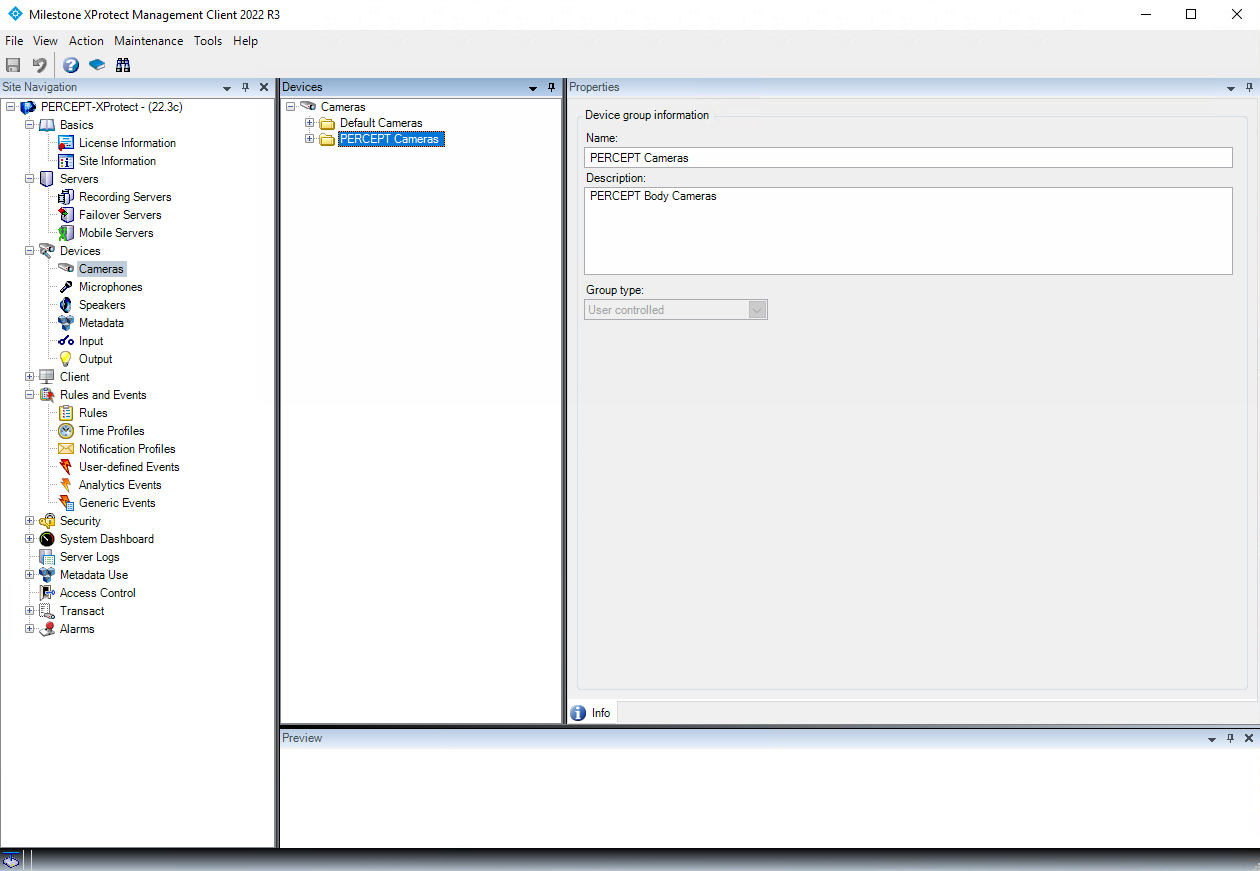
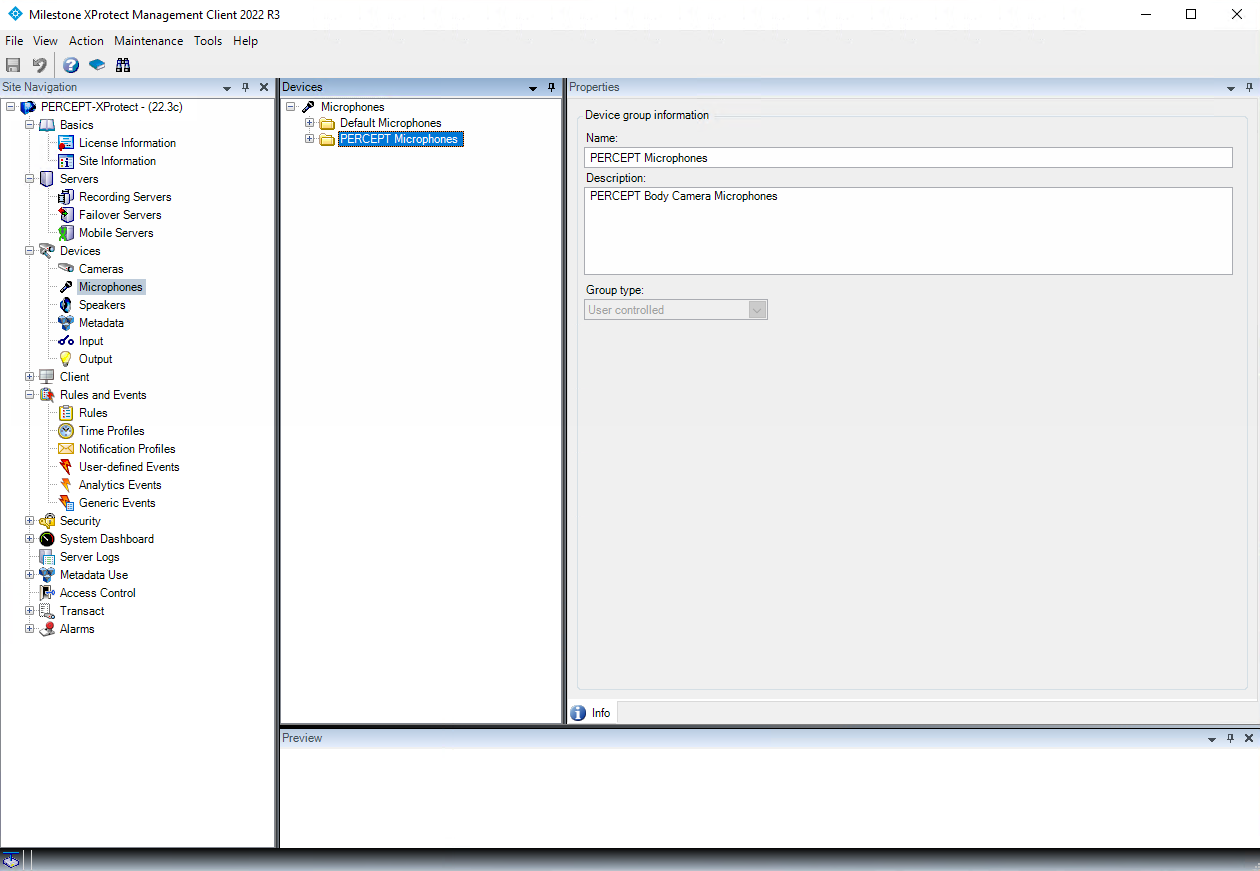
This separation makes rules easier to target and keeps PERCEPT-specific behavior isolated from other devices.
Camera enrollment in XProtect
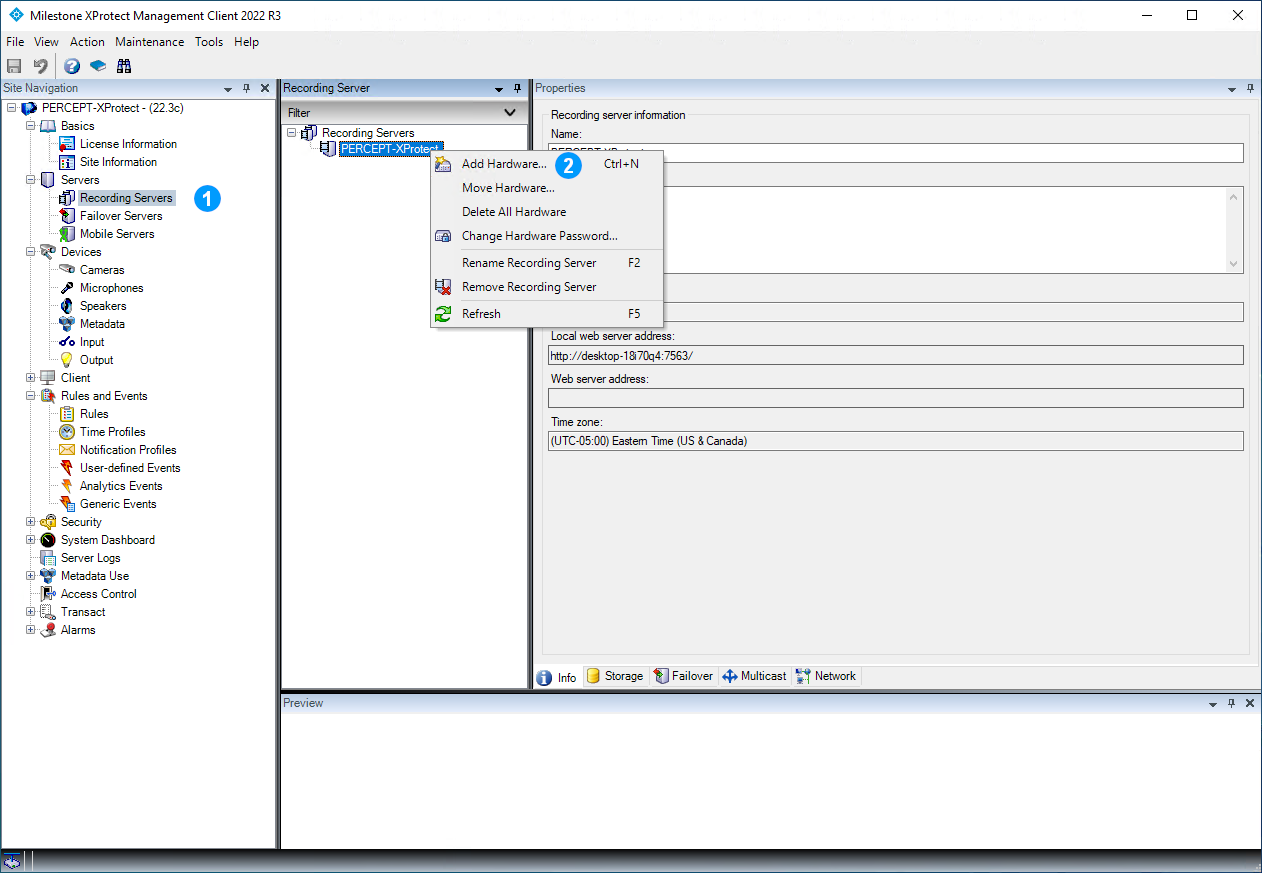
- In XProtect Management Client, open Recording Servers.
-
Right-click the recording server and select Add Hardware.
-
Select Manual.
- Select Next.
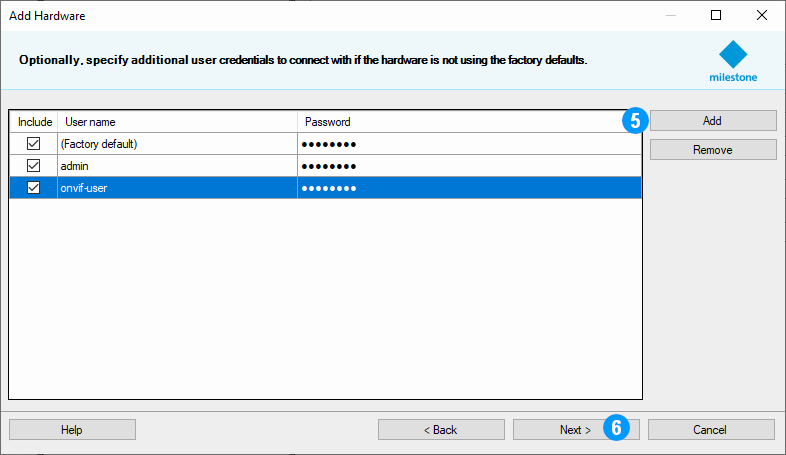
- Add or select the ONVIF credentials created on the camera.
-
Select Next.
-
Use the ONVIF generic driver.
- Select Next.
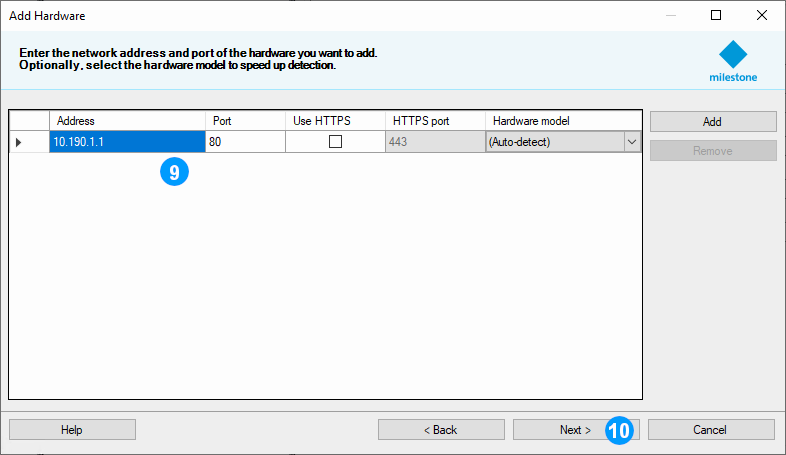
- Enter the camera IP address.
-
Confirm that XProtect reports a successful connection and select Next.
-
Confirm the second successful status message and select Next.
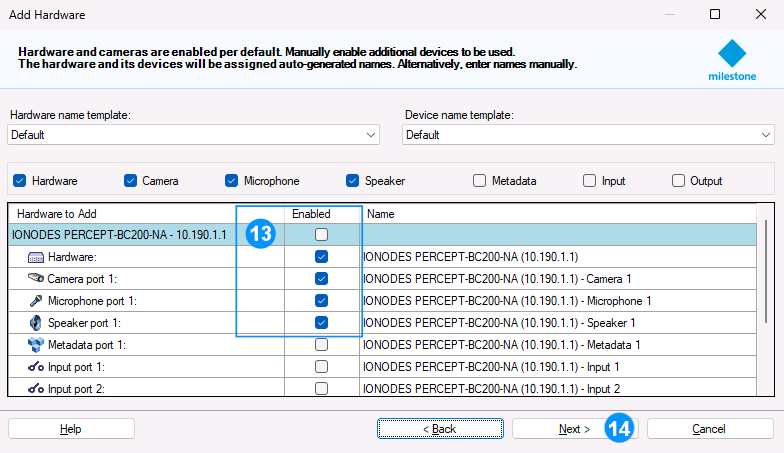
- Select the device components to configure.
-
Enable the following components:
- Hardware - Camera 1 - Microphone 1 - Speaker 1 -
Select Next.
Note
Input ports can be enabled, but ONVIF events are generally a better fit than direct button-to-action assumptions for wearable-camera workflows.
-
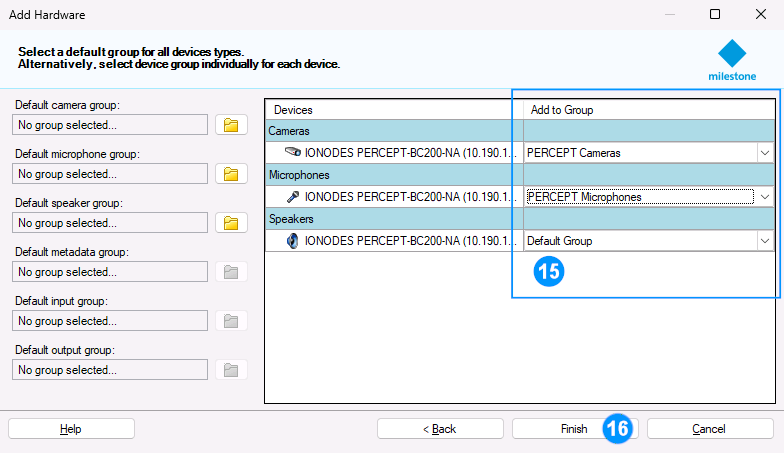
Assign the camera and microphone to the PERCEPT Cameras and PERCEPT Microphones groups, and assign the speaker to the default speaker group unless the site requires a separate group.
-
Select Finish.
Camera configuration in XProtect
Camera settings and streams
On Camera 1 > Settings:
- Select Camera 1.
- Select the Settings tab.
- Confirm that the exposed streams match the camera profile choices.
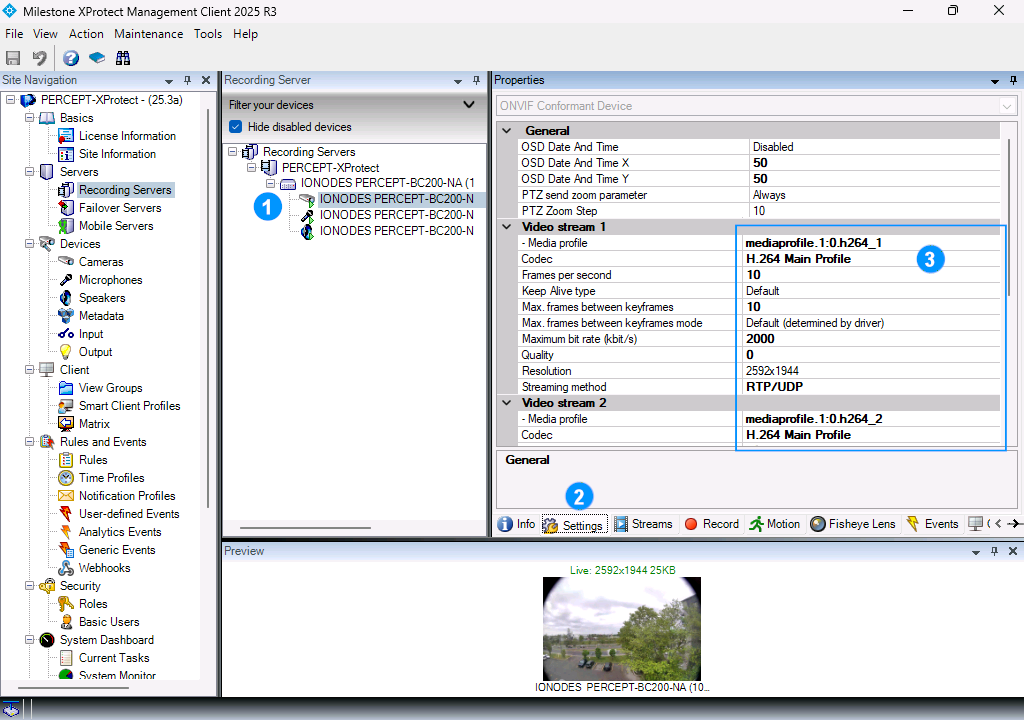
After enrollment, make further stream changes in XProtect Management Client rather than in the camera web interface.
Use RTP/UDP as the recommended streaming method.
On Streams:
- Select the Streams tab.
- Add a video stream if Video stream 2 is not already listed.
-
Configure the streams as follows:
- Video stream 1
- Live mode: Never
- Default: Unchecked
- Record: Checked
- Video stream 2
- Live mode: When needed
- Default: Checked
- Record: Unchecked
- Video stream 1
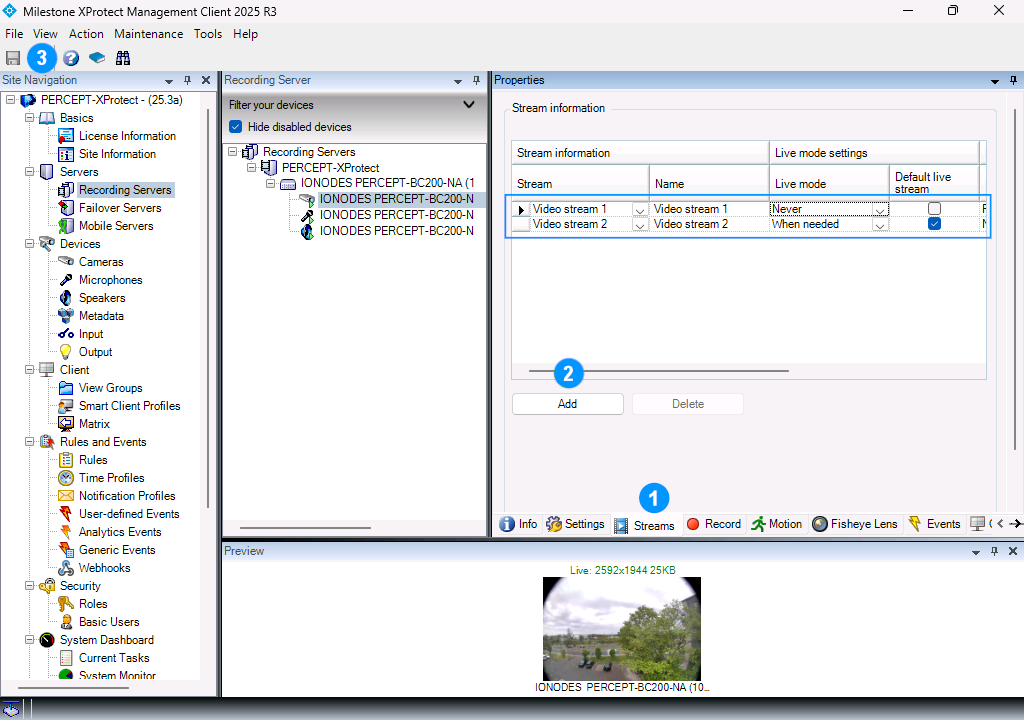
This keeps the high-bitrate stream for recording and the low-bitrate stream for live viewing.
Panomorph dewarping
If the camera's Panomorph lens should be dewarped in XProtect Smart Client, open the Fisheye Lens tab and enable fisheye lens support. Configure the lens as follows:
- Lens type: ImmerVision Enables Panomorph
- Camera position/orientation: Wall mount
- ImmerVision Enables Panomorph RPL number:
C1ZZV
Without Panomorph support, XProtect displays the full hemispherical image. XProtect Web Client does not support Panomorph dewarping.
Avertissement
Some XProtect Smart Client versions or service packs may have stability issues when switching between Live and Playback with Panomorph enabled, or when Live and Pre/Post-Recording use different resolutions. Install the latest applicable service packs, or disable Panomorph support if the issue persists.
Recording and motion
On Record:
- Select the Record tab.
- Clear Recording.
- Select Save.
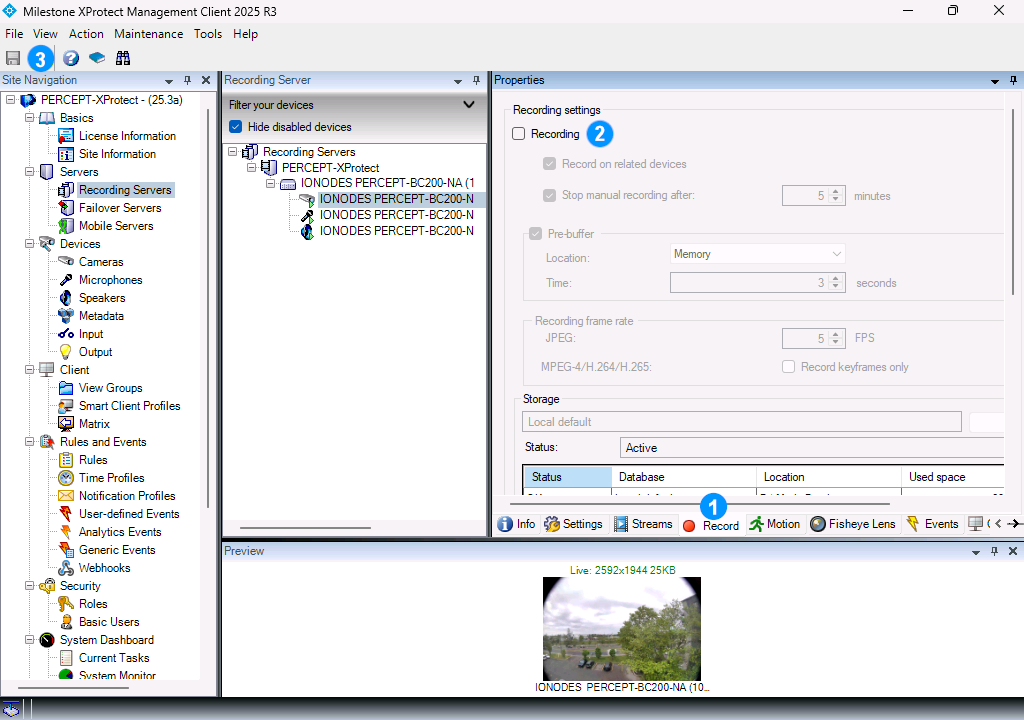
For the recommended deployment, recorded evidence comes from edge storage rather than automatic direct-to-VMS recording.
On Motion:
- Select the Motion tab.
- Clear Motion detection.
- Select Save.
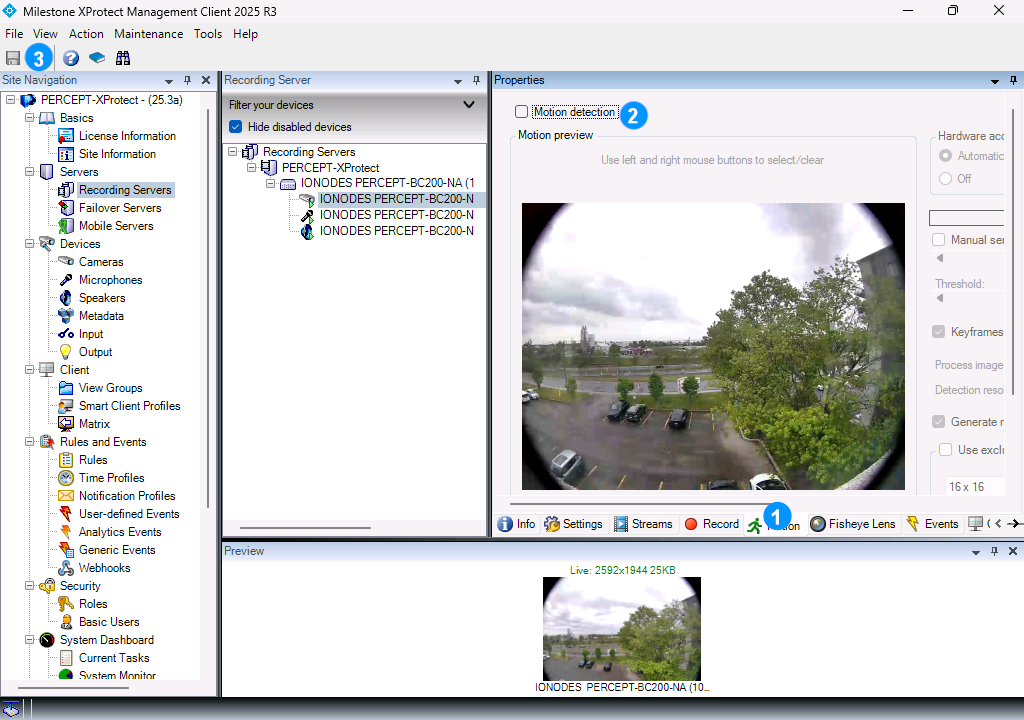
VMS-side motion detection is generally unsuitable for wearable cameras and forces the stream to remain active.
Events and client mapping
On Events:
- Select the Events tab.
- Select Add.
- Select the dynamic event RecordingHistory/Recording/State Rising.
- Confirm the selection.
- Select Save.
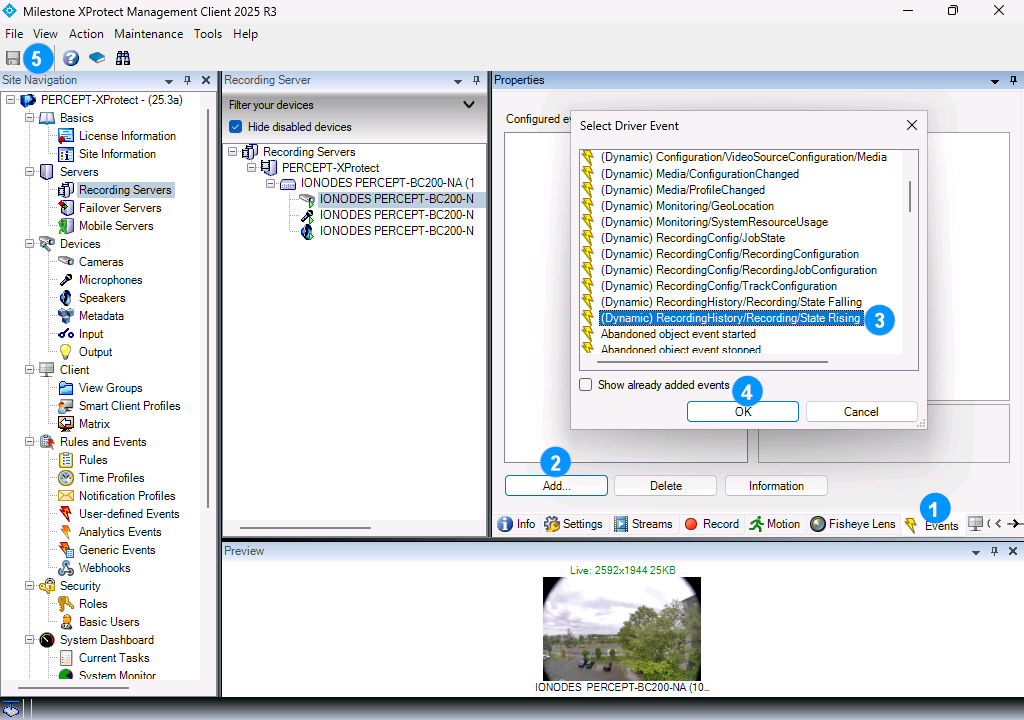
This event allows XProtect to react when the wearer starts a recording.
On Client:
- Select the Client tab.
- Clear the related metadata field.
- Select Save.
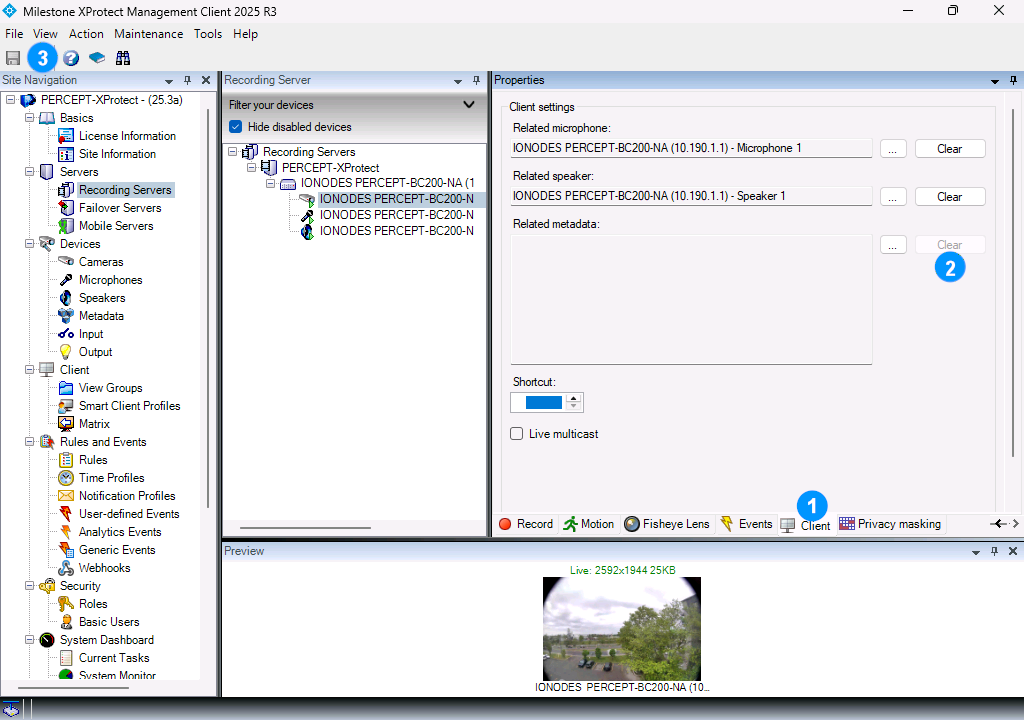
Keep Smart Client mapping focused on the relevant video, microphone, and speaker components.
Microphone and speaker
For Microphone 1:
- Select the microphone device.
- Select the Settings tab.
- Use a low-bitrate AAC profile at 32 kHz or 44 kHz, with RTP/UDP as the streaming method.
-
Select Save.
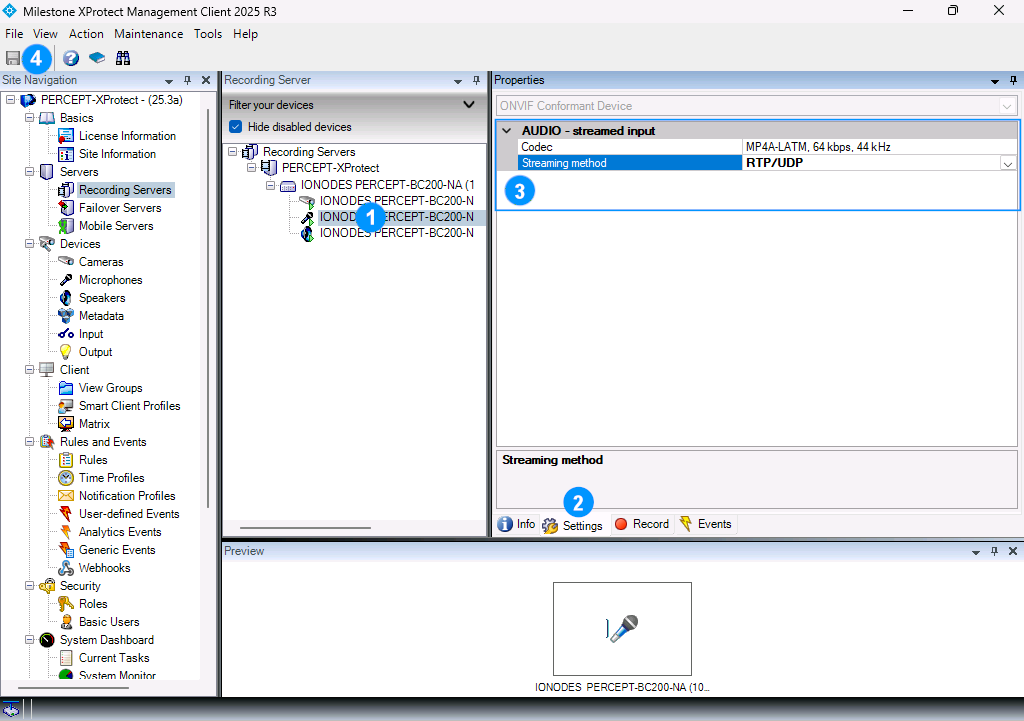
Do not enable microphone recording in XProtect for the recommended deployment.
For Speaker 1:
- Select the speaker device.
- Select the Settings tab.
- Use a low-bitrate AAC profile at 32 kHz or 44 kHz, with RTP/UDP as the streaming method.
-
Select Save.
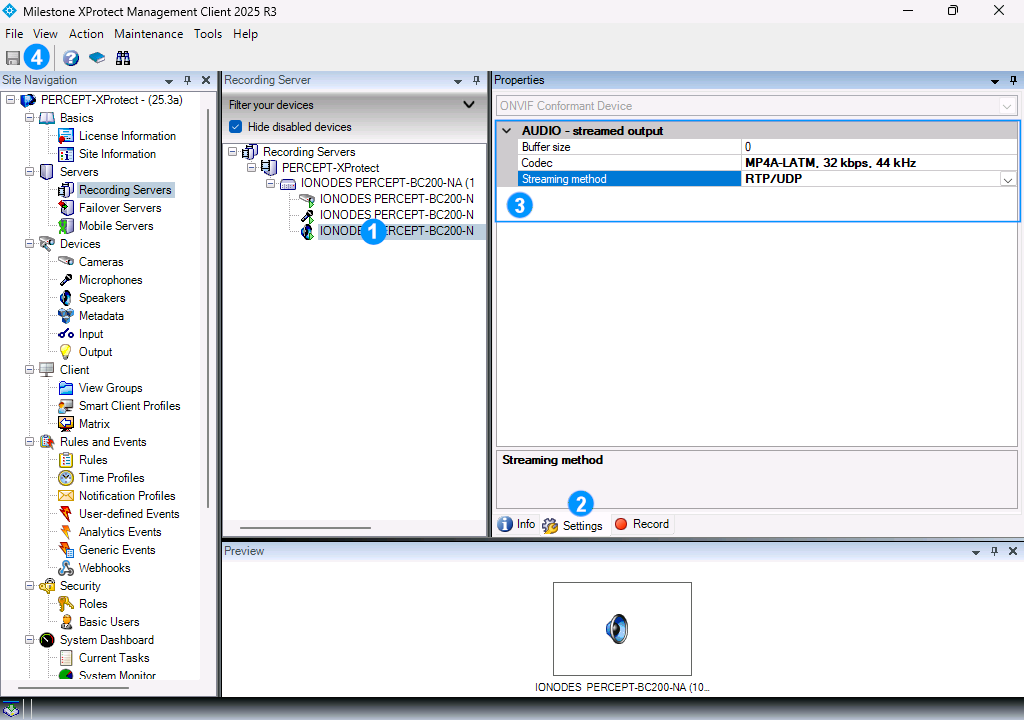
Do not enable speaker recording in XProtect for the recommended deployment.
XProtect rules
Default start audio feed rule
By default, XProtect starts audio feeds too broadly. Modify the default rule as follows:
- Open Rules and Events > Rules.
- Edit Default Start Audio Feed Rule.
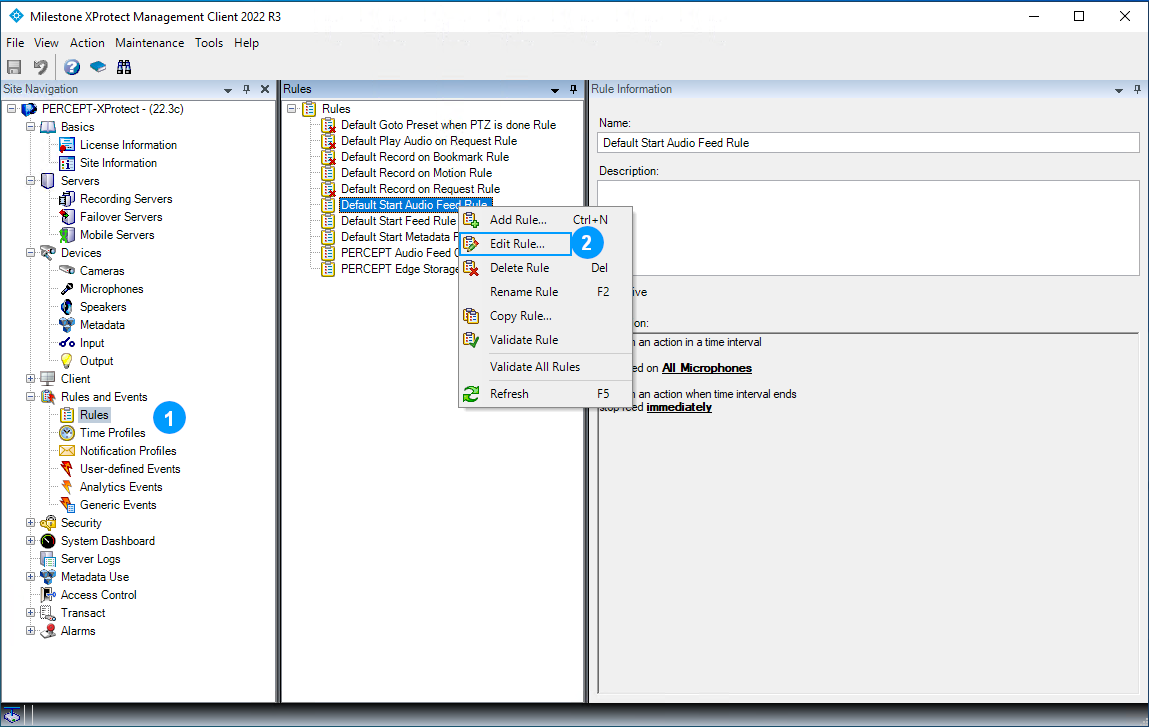
Keep the existing rule for non-PERCEPT microphones only.
PERCEPT on-demand audio feed
Create a rule that starts the PERCEPT microphone feed only when a live client feed is requested.
- Open Rules and Events > Rules.
- Add a new rule.
Use:
- Rule type: Perform an action on event
- Event: Devices > Predefined Events > Live Client Feed Requested
- Device group: PERCEPT Microphones
- Action: Start feed on devices
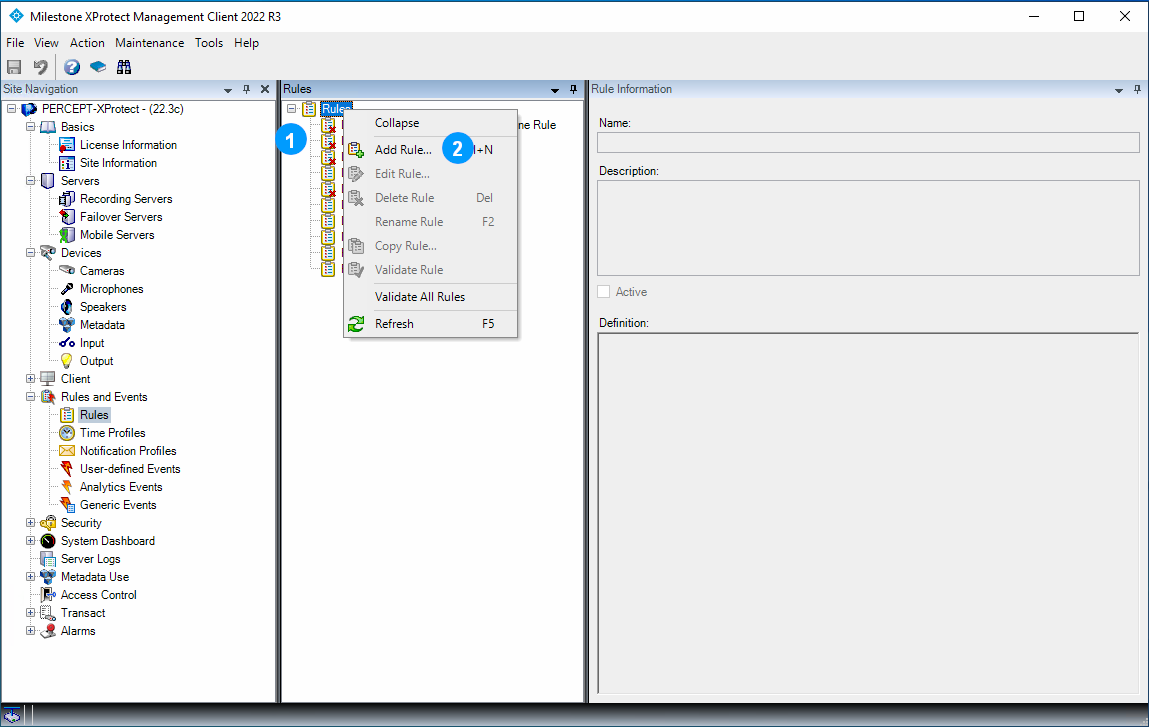
This keeps microphone streaming aligned with operator demand.
PERCEPT edge-storage transfer rule
Create a recurring rule that retrieves remote recordings from PERCEPT Cameras and PERCEPT Microphones.
- Open Rules and Events > Rules.
- Add a new rule and select Perform an action on a recurring time.
- Configure the recurrence and continue to the action step.
- Select Retrieve and store remote recordings from devices.
- Select the PERCEPT Cameras and PERCEPT Microphones device groups.
Use:
- Action: Retrieve and store remote recordings from devices
- Device groups: PERCEPT Cameras and PERCEPT Microphones
- Relative time: typically
-24 hoursfor a once-per-shift or once-per-day model
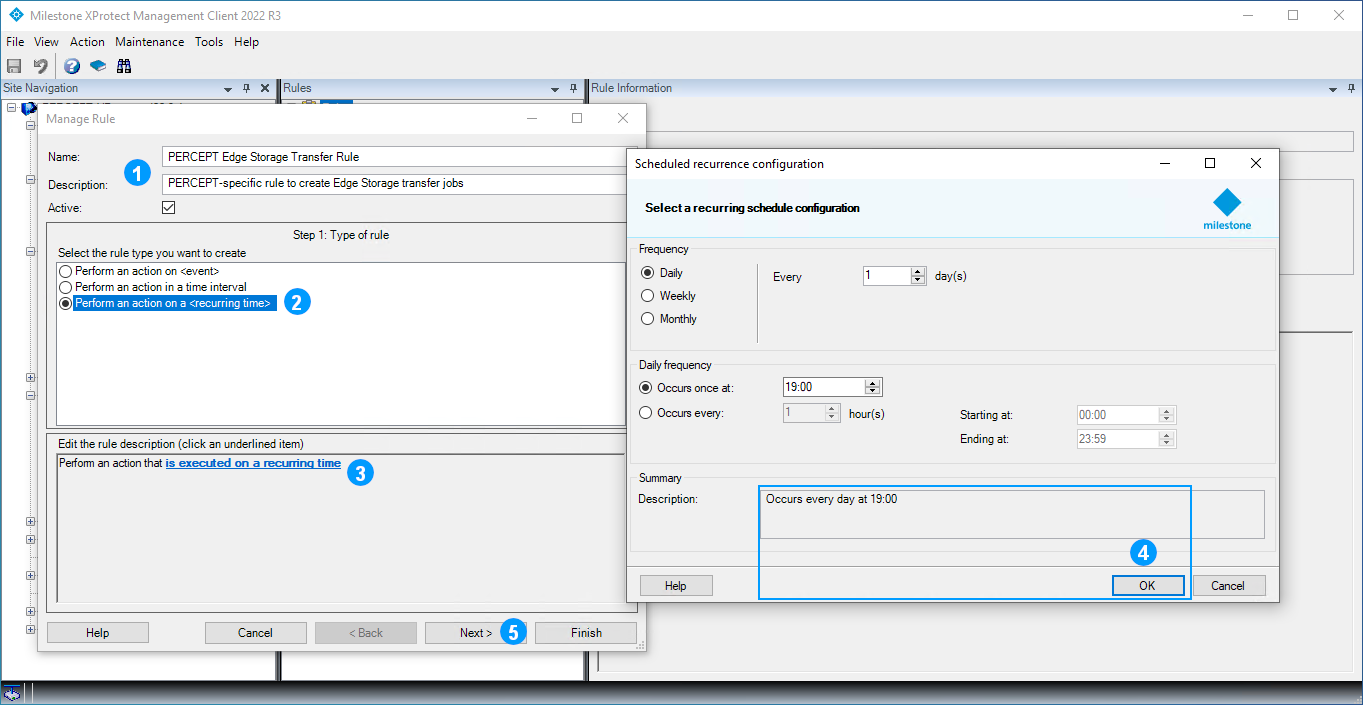
Schedule the recurrence for a time when cameras are normally docked.
Note
When an edge-storage transfer job exists, XProtect Edge Storage Manager retries failed retrieval attempts every 15 seconds until they succeed.
Optional event-to-alarm workflow
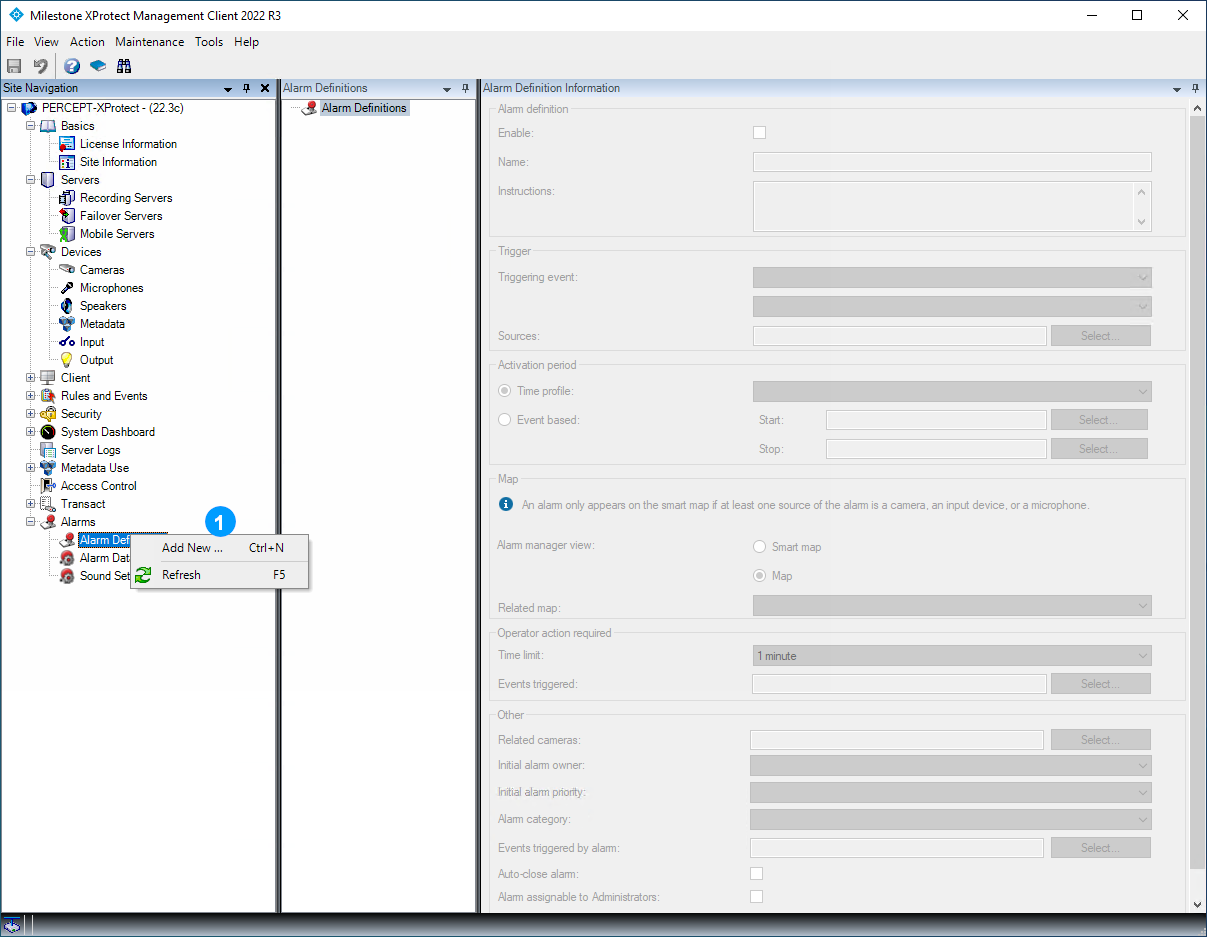
If the site wants a wearer-initiated recording to raise an operator-facing alarm, create an alarm definition using the event added under the camera's Events tab.
- Open Alarms > Alarm Definitions.
- Add a new alarm definition.
- Select RecordingHistory/Recording/State Rising as the triggering event.
- Select the relevant PERCEPT cameras as event sources.
Deployment validation
Live video and audio
Validate the following in Smart Client or Web Client:
- With no Smart Client, Web Client, or Management Client live view open, confirm that the camera is not streaming.
- Open the camera and confirm that the expected live stream starts.
- Enable video diagnostics and confirm that the low-bitrate live stream is used.
- Confirm that listening and talking work as expected. Allow for approximately 0.5 to 1 second of audio buffering and latency.
- If Panomorph support is enabled, confirm that Smart Client can dewarp and navigate the image.
- When the stream is closed, confirm that the camera returns to its idle network state.
Alarm and recording workflow
Trigger a recording from the body camera and confirm that the expected alarm appears in Alarm Manager.
Verify that:
- The alarm source and message match the configured event.
- The live preview opens correctly.
- Operator instructions appear as expected.
Edge-storage transfer and playback
If playback is blocked over Wi-Fi, insert the camera in a docking station before testing edge transfer.
After the edge-transfer rule runs, verify that:
- The recording becomes available from the alarm or playback workflow.
- Video diagnostics show the high-bitrate recording stream.
- The Alarm Manager preview opens, noting that audio is not available there.
- Audio is available and synchronized in the Playback view.
For troubleshooting, review the XProtect Recording Server EdgeStorage.log. If a temporary rule was used to trigger the transfer, disable or delete it after testing. Disable video diagnostics when validation is complete.
Network switching for remote deployments
If the deployment uses VPN over Wi-Fi or LTE, verify that the camera reconnects with the expected address and that live streaming, audio, and alarms continue to work after interface changes.
Priority should remain:
- Docking-station Ethernet
- Wi-Fi
- LTE
When the active network interface changes during a live stream, allow approximately 20 seconds for the stream to resume in Smart Client or Web Client.