Page non traduite
Cette page n'est pas encore disponible en français. Le contenu est affiché en anglais.
Genetec Security Center integration
This guide describes how to prepare an IONODES Secure Display Station (SDS), add it to Genetec Security Center, assign camera streams manually or through events, and validate the display output.
Screenshots use an ION-R200 as an example. The integration also applies to ION-R100S, ION-R150, and ION-R300, subject to model-specific limits and the compatibility requirements below. Interface labels can vary with the installed firmware and Security Center version.
Note
This guide assumes that the SDS is installed, reachable on the network, and configured for administrator access. It focuses on the Genetec integration rather than repeating the complete device setup.
Refer to the User Manuals section for device-specific setup and operating instructions.
Compatibility and integration model
Security Center represents each reported SDS video tile as an analog monitor. Assigning a camera to that analog monitor configures the corresponding SDS data source. Operators can change cameras from Security Desk, or Security Center can assign cameras automatically through event-to-action rules.
| Video codec | SDS firmware | Genetec Security Center |
|---|---|---|
| H.264 | 5.6.1.3 or newer | Supported since 5.7 SR5 |
| H.265 | 6.8.5.0 or newer | 5.11 with driver pack 11.7.0 or newer |
| H.265 | 6.8.5.0 or newer | 5.12 with driver pack 12.3.0 or newer |
Confirm compatibility for other Security Center and driver-pack combinations before deployment. If H.265 integration is unavailable, assign an H.264 stream as described under Stream usage and codec selection.
Avertissement
Genetec Encrypted Video streams are not compatible with SDS devices. HTTPS command-and-control is a separate feature and does not make encrypted Genetec video streams compatible. Disable Genetec video encryption only for cameras that must be displayed on the SDS where possible.
SDS preparation
Enable Genetec integration
- Open Configuration in the SDS web interface.
- Select System.
- Expand Features.
- Ensure that Genetec Integration is checked. The feature is enabled by default.
- If you changed the feature setting, click Save & Reboot.
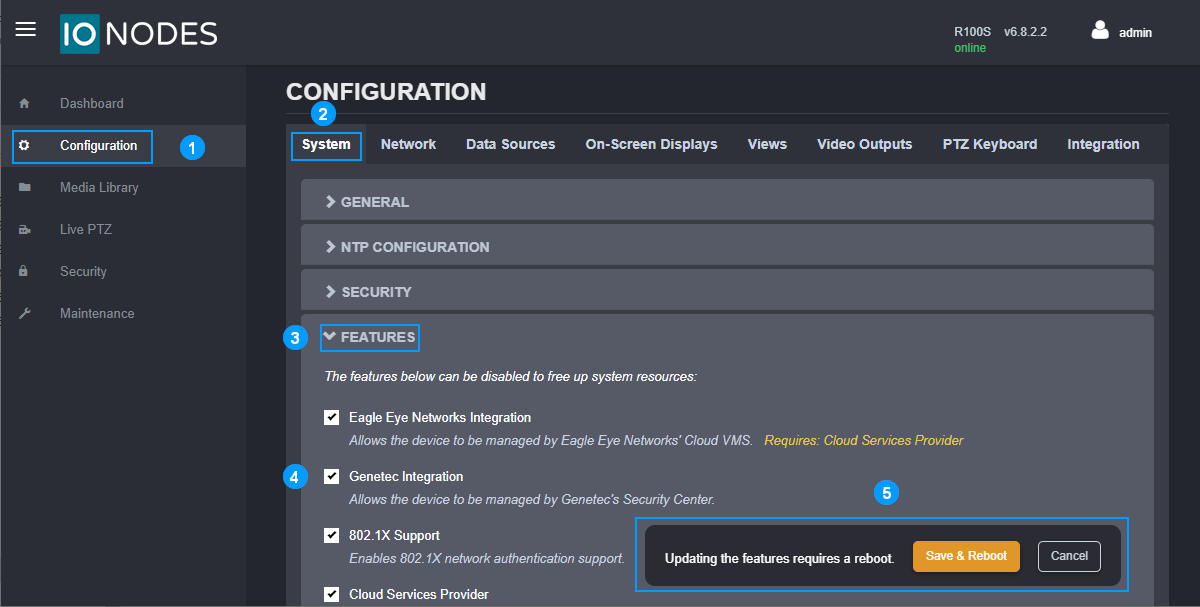
Configure reported outputs
- Open Configuration.
- Select Integrations. Some firmware versions label the tab Integration.
- Expand Genetec.
- Set Outputs Reported to the number of analog monitors that Security Center should control, using the value field or slider.
- Click Save.
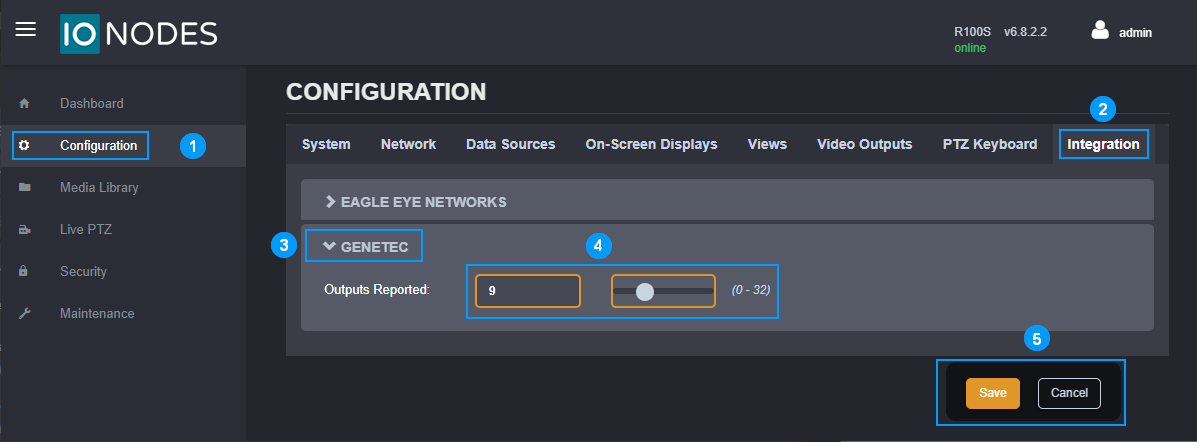
The reported monitors map to SDS data sources in numerical order. Reporting 10 outputs gives Security Center control of data sources 1 through 10; data sources 11 and above remain available for other uses. These outputs are video tiles, not physical HDMI connectors.
The source integration guide specifies the following maximum numbers of reported tiles:
| SDS model | Maximum reported tiles |
|---|---|
| ION-R100S | 32 |
| ION-R150 | 32 |
| ION-R200 | 32 |
| ION-R300 | 48 |
Note
The output control shown by some firmware versions extends to 48 even on models listed with a 32-tile limit in the source guide. Confirm the supported limit for the deployed model and firmware before configuring more than 32 reported outputs on an ION-R100S, ION-R150, or ION-R200.
If you change Outputs Reported after enrolling the SDS in Security Center, reboot the SDS for the new number of outputs to take effect in Genetec.
Prepare HTTPS command-and-control
HTTPS is optional for enrollment and enabled by default in the SDS network configuration. To verify it:
- Open Configuration.
- Select Network.
- Expand HTTP Configuration.
- Ensure that Accept HTTPS Connections is enabled.
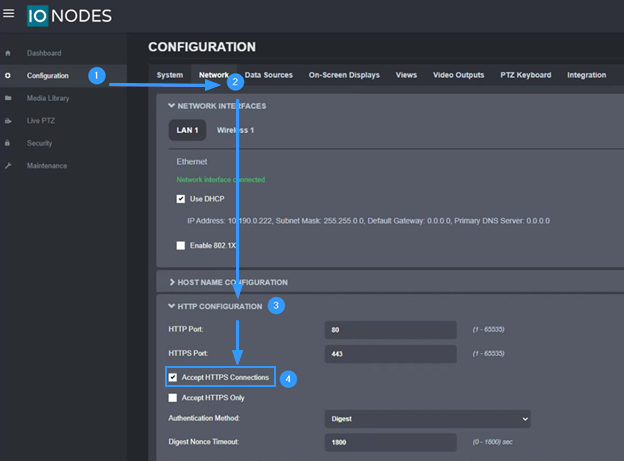
Note the configured HTTPS port for enrollment.
The SDS uses a self-signed certificate by default. Security Center must either accept that certificate or trust a custom certificate installed on the SDS. Custom certificate upload and certificate signing requests are available since SDS firmware 6.8.1.0; see HTTPS certificates and trust.
Configure views and tile assignments
Configure the SDS views before assigning cameras in Security Center.
- Open Configuration.
- Select Views.
- Select View 1, or another view to configure.
- Enter a descriptive view name.
- Select the desired Tile Layout.
- Check that the layout preview matches the intended tile arrangement.
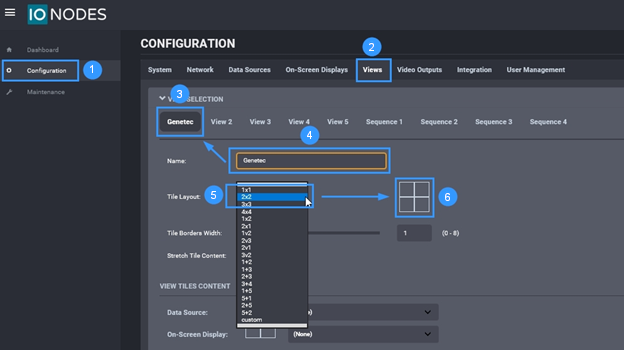
Assign data sources to the view's tile positions:
- Locate the Data Source row for the top-left tile under View Tiles Content.
- Choose data source 1 from that row's drop-down menu.
- Locate the Data Source row for the top-right tile.
- Open that row's Data Source drop-down menu.
- Select 2: Data Source 2 to assign data source 2 to the top-right tile.
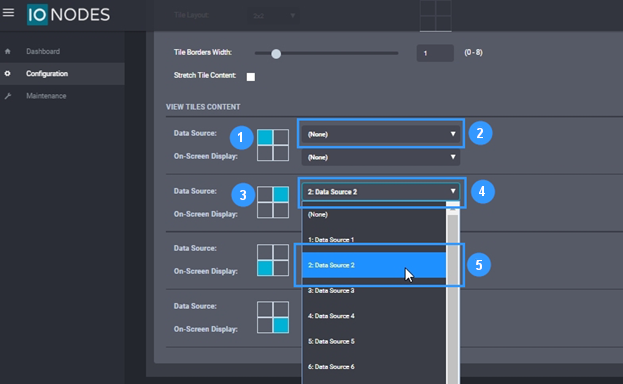
Repeat for the other tiles, then click Save at the bottom of the page.
A data source can normally represent a video stream or a web page. For this integration, the Genetec-controlled data sources represent IP video streams.
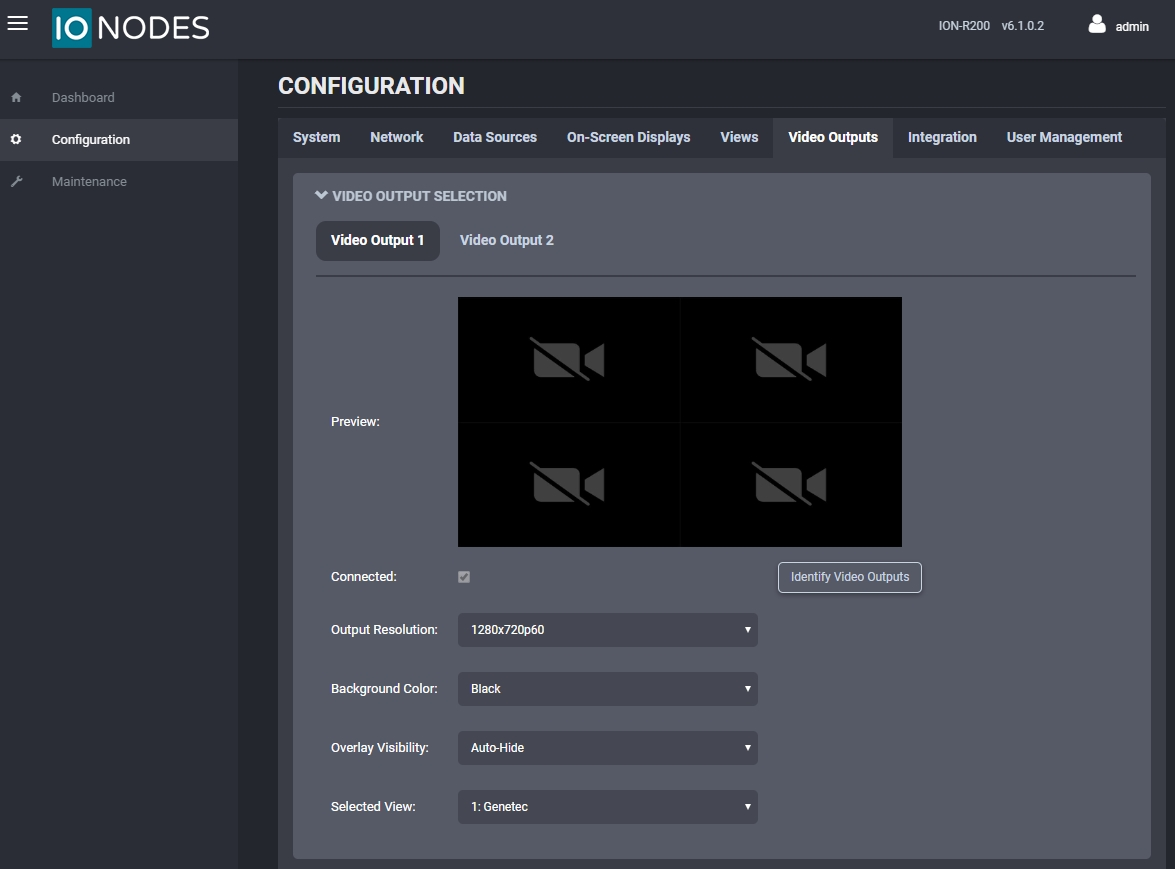
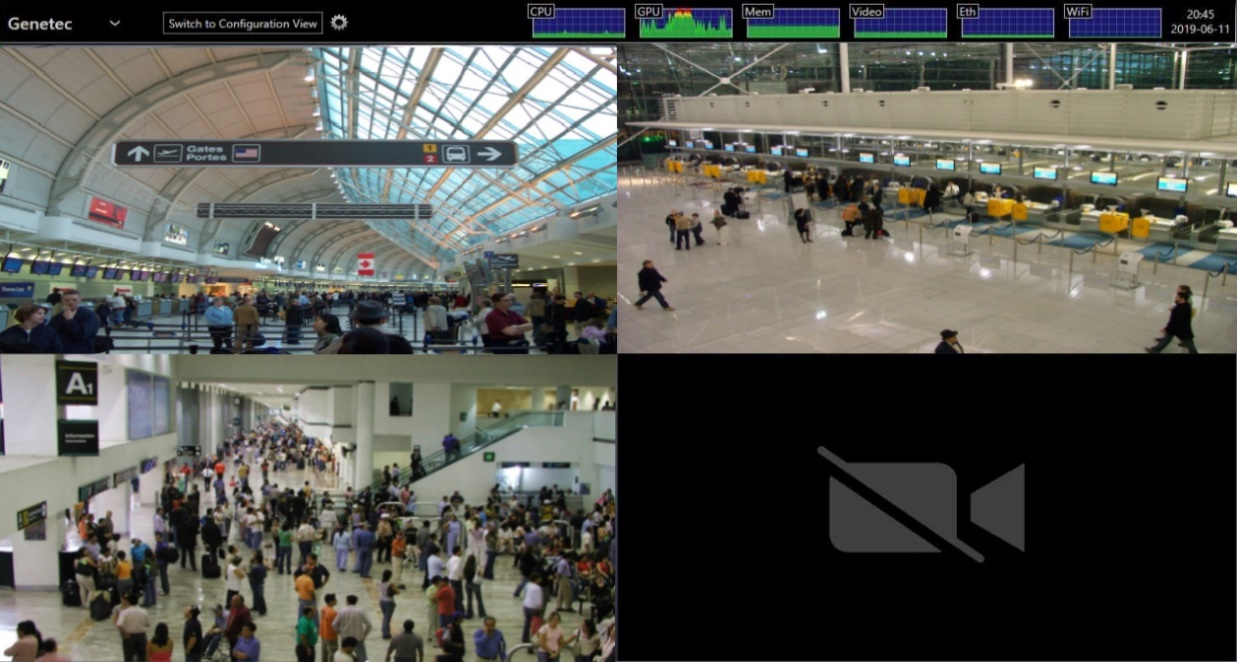
Open Video Outputs and check the preview of the selected view. Unassigned camera sources can show a crossed-out camera icon until cameras are assigned in Security Center.
Enrollment in Genetec Security Center
Add the SDS video unit
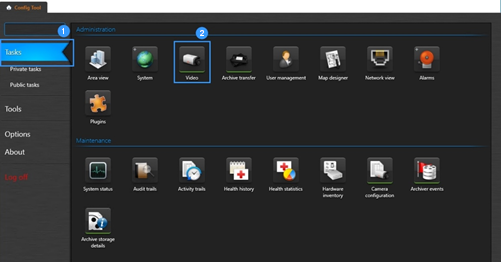
- In Genetec Config Tool, open Tasks.
- Select Video.
Add the SDS using the device list:
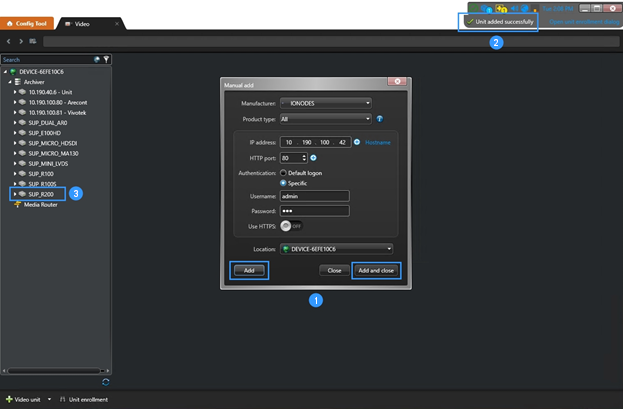
- Locate the device list on the Roles and units tab. The example adds an ION-R200.
- Click + Video unit.
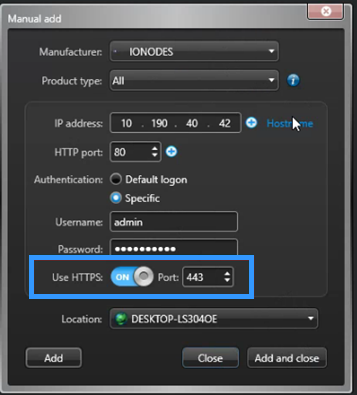
- In the Manual add dialog, configure the new unit's connection settings.
- Select IONODES as the manufacturer.
- Enter the SDS IP address and HTTP port.
- Select Specific authentication.
- Enter the SDS username and password.
- Once any HTTPS and certificate-trust settings described below are configured, click Add, or Add and close if this is the only unit being added.
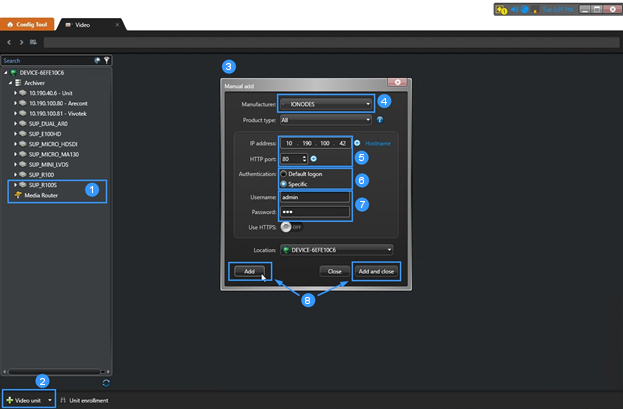
For HTTPS command-and-control, enable Use HTTPS and enter the SDS HTTPS port. Configure certificate trust as described below before completing enrollment.
HTTPS certificates and trust
Trusted custom certificate
Use a certificate signed by an authority trusted by the Genetec servers when available. This avoids relaxing Security Center's certificate-validation settings.
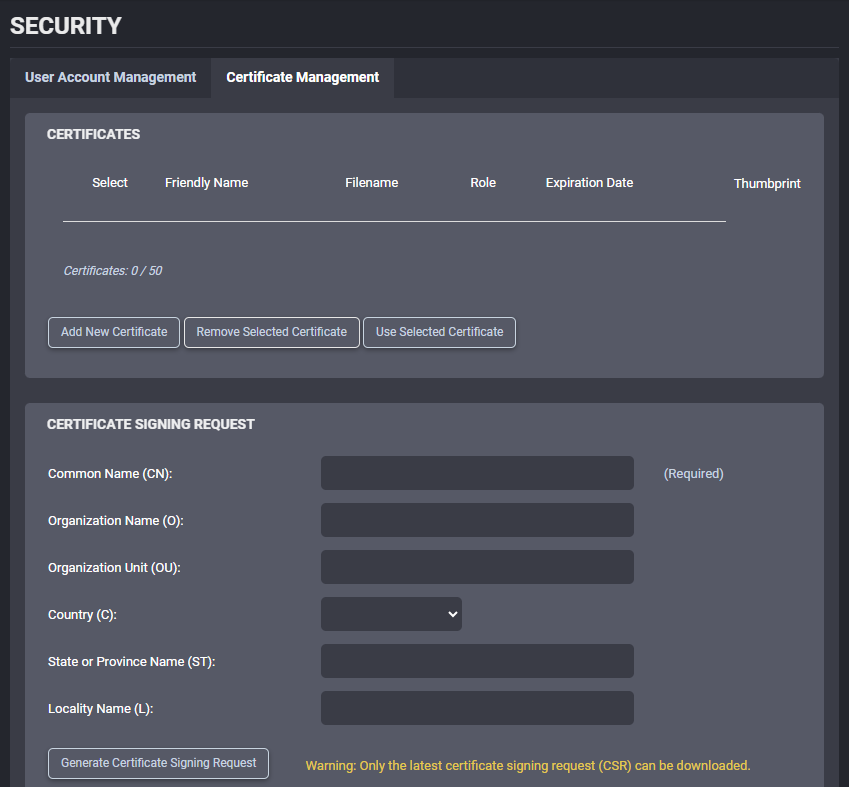
In the SDS web interface, sign in with an Administrator account and open Security > Certificate Management.
To install a certificate:
- Click Add New Certificate.
- Select a password-protected PFX / PKCS #12 certificate file (
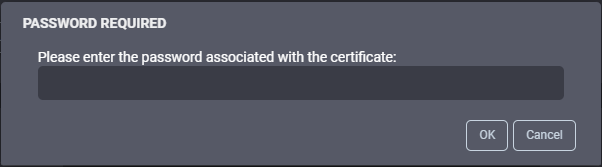
.pfxor.p12). - Enter the certificate password when prompted. The certificate is added to the list with the Server role.
- Select the certificate and click Use Selected Certificate.
When prompted during import, enter the certificate password and click OK:
Applying the certificate restarts the SDS web server and disconnects the browser session.
If a certificate authority requires a certificate signing request (CSR):
- Fill in the required fields in the Certificate Signing Request section of the same tab.
- Click Generate Certificate Signing Request and download the CSR through the browser.
- Send the CSR to the certificate authority.
- Upload and apply the resulting certificate using the procedure above.
For certificate formats, permissions, and CSR details, see the Security page in the applicable manual under User Manuals.
Default self-signed certificate
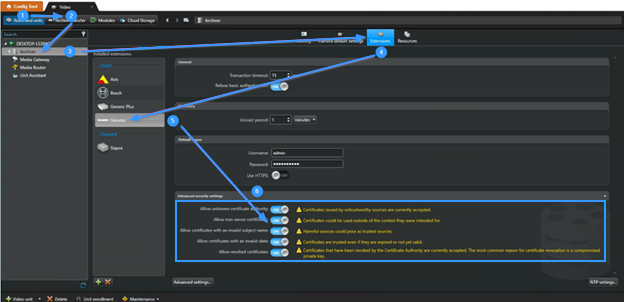
If the deployment uses the SDS's default self-signed certificate, configure Security Center to accept it:
- In Config Tool, open Video > Roles and units.
- Select the Archiver that will manage the SDS.
- Open Extensions.
- Select Genetec from the installed extensions.
- Expand Advanced security settings.
- Enable the Allow all certificates options shown for the self-signed-certificate configuration.
Avertissement
Allowing all certificates relaxes certificate validation for connections handled by these Archiver settings, not just this SDS. Use this option only if permitted by the deployment's security policy. A certificate trusted by the Genetec servers is preferred.
Confirm enrollment and licensing
To finish enrollment and confirm the result in Config Tool:
- Click Add or Add and close after completing the connection and certificate settings.
- Confirm that the Unit added successfully notification appears.
- Confirm that the SDS appears in the device list.
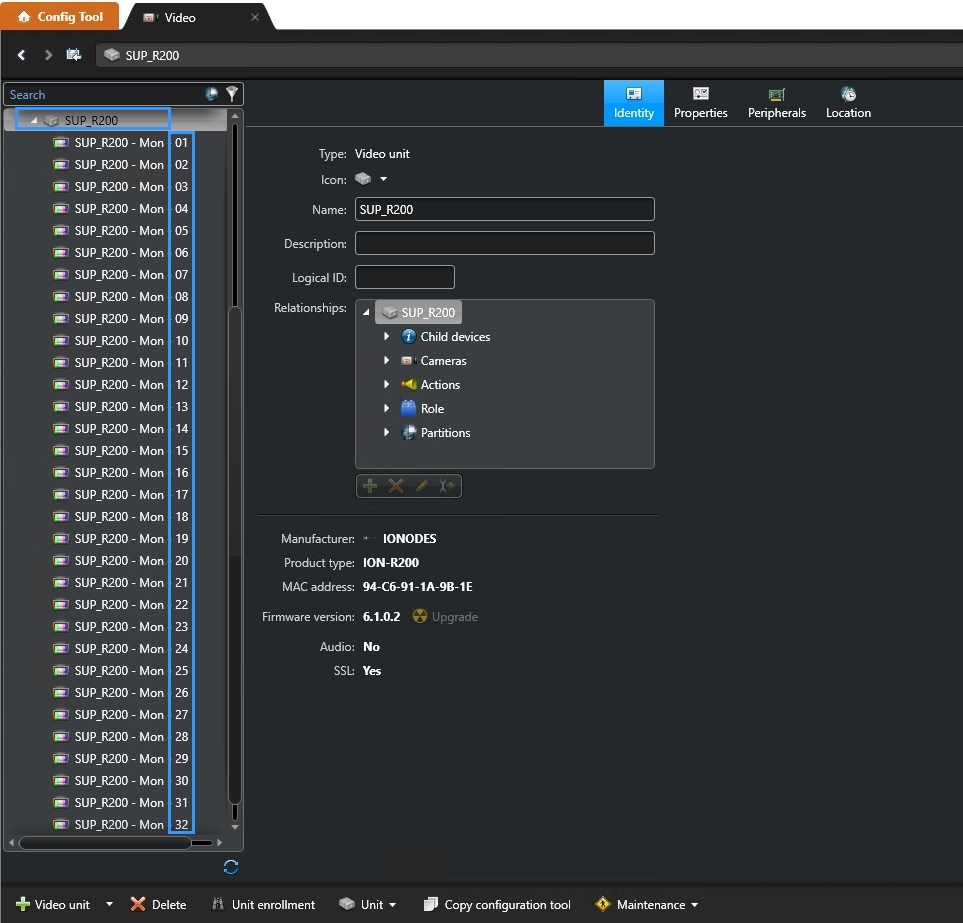
Expand the SDS and check that its analog-monitor count matches Outputs Reported. The example below reports 32 monitors from an ION-R200.
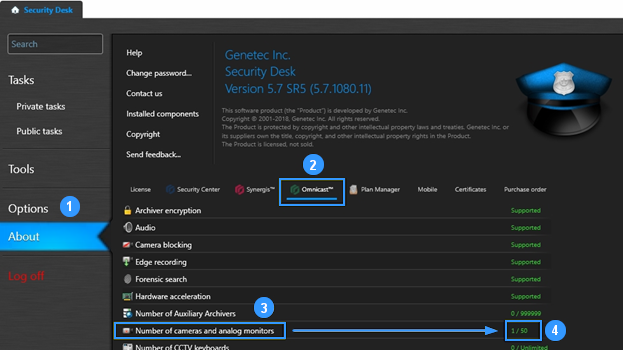
Each SDS requires one Cameras and Analog Monitors license, regardless of the number of reported tiles. To verify usage in Security Desk:
- Open About.
- Select Omnicast.
- Locate Number of cameras and analog monitors.
- Check that the count increased by one after enrollment. If the SDS is the only enrolled device, the count should be 1.
Video stream configuration
Disable incompatible video encryption
Genetec Encrypted Video is intended for Security Center's internal video services and cannot be decoded by an SDS. Prefer a per-camera exception so other cameras can retain encrypted video streams.
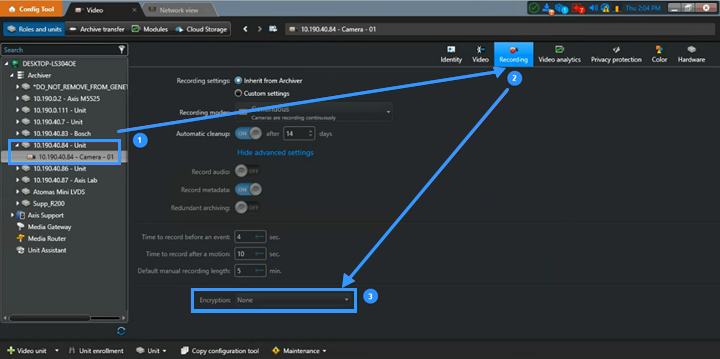
For an individual camera, in Config Tool:
- On Video > Roles and units, select the camera under its Archiver.
- Open Recording settings.
- Set Encryption to None.
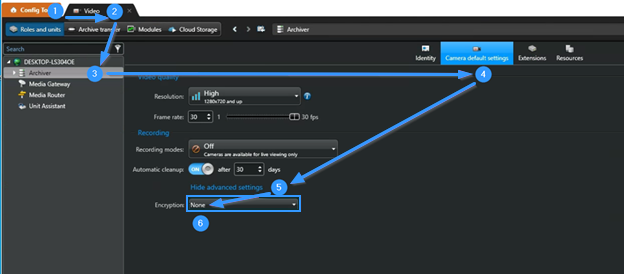
Alternatively, to change the default for video units on an Archiver:
- Open Genetec Config Tool.
- Open Video > Roles and units.
- Select the Archiver.
- Open Camera default settings.
- Click Show advanced settings.
- Set Encryption to None.
Avertissement
Disabling Genetec video encryption changes the protection of the affected streams within Security Center. Limit the change to cameras required by the SDS and follow the deployment's security policy. The location of encryption settings varies by Security Center version.
Assign cameras to analog monitors
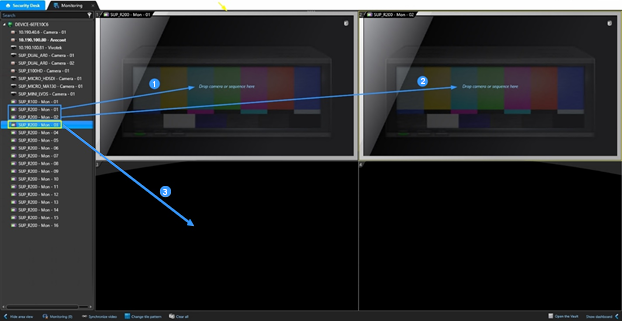
In Security Desk, open Monitoring. Each analog monitor corresponds to a numbered SDS data source; an unassigned monitor shows a background image rather than a camera stream. The example uses a four-tile layout and the first three SDS analog monitors:
- Drag SDS analog monitor 1 from the device list into the top-left Monitoring tile.
- Drag SDS analog monitor 2 into the top-right Monitoring tile.
- Drag SDS analog monitor 3 into the bottom-left Monitoring tile.
Assign cameras to those analog monitors:
- Drag the first camera onto the top-left tile containing analog monitor 1.
- Drag the second camera onto the top-right tile containing analog monitor 2.
- Drag the third camera onto the bottom-left tile containing analog monitor 3.
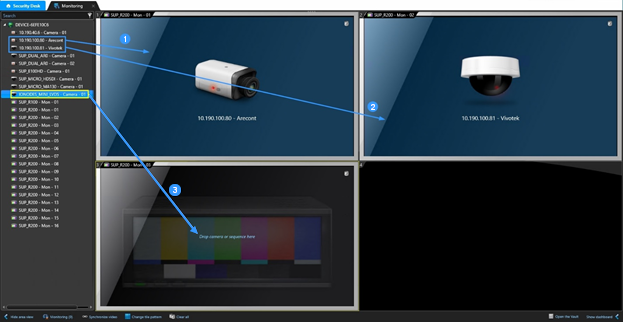
Security Center automatically assigns and configures the corresponding SDS data source when a camera is dropped onto its analog monitor. Repeat for any other monitors.
Confirm that the assigned cameras appear in the Monitoring layout.
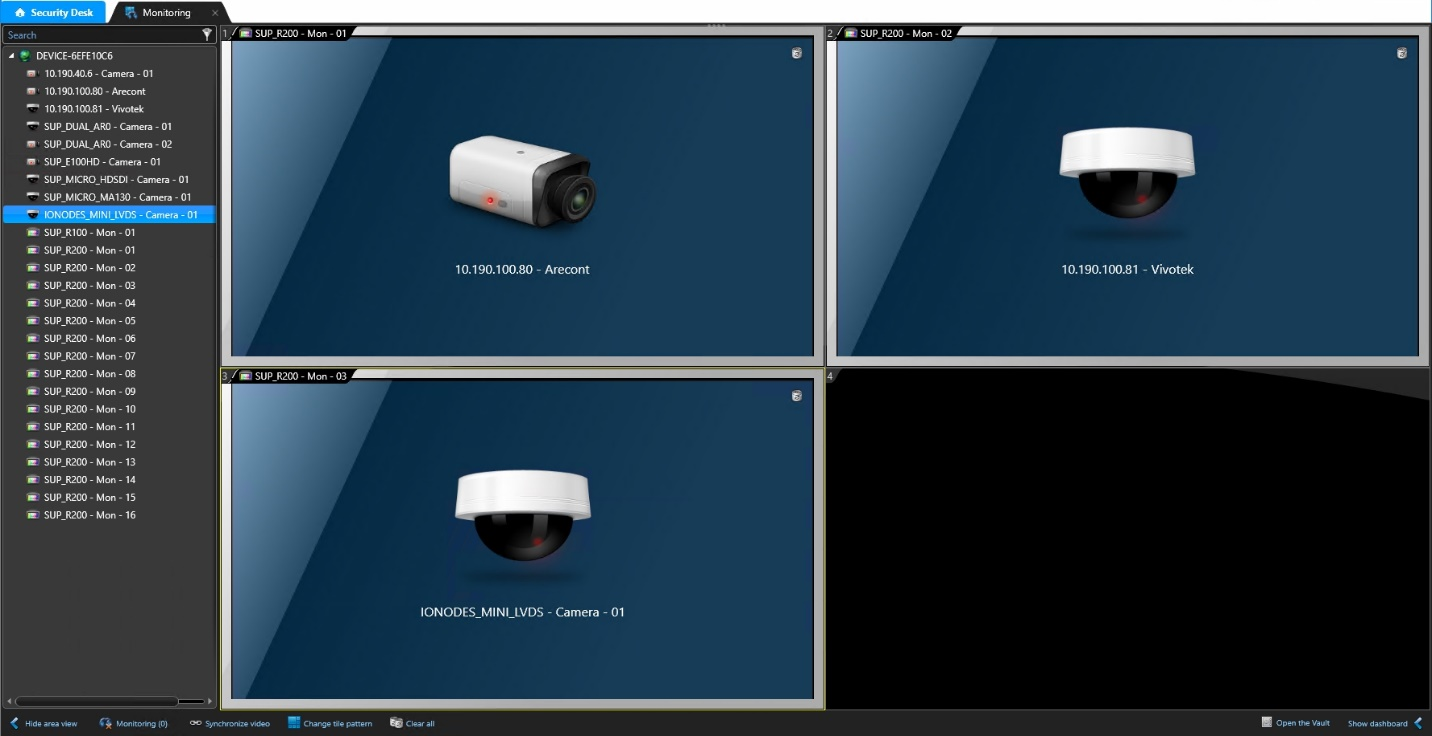
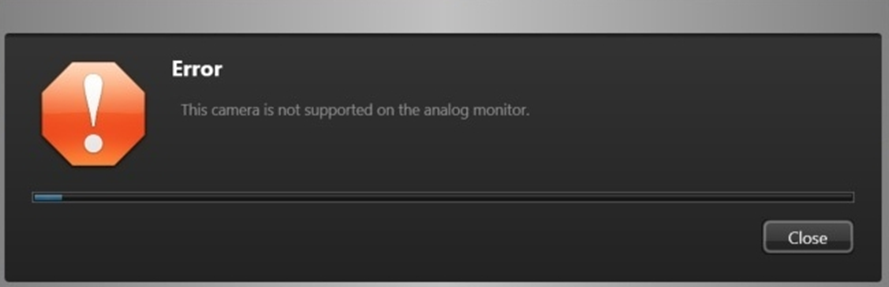
If an encrypted camera stream is assigned, Security Desk can show This camera is not supported on the analog monitor. Review the camera's Genetec encryption settings before retrying.
Stream usage and codec selection
By default, the SDS receives the camera's Live stream usage. H.265 requires the firmware, Security Center, and driver-pack versions listed under Compatibility and integration model.
If H.265 is assigned without the required support, the SDS tile can show Connection Lost or a crossed-out camera icon indicating a disabled data source.
To use H.264 instead, choose one of these approaches:
- Configure the camera's Live stream usage as H.264 in Config Tool.
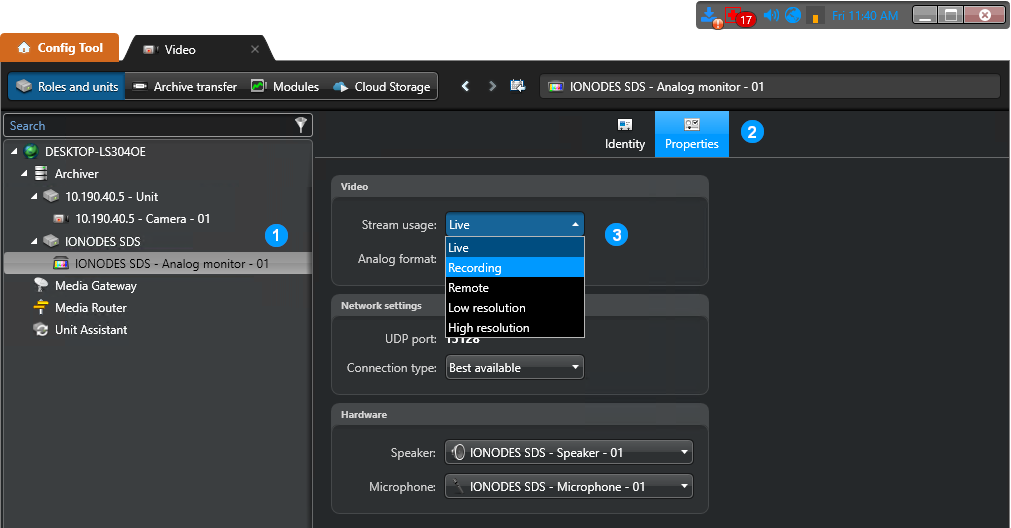
- If Live must remain H.265, configure an alternate stream usage as H.264: Recording, Remote, Low resolution, or High resolution. Then select that usage for the SDS analog monitor.
To select an alternate stream usage:
- In Config Tool, select the SDS analog monitor corresponding to the target data source.
- Open Properties.
- Under Video, set Stream usage to the camera usage configured for H.264.
Event-to-action camera assignment
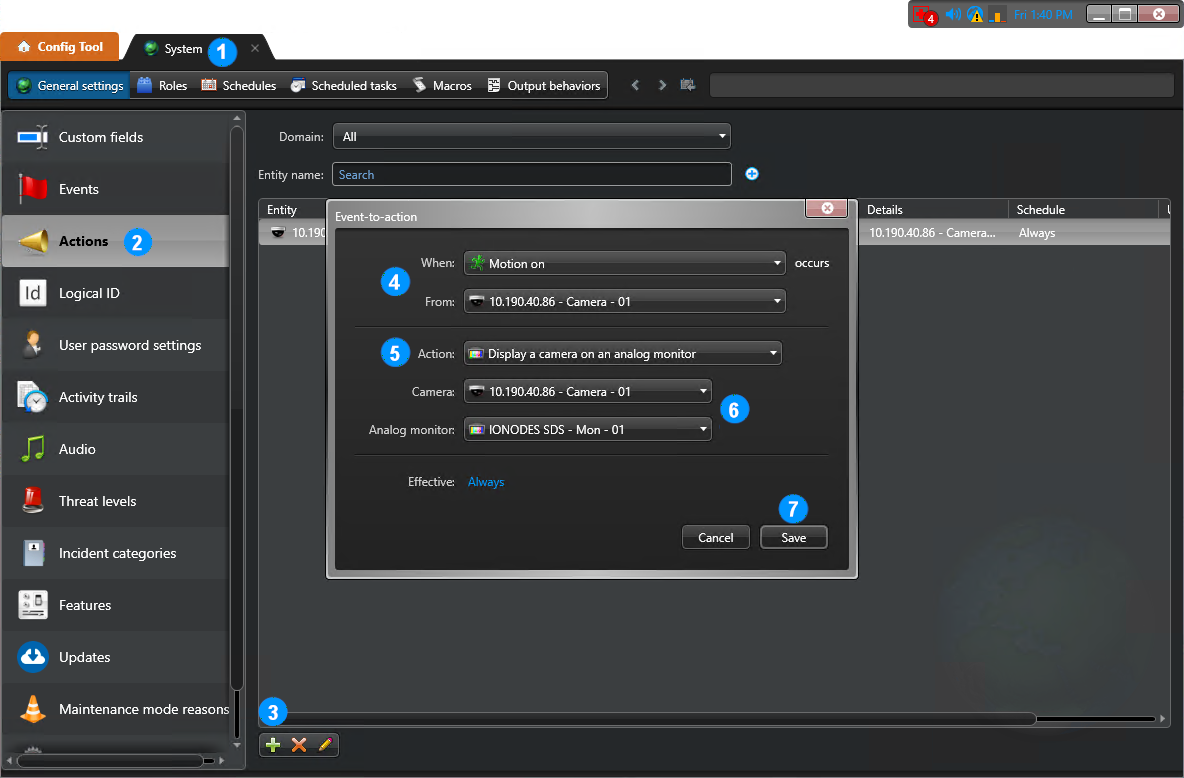
Security Center can assign cameras to SDS data sources automatically. For example, a motion-detection event can display the detecting camera on a selected SDS analog monitor.
- In Config Tool, open Tasks > System.
- Open General settings > Actions.
- Click + to add an event-to-action rule.
- Select the event type and event source.
- Set Action to Display a camera on an analog monitor.
- Select the Camera and target Analog monitor.
- Click Save.
The same codec and video-encryption requirements apply to event-driven assignments as to manual assignments.
Deployment validation
Validate one SDS from preparation through enrollment and camera assignment before repeating the configuration on other stations.
- Confirm that Security Center discovers the configured number of analog monitors and consumes one device license for the SDS.
- Assign a compatible camera stream to an analog monitor in Security Desk.
- In the SDS web interface, open Configuration > Video Outputs and verify that the camera appears in the expected tile of the configured view.
- Check the physical display connected to the SDS. Its camera assignments and tile layout should match the configured view.
- Change a camera assignment manually and verify that the corresponding SDS tile updates.
- If event-to-action rules are configured, trigger the selected event and confirm that its camera appears on the target monitor.
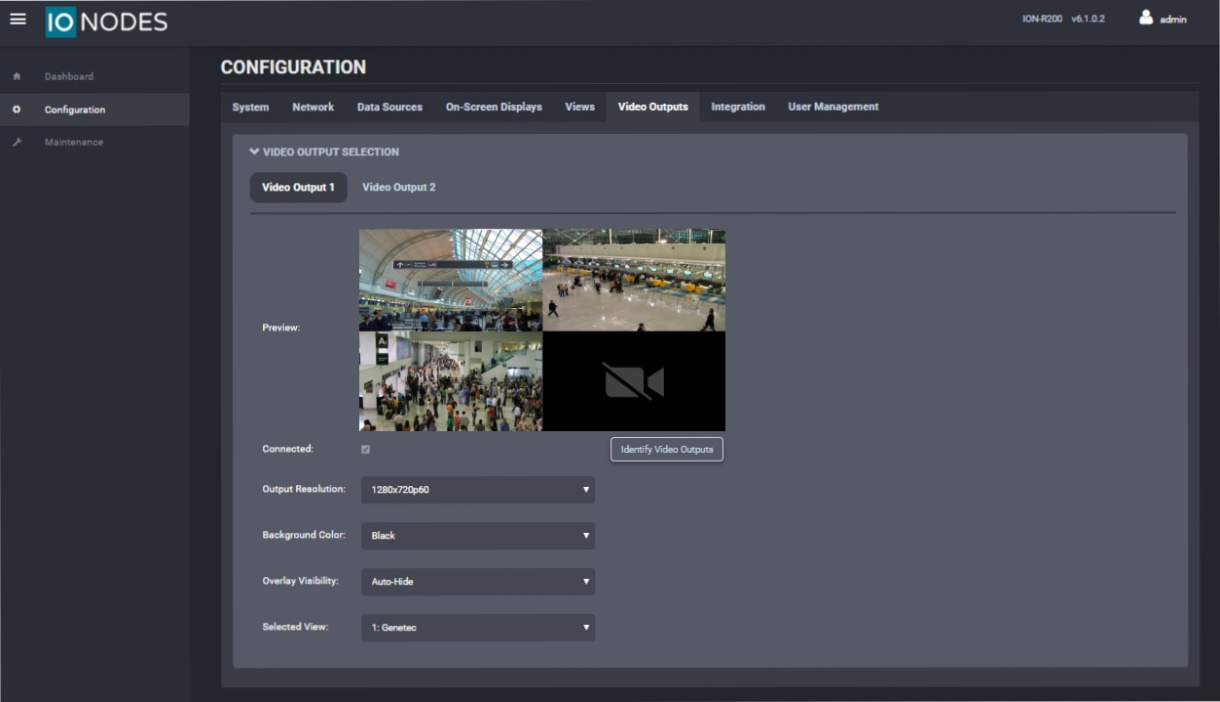
If a tile fails to display video, check the reported-output mapping, the view's data-source assignment, the camera's encryption setting, the selected stream usage, and codec/version compatibility.