Page non traduite
Cette page n'est pas encore disponible en français. Le contenu est affiché en anglais.
Milestone XProtect integration
This guide describes how to install and configure the IONODES Secure Display Station (SDS) plug-in for Milestone XProtect, add SDS devices, send live camera views to their displays, and validate the output.
The plug-in adds controls to XProtect Management Client and XProtect Smart Client.
Note
This guide uses Imaging Server, the recommended approach for new installations. Open Network Bridge is a legacy alternative and is not covered here; contact IONODES Support if that deployment method is required.
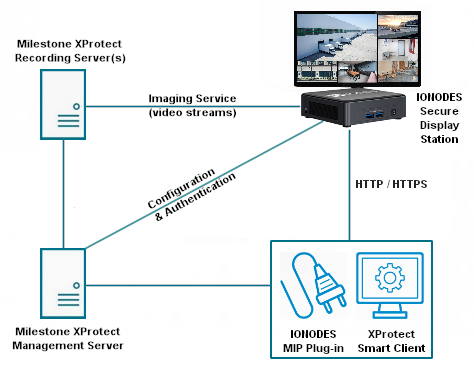
The SDS receives video from the XProtect Recording Server's Imaging Service. The Management Server supplies configuration and authentication, while the plug-in communicates with the SDS over HTTP or HTTPS to configure its display.
Note
This guide is based on the source plug-in manual, document version 1.4. Some screenshots show older versions than the deployment requirements below; use the required versions for installation. Interface labels can vary with the installed XProtect and SDS versions. Refer to User Manuals for device-specific setup and operating instructions.
Requirements
| Feature | Requirements |
|---|---|
| SDS plug-in integration | XProtect 2021 R2 or later, an IONODES SDS plug-in installation, and a supported XProtect edition: Express+, Professional+, Expert, or Corporate. |
| Imaging Server on a host separate from Management Server; non-default live stream selection | Plug-in 1.0.2.3 or newer and SDS firmware 6.8.4.5 or newer. |
| Streaming Media encryption | Plug-in 1.0.2.5 or newer and SDS firmware 15.3.0.6 or newer. |
Use an SDS account with the Power user role or higher for plug-in access. Certificate management requires an Administrator account.
Imaging Server access uses a separate XProtect Basic User whose role permits XProtect Smart Client logon and Cameras View Live for the cameras that the SDS must display.
Avertissement
The privacy-mask workaround described under Troubleshooting allows the SDS to receive a stream without its privacy mask. Do not use that workaround where an unmasked display would violate privacy requirements.
Install and configure the plug-in
Install the plug-in
- Close all XProtect client applications, including Smart Client and Management Client.
- Stop all XProtect server components and services.
- Run the IONODES SDS plug-in installer on the XProtect Management Server and on each computer that will use Smart Client or Management Client to configure or control the SDS integration.
- Use the plug-in directory required by the Milestone installation, normally
C:\Program Files\Milestone\MIPPlugins. Adjust the path if Milestone is installed elsewhere. - Restart the XProtect server components and services.
Configure Imaging Server defaults
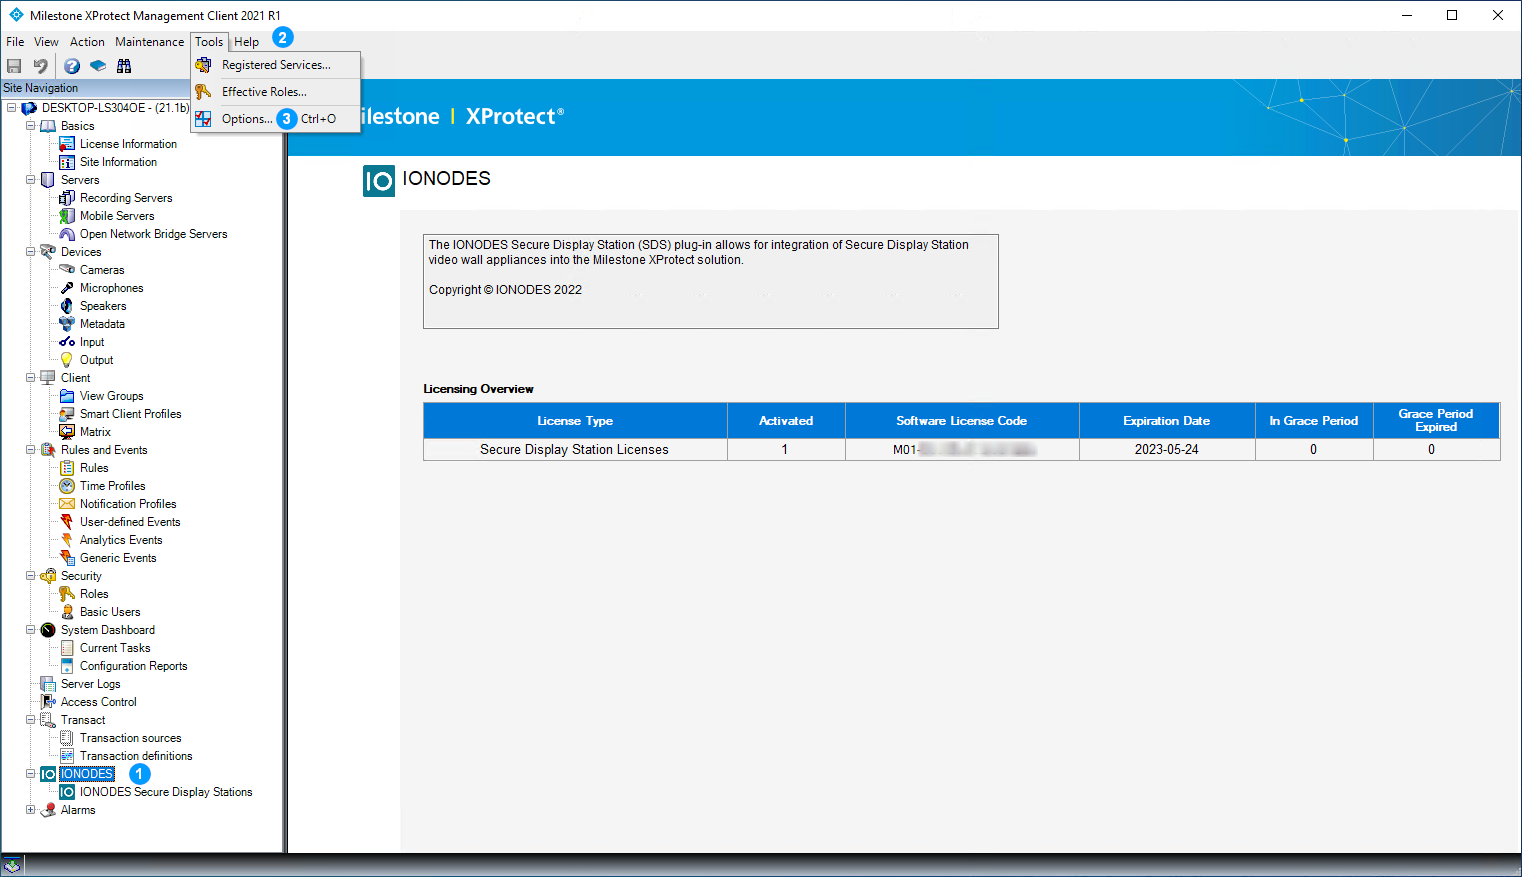
- Open XProtect Management Client and confirm that IONODES appears in Site Navigation.
- Open Tools.
-
Select Options.
-
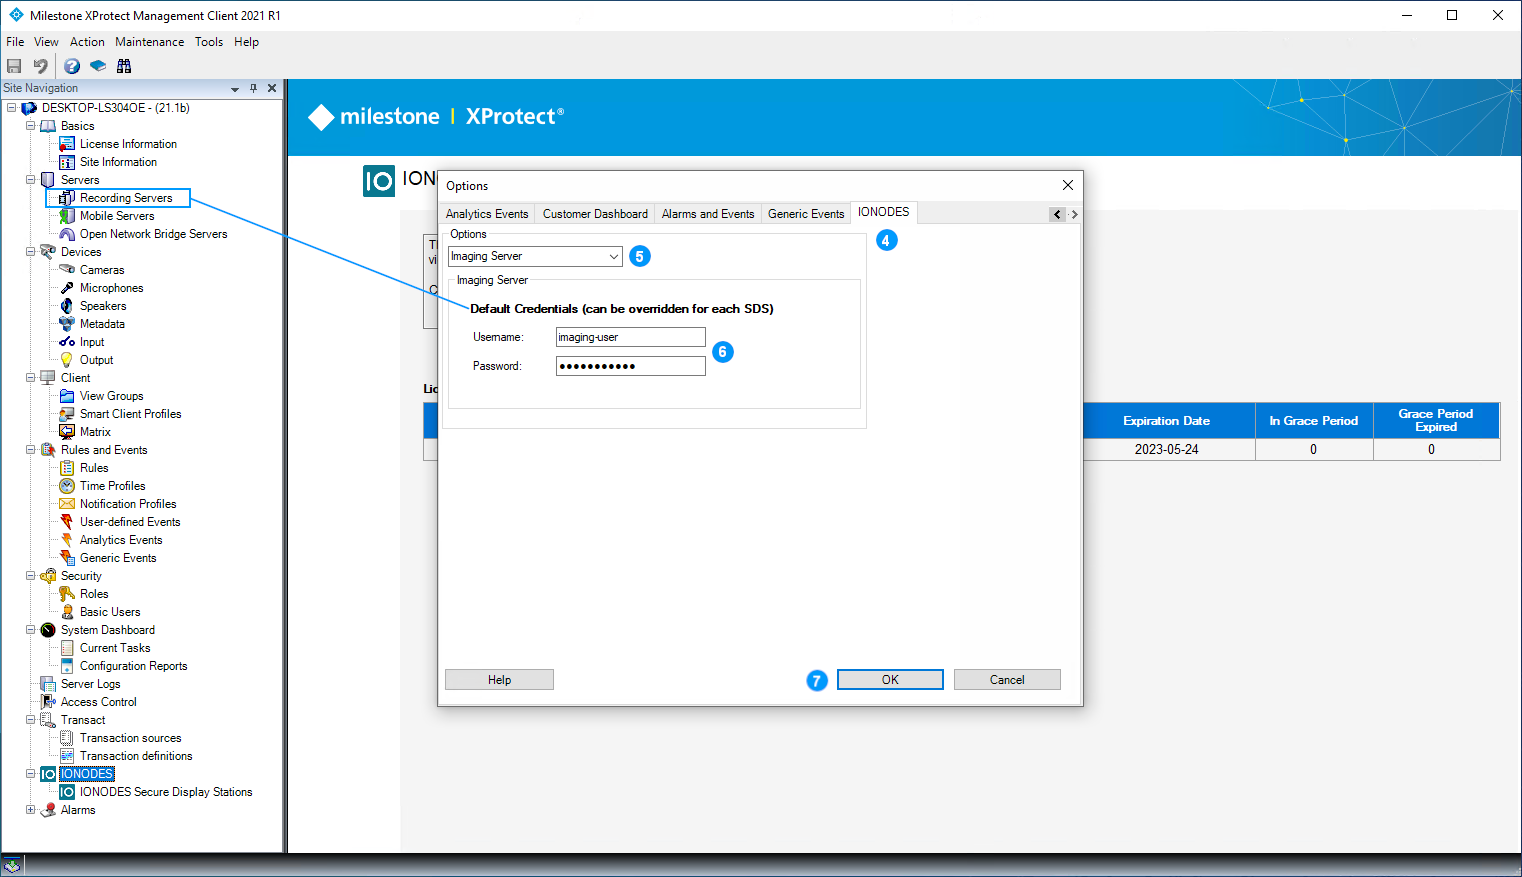
Select the IONODES tab.
- Select Imaging Server.
- Enter the default credentials for the XProtect Basic User with the required logon and live-camera permissions.
-
Click OK.
Add an SDS to XProtect
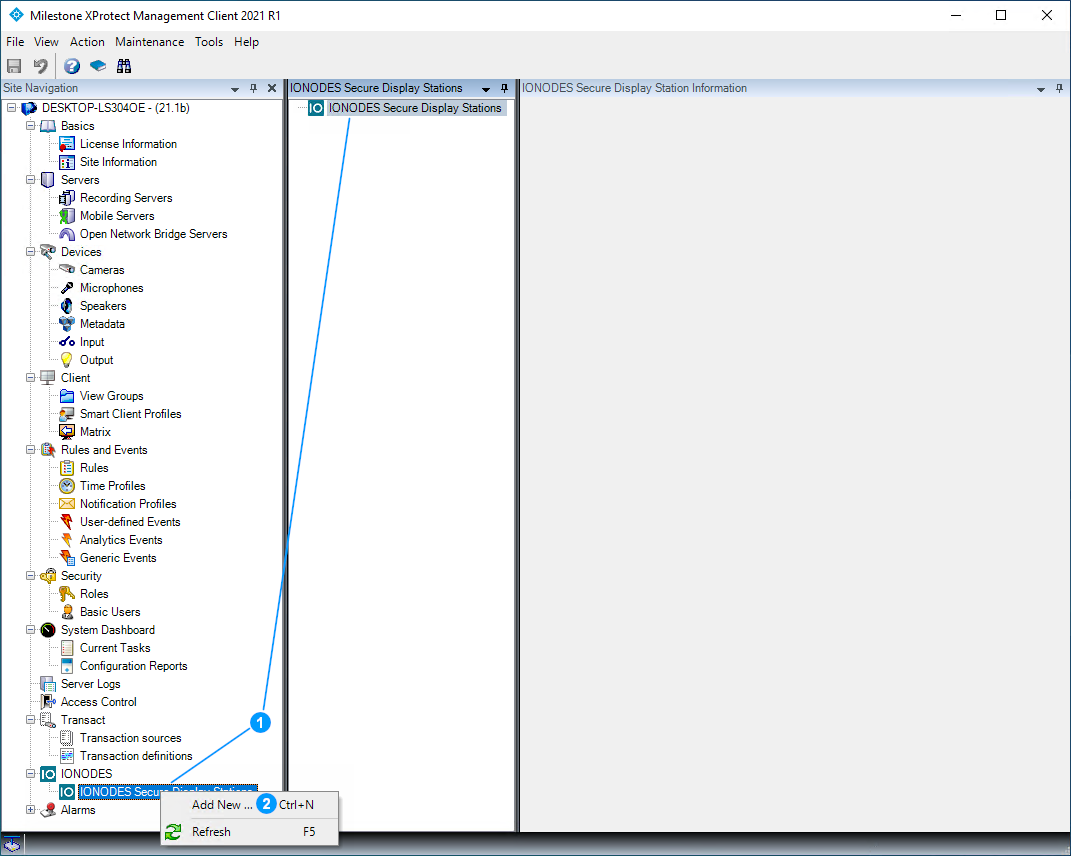
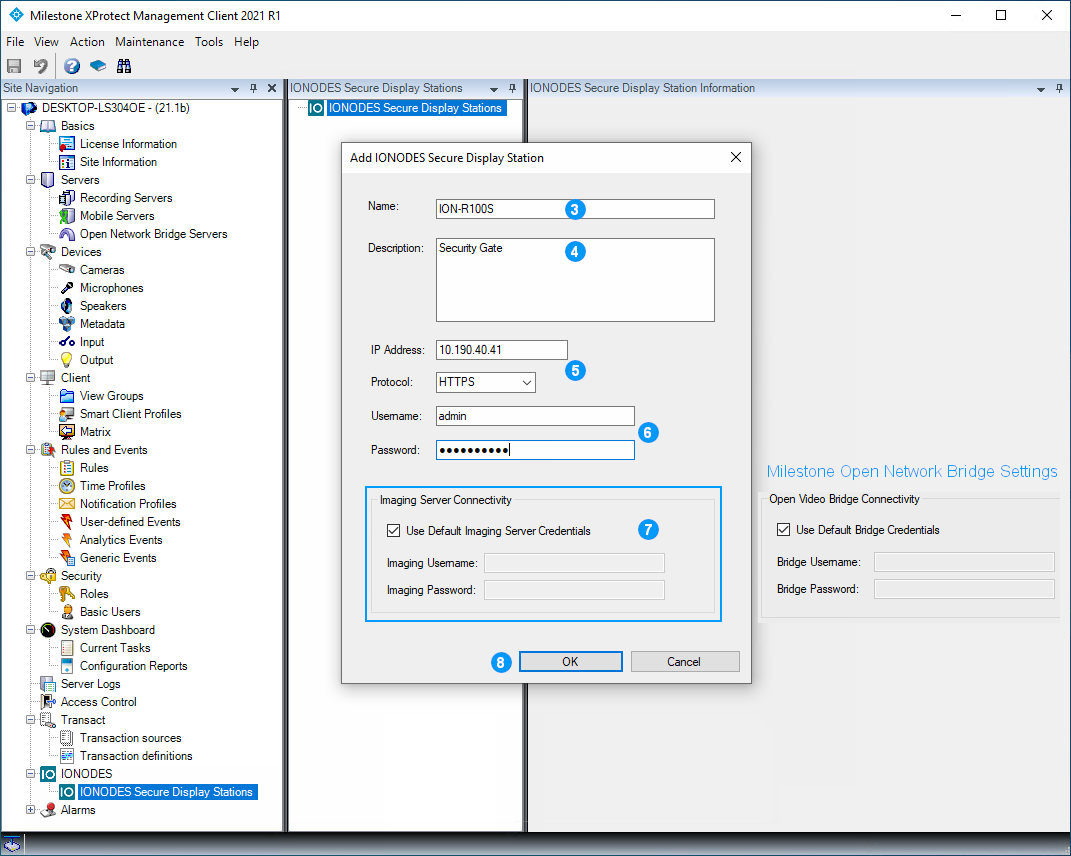
- In Management Client, expand IONODES in Site Navigation and right-click IONODES Secure Display Stations in the left or center pane.
-
Select Add New.
-
Enter the name that will identify the SDS in Smart Client.
- Enter an optional description.
- Enter the SDS IP Address and select HTTP or HTTPS for plug-in-to-SDS communication. HTTPS is recommended.
- Enter the SDS username and password, using an account with Power user permissions or higher.
- Under Imaging Server Connectivity, select Use Default Imaging Server Credentials, or configure separate Imaging Server settings and credentials for this SDS.
-
Click OK.
-
Confirm that the device information and connection status appear, then click the Save toolbar icon.
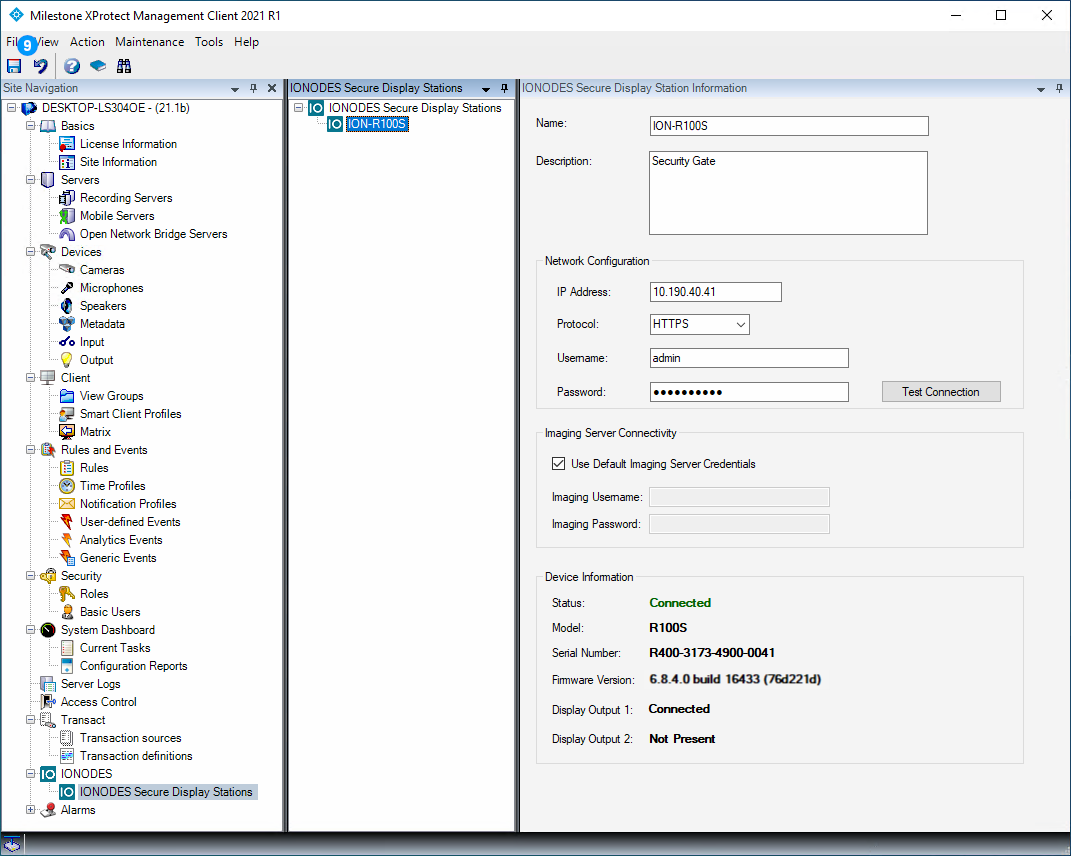
Deployments can use multiple Imaging Servers and different credentials for individual SDS devices, including accounts restricted to specific cameras. The SDS login credentials and Imaging Server credentials serve different connections and are not interchangeable.
Configure and send live views
Configure and copy the Smart Client view
Only live camera streams can be sent to the SDS through the plug-in. Static images, web content, analytics, and other source types are not supported by this workflow.
If the view needs non-default streams, make the selections described under Select a non-default live stream before copying the view to the SDS.
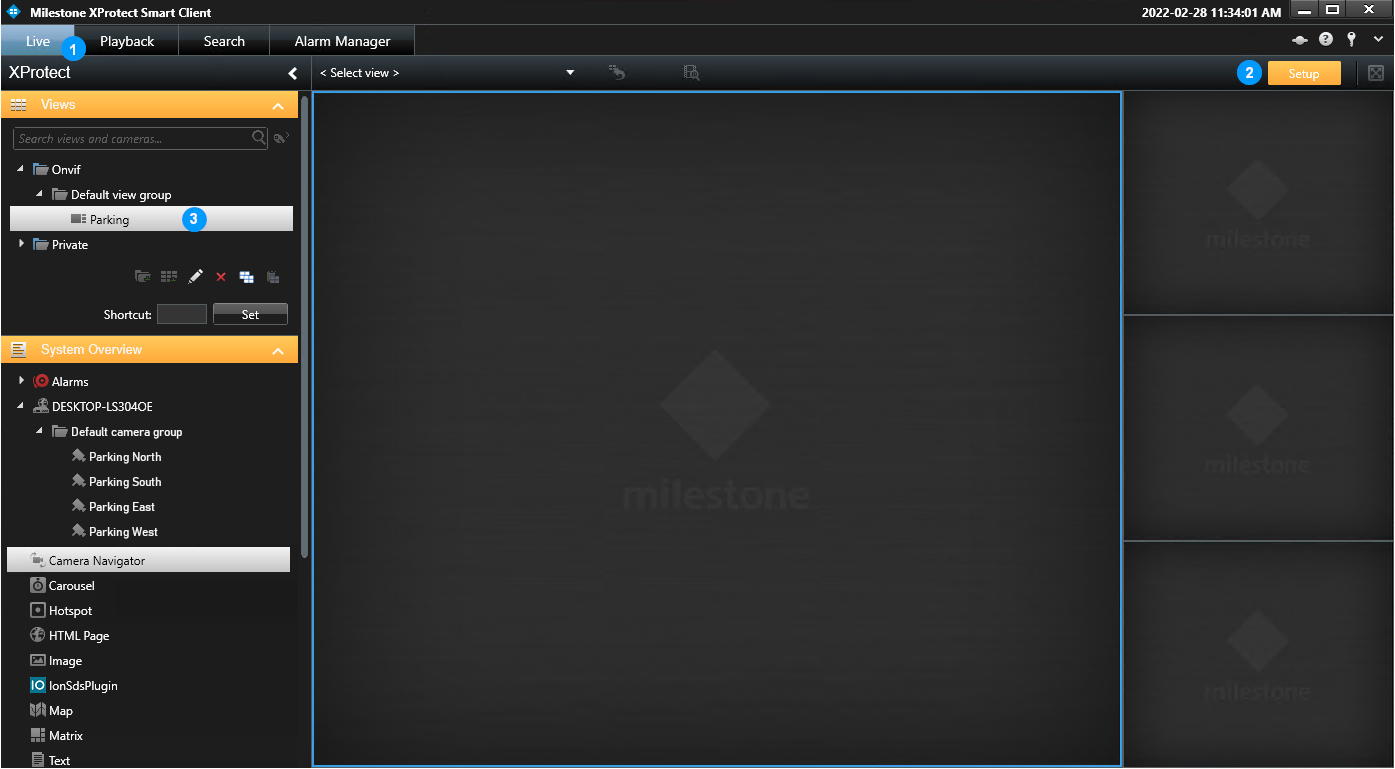
- In XProtect Smart Client, open Live.
- Turn Setup on.
-
Select or create a view with the desired layout.
-
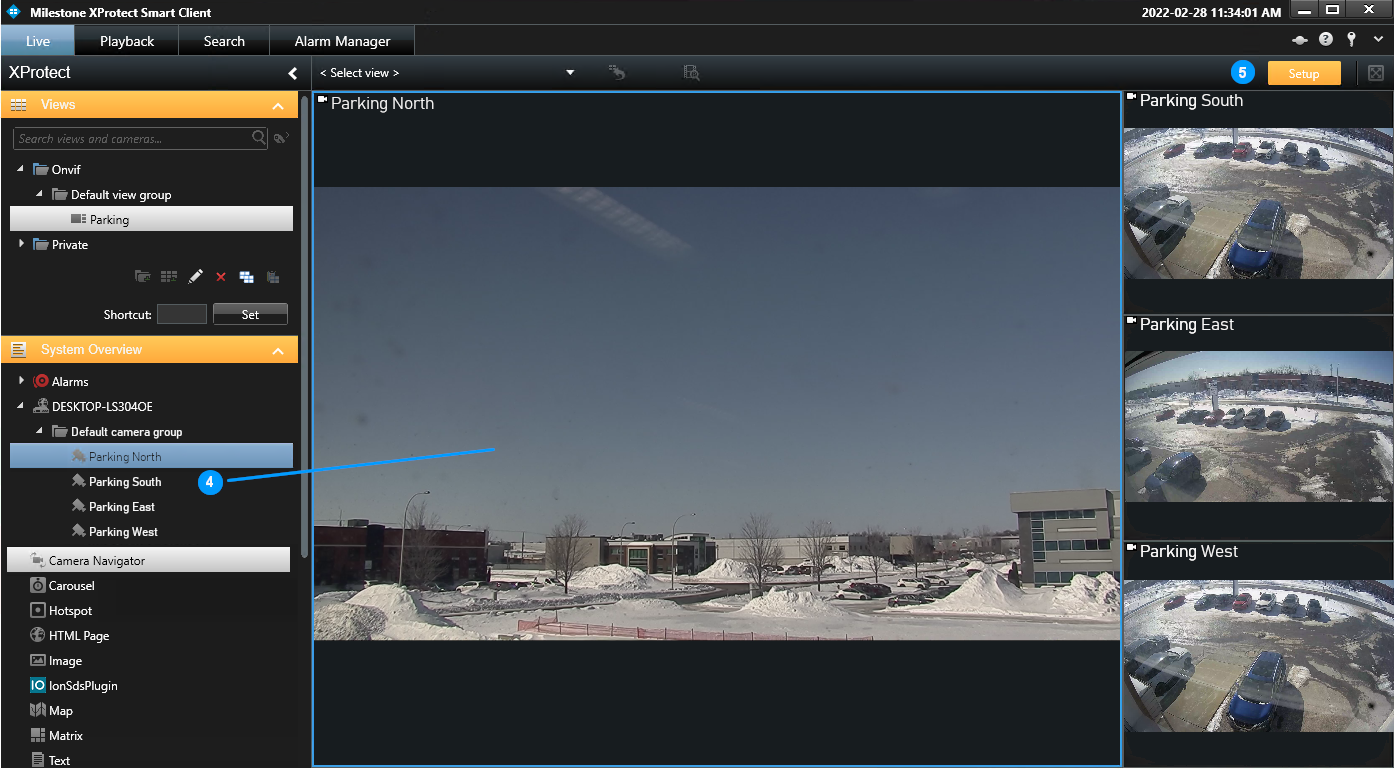
Drag cameras into the view's tiles.
-
Turn Setup off when the layout and camera assignments are complete.
-
Under MIP Plug-ins > IONODES Secure Display Stations, select the target SDS display output.
-
Click Copy view to SDS.
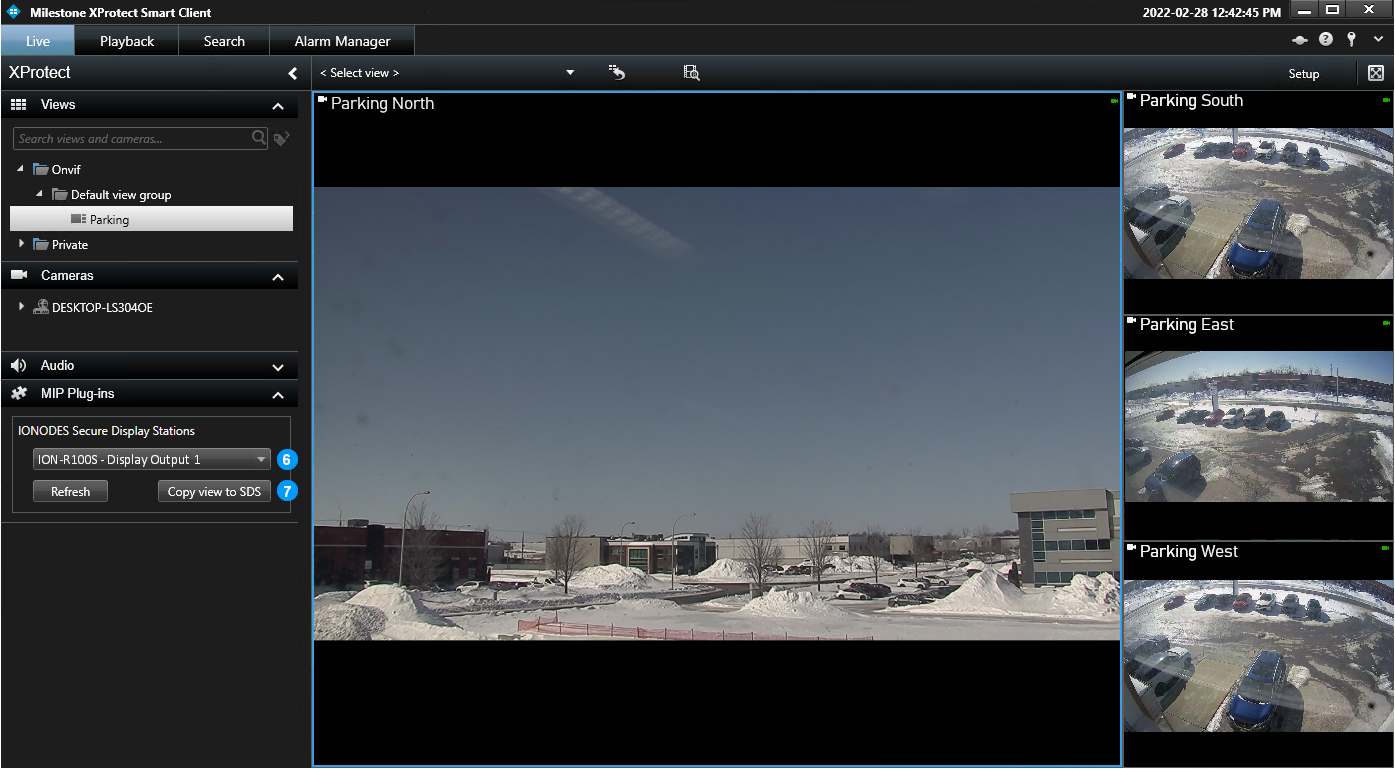
Note
The plug-in supports a maximum of 16 tiles per view. Sending a view with more than 16 tiles returns an error.
Select a non-default live stream
If required, configure secondary streams for the cameras in Management Client. Lower-resolution or lower-bitrate streams can reduce network, server, and SDS decoding load.
In Smart Client:
- Turn Setup on and select a camera tile.
- Scroll down the left pane to Properties.
- Choose the required stream from the Live stream drop-down menu.
- Turn Setup off and use Copy view to SDS to send the updated selection.
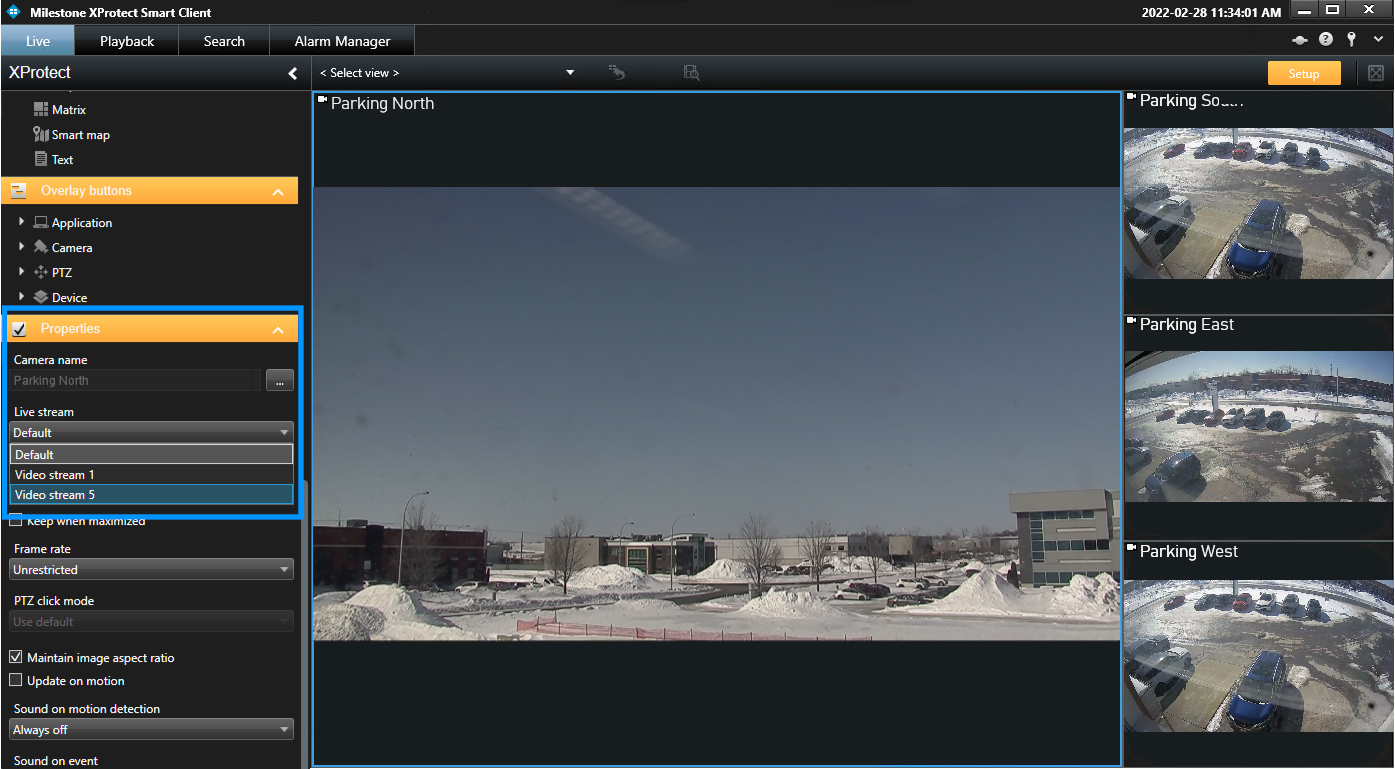
If a requested stream does not start, see Live streams that do not start.
Validate the display output
In the SDS web interface, open Configuration > Video Outputs and check the output preview.
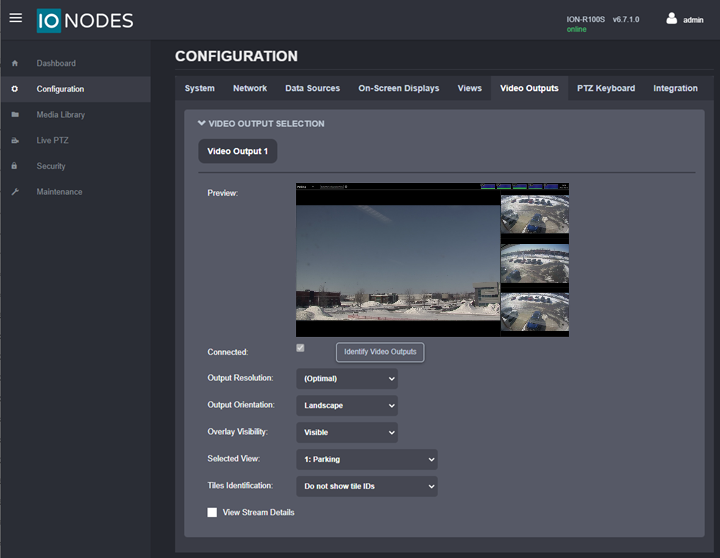
Verify that the connected display shows the same camera assignments and layout.
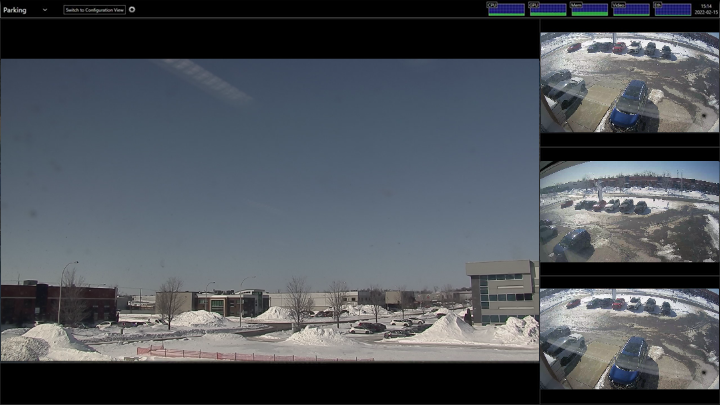
To change the displayed view, configure the new view in Smart Client and use Copy view to SDS again.
Streaming Media encryption
With the required plug-in and firmware versions, the SDS detects Streaming Media encryption configured in Milestone Server Configurator and connects to Imaging Server using SSL. It validates the server's certificate chain against its trusted certificate store.
This encrypts Imaging Server video streams and is separate from the HTTPS option used for plug-in-to-SDS communication.
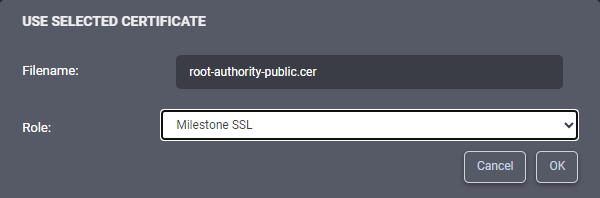
If the server's signing root certification authority (CA) is not already trusted by the SDS, import the root CA certificate:
- Sign in to the SDS web interface with an Administrator account.
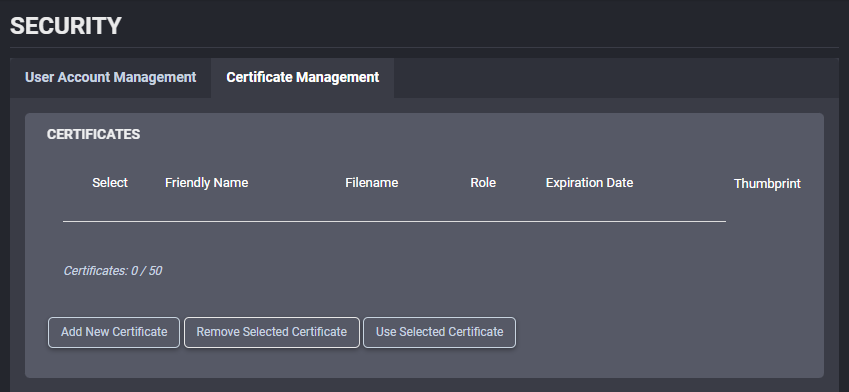
- Open Security > Certificate Management.
-
Click Add New Certificate and select the root CA certificate file that signed the Imaging Server certificate.
-
Set Role to Milestone SSL and click OK.
Repeat for any additional root CA certificates required by the deployment. If encryption is enabled or disabled after a view was sent to the SDS, send the view again so the SDS detects the changed settings.
Licensing
Installing the plug-in activates a demo license for 10 SDS devices, without feature limitations. It is valid for 30 days, followed by a 30-day grace period.
For production licensing:
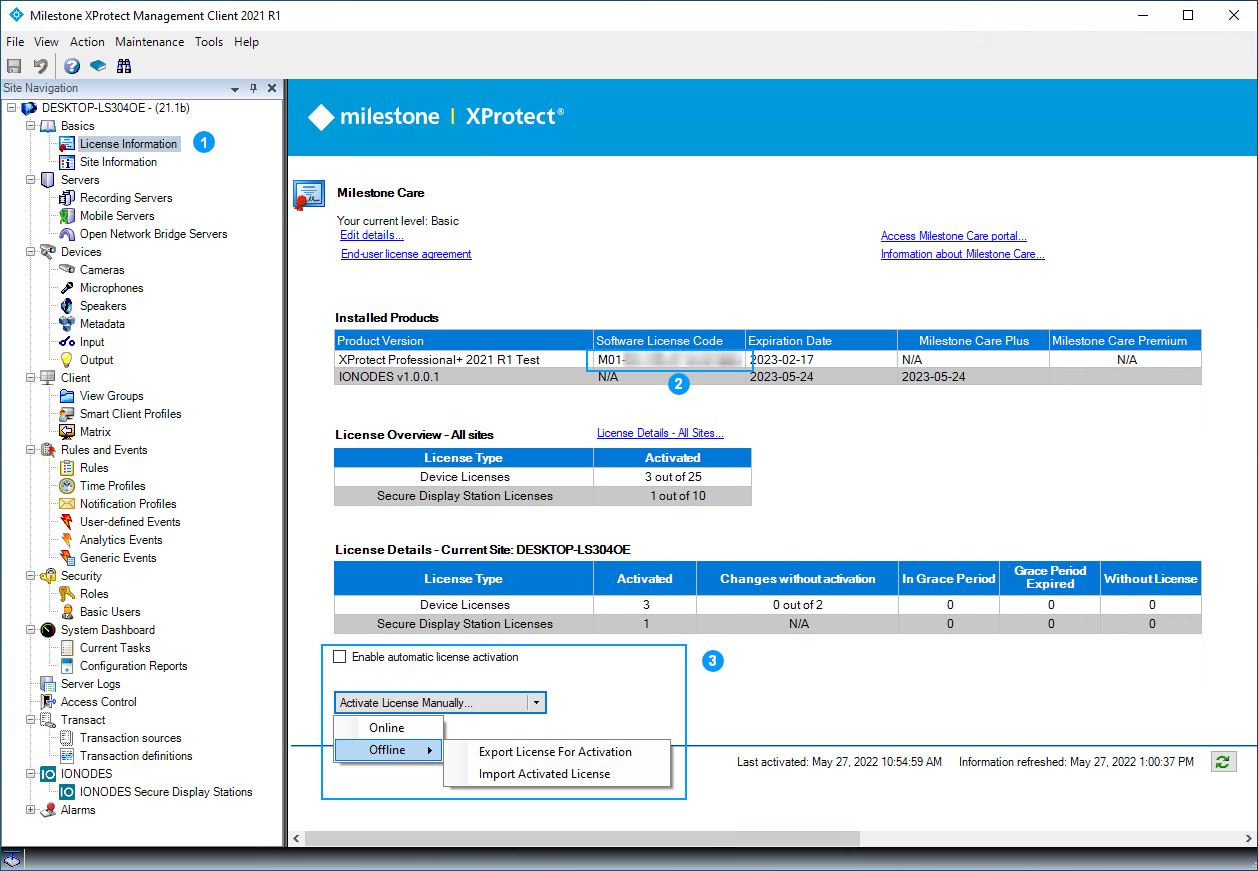
- In Management Client, open Basics > License Information.
- Record the system's Software License Code and provide it when purchasing an IONODES plug-in license from IONODES Sales or an authorized reseller.
- After purchase, activate the assigned licenses through the Milestone licensing workflow. Automatic, manual online, and manual offline activation are supported.
Refer to the Milestone Customer Dashboard instructions in the Milestone documentation for activation details.
Troubleshooting
Connection Lost on a video tile
Enable Video Output Stream Details in the SDS web interface to display the diagnostic overlay.
A continuous Connecting... message with a URI beginning milestone:// indicates a problem with Imaging Server connection settings, credentials, or permissions. Check the server configuration and the XProtect Basic User's access.

If Streaming Media encryption settings changed after the view was last sent to the SDS, use Copy view to SDS again.
Missing streaming media certificate
Missing Milestone streaming media certificate indicates that the SDS does not trust the Recording Server's certificate. Import the signing root CA certificate with the Milestone SSL role as described under Streaming Media encryption.

Live streams that do not start
Connection failed can mean that the Recording Server lost its connection to the camera, or that the selected live stream has not started.
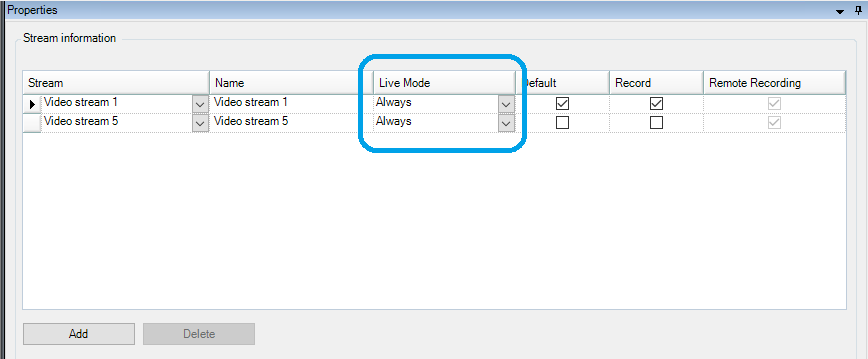
On some XProtect versions and patch levels, an SDS request does not trigger a live stream configured to start When needed, particularly for non-default streams. In Management Client, set that stream's Live Mode to Always if required, then send the view to the SDS again.
Cannot add an SDS
Verify the SDS network connection, IP address, and plug-in login credentials. The SDS account must have Power user permissions or higher.
Privacy-masked streams
The source manual notes that RecorderConfig.xml can be configured to permit streams from cameras with privacy masking. Such streams appear on the SDS without the mask applied. Do not treat the SDS output as privacy-masked or enable this behavior where masking is required.
Apply changed settings
Depending on the change, restart XProtect Management Server and/or Smart Client, and send the view to the SDS again. If the issue persists, contact IONODES Support.