PTZ
The ION-R100S supports three ways to control a PTZ-enabled camera:
- Use a network PTZ keyboard to select tiles, assign cameras, and control movement over the LAN.
- Use Live PTZ in the ION-R100S web interface to control a camera remotely and manage its presets.
- Use the PTZ controls in a displayed video tile when a standard mouse and keyboard are connected directly to the ION-R100S.
PTZ Data Source Requirements
Only ONVIF data sources support PTZ. PTZ is disabled by default, so the camera is not recognized as a PTZ source until Enable PTZ is selected for its data source.
Select Enable PTZ in either of the following locations:
- During the ONVIF discovery wizard, select the Enable PTZ checkbox when choosing the video stream.
- After completing the wizard, select the Enable PTZ checkbox in the data source configuration.
Preset availability is determined by the camera. Presets are saved on the camera, not on the ION-R100S.
PTZ Controls in a Video Tile
PTZ and preset commands can be sent from any video tile that displays a PTZ-enabled data source.
Note
If Enable PTZ is unavailable, the data source or camera does not support PTZ over ONVIF. Only ONVIF Continuous Mode is supported.
To control the camera from its tile:
- Connect a standard mouse and keyboard to the ION-R100S.
- Open a view containing the PTZ-enabled camera.
- In the top-right corner of the camera tile, select the PTZ button. The PTZ control overlay appears.
- Use the overlay to pan, tilt, and zoom the camera, or to call and manage its presets.
Tip
Double-click a camera tile to maximize it when the tile is too small. The video tile itself can also be used to pan and tilt the camera.
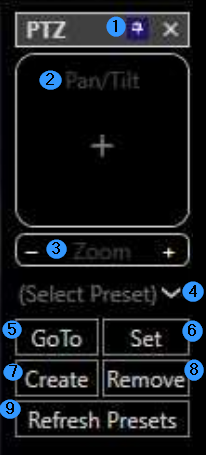
The numbered controls in the overlay are:
- Pin PTZ control: Keeps the PTZ control overlay open. When not pinned, the overlay collapses or hides.
- Pan/Tilt: Click and drag from the center to move the camera. The farther the pointer is from the center, the faster the camera moves. Release the mouse button to stop movement.
- Zoom: Click and drag from the center to zoom the camera. The farther the pointer is from the center, the faster the zoom changes. Release the mouse button to stop zooming.
- Preset selector: Select a camera preset from the drop-down list.
- Go To: Moves the camera to the selected preset.
- Set: Replaces the selected preset with the camera's current position.
- Create: Creates a new preset using the camera's current position.
- Remove: Deletes the selected preset.
- Refresh Presets: Retrieves the current presets from the camera and updates the preset list.