Data Sources
This section focuses on configuring Data Sources, which are connections to external devices, cameras, web pages, and local media used by the ION-R300 display workflows.
The ION-R300 supports up to 48 separate data sources by default. Enable Additional Data Sources in System > Features to increase the limit to 96.
Note
All data source types must be enabled and assigned to a view tile before content is displayed. For view tile assignment steps, refer to Views.
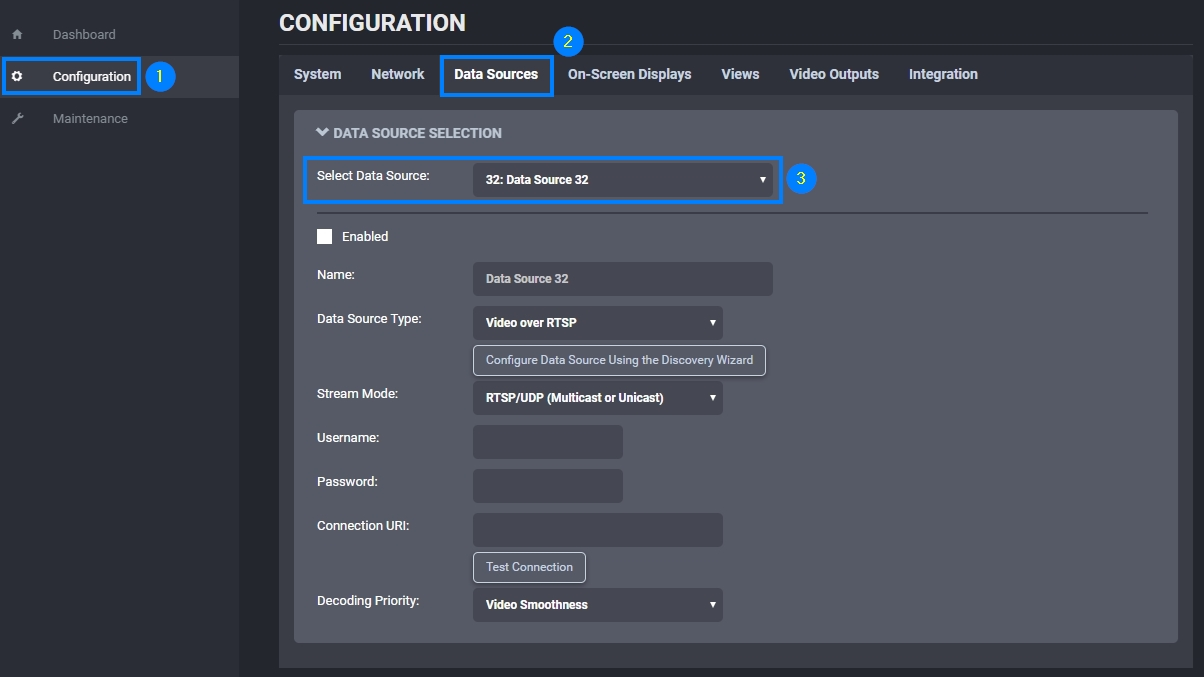
In the Configuration page, select the Data Sources tab, then select the data source to configure from the data source list.
Note
Each streaming video data source creates a single connection. Even if the video is played on two different outputs at the same time, the stream is captured only once.
Video over ONVIF/RTSP
If the video stream connection URI is unknown, set Data Source Type to Video over Onvif/RTSP and click on Configure Data Source Using Discovery Wizard. The discovery wizard populates the data source configuration through the following steps.
Note
Video over ONVIF/RTSP discovery only works with ONVIF-compatible cameras and encoders. Devices that do not support ONVIF may not appear in the discovery list. For non-ONVIF devices, use Video over RTSP and enter the stream URI manually.
Note
Some ONVIF-capable cameras have ONVIF disabled by default. If a camera does not appear in discovery, verify that ONVIF is enabled on the camera and that valid ONVIF credentials are configured. Refer to the camera manufacturer documentation for the exact steps.
The wizard displays a list of all cameras and encoders discovered on the network. If the required camera does not appear in the list, verify that the camera is connected to the network and press Refresh.
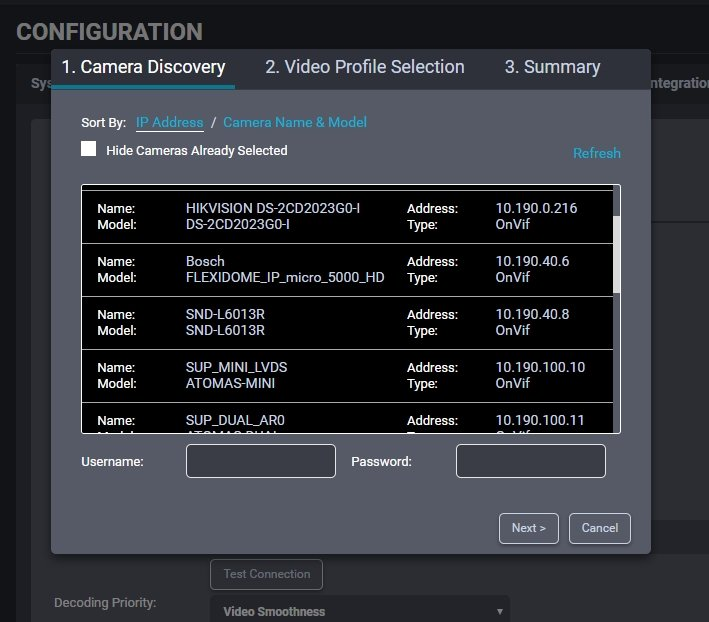
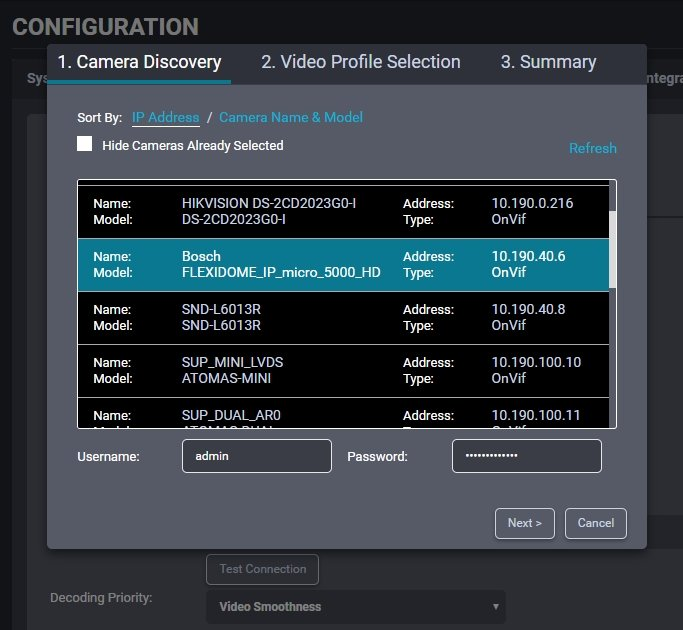
Select the required camera from the list. Then, enter the Username and Password of Onvif credentials required to connect to the camera. Press the Next button.
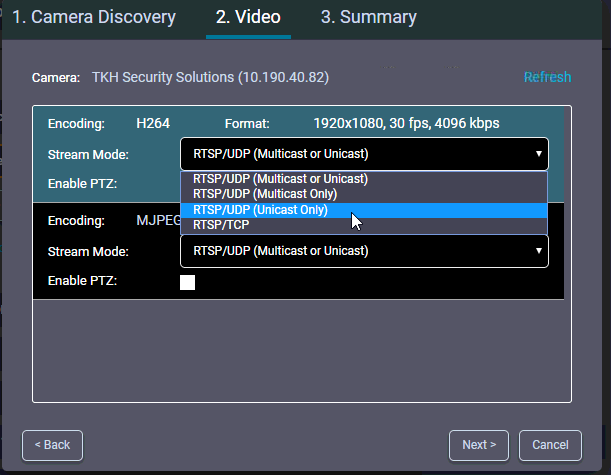
In this step, the wizard displays a list of all video streams available from the camera that are supported by the ION-R300. Click on the desired video stream. The Stream Mode field shows a list of network connection types supported by the camera. Select the desired streaming mode and press Next. Select Enable PTZ to make PTZ controls available when viewing video from the camera.
Note
If the username or password entered in the previous step is incorrect, the wizard displays a warning indicating that it can’t retrieve video profiles. In this case, press Back and enter the correct credentials.
Note
The Enable PTZ option does not appear if the camera does not support PTZ over ONVIF.
The wizard displays the details of the selected video stream. Verify that the correct stream is selected, then click on Done. The wizard then closes, and the data source configuration is automatically populated.
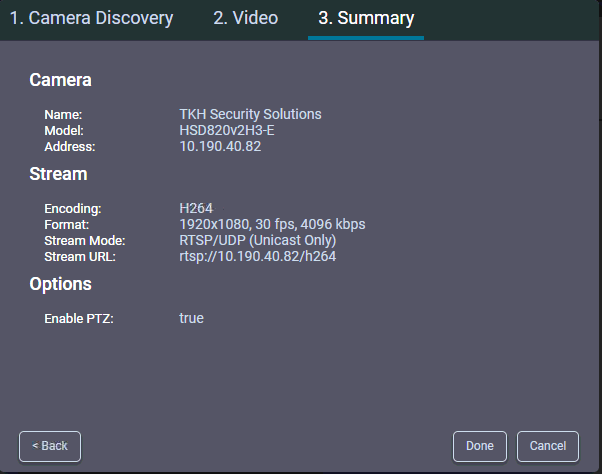
To finalize the data source configuration, type in a name (optional) for the data source and press Save at the bottom to save the new configuration.
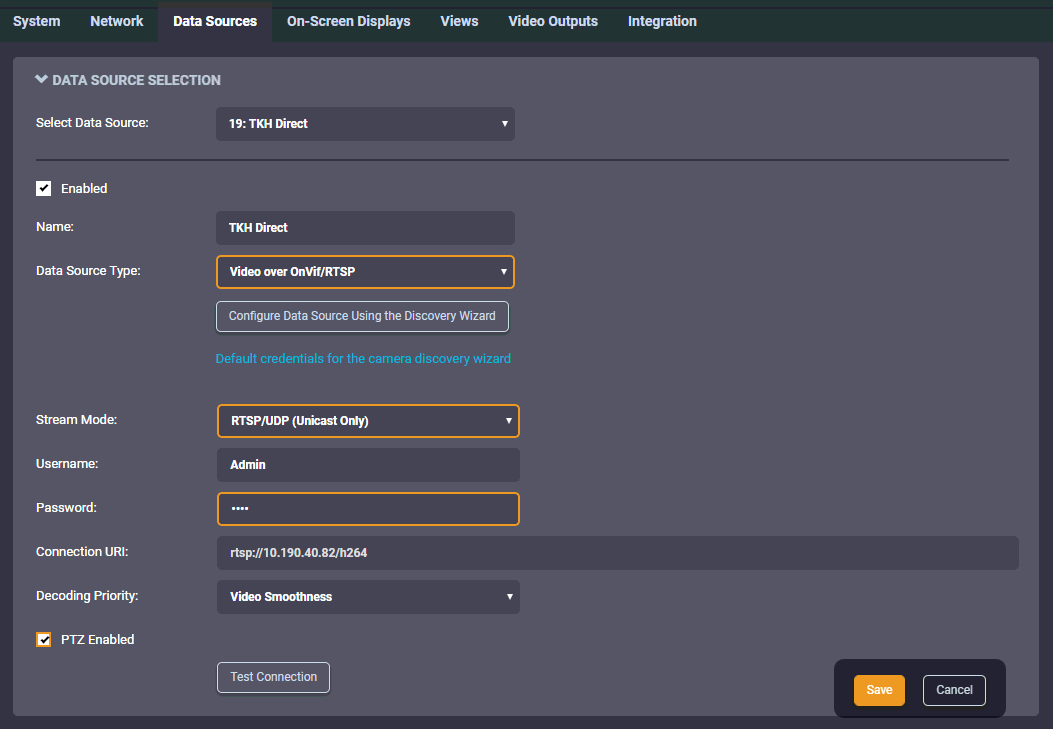
Video over RTSP
To configure an RTSP video connection, set Data Source Type to Video over RTSP.
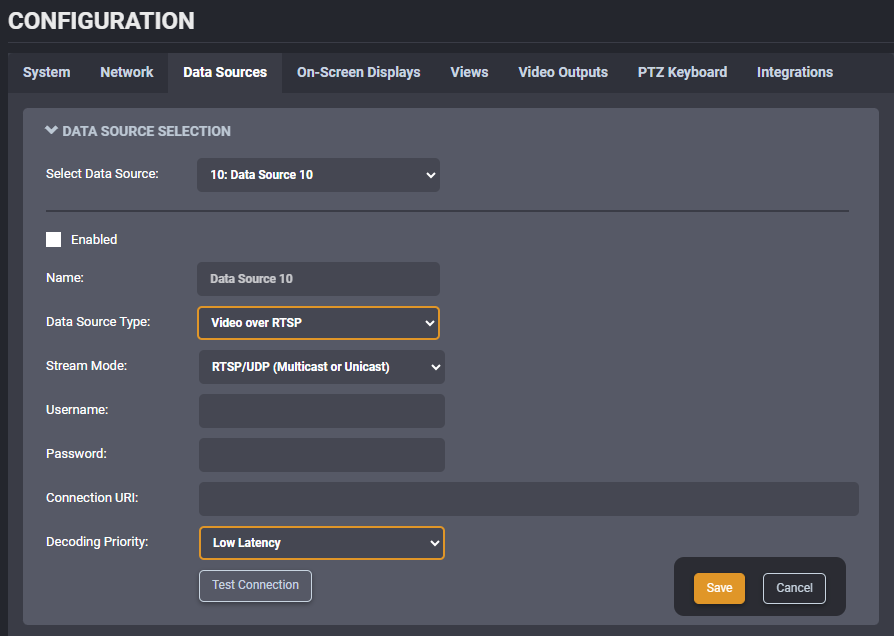
To connect to a video stream, the ION-R300 needs the Connection URI and Stream Mode, as well as any Username and Password required by the camera or encoder. This data source type is recommended when the exact video stream connection URI is known.
Note
RTSP connection URIs are specific to each camera model and manufacturer and can be found in the camera manufacturer documentation.
Video over HTTP
To configure an MJPEG over HTTP video connection, set Data Source Type to Video over HTTP. There is no standardized method to query the list of available HTTP video streams in a camera and thus the discovery wizard cannot be used to configure the data source. Enter the Connection URI as well as any Username and Password required by the camera. If the Connection URI is unknown, consult the camera documentation or contact the camera manufacturer.
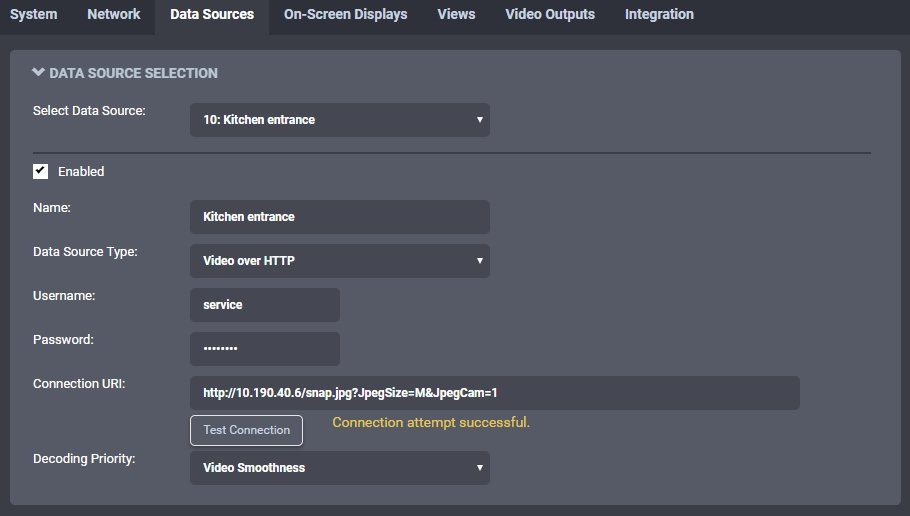
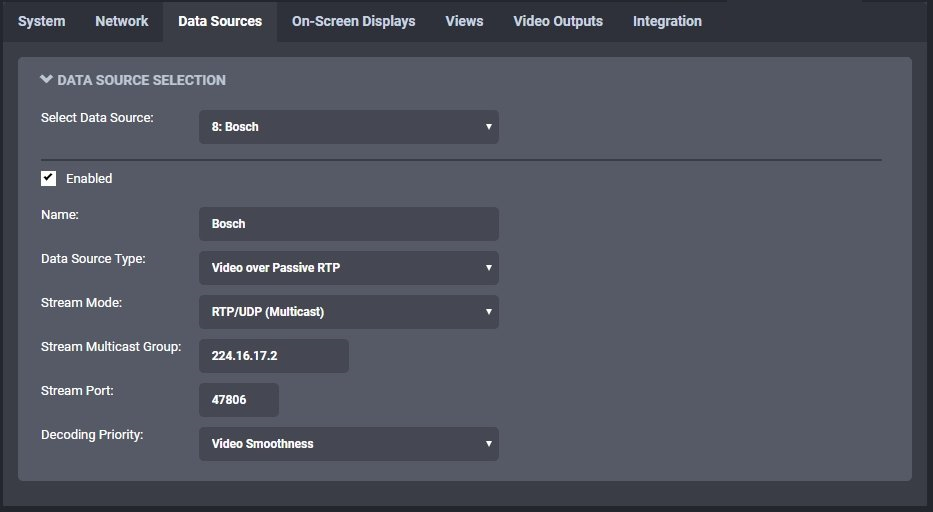
Video over Passive RTP
Some video systems transmit video over passive connections. In this mode, the camera just sends the video to a fixed IP address or multicast group address without knowing if there is somebody to receive the video.
To configure a passive video connection, set Data Source Type to Video over Passive RTP, and then set the Stream Mode and Stream Port to match the passive video stream. If the passive video is sent to a multicast group, also enter the Stream Multicast Group. If the passive video is sent using SSM (Source-Specific Multicast), enter the Stream Multicast Group and Stream Source.
Testing a Connection
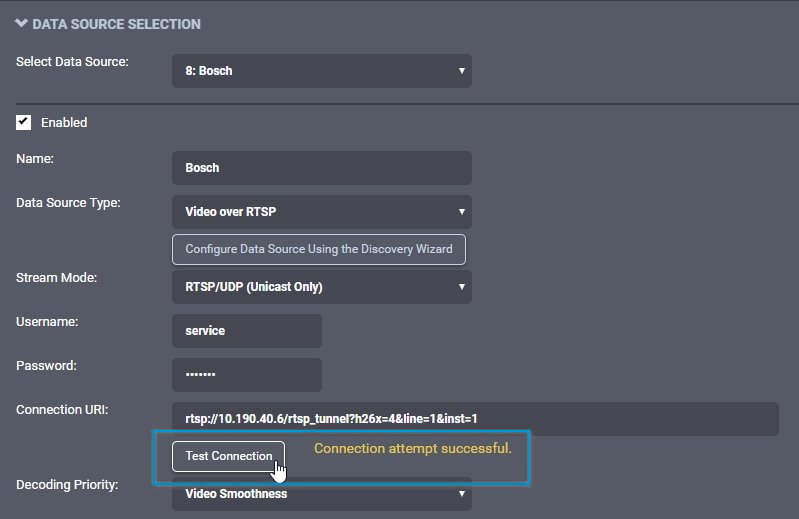
Once the data source is fully configured and saved, press the Test Connection button to test the connection.
Possible results are:
-
Connection attempt successful. No error was reported while testing the connection.
-
Connection attempt timed out. Tried to connect to the camera but got no answer. The camera may be temporarily offline, else it is unreachable.
-
Connection attempt refused by remote. The connection to the camera was established, but the camera refused the username/password provided.
-
Connection established, but unable to start video stream. The connection to the camera was established, but the video stream could not be started. The connection URI may not point to a valid video stream in the camera. This can also occur if the camera has reached a connection or streaming limit due to other third-party connections.
-
Invalid connection URI or internal error, connection attempt impossible. The connection URI is malformed or incomplete.
Note
Connection testing is only available for Video over RTSP and Video over HTTP data sources.
Web Connections
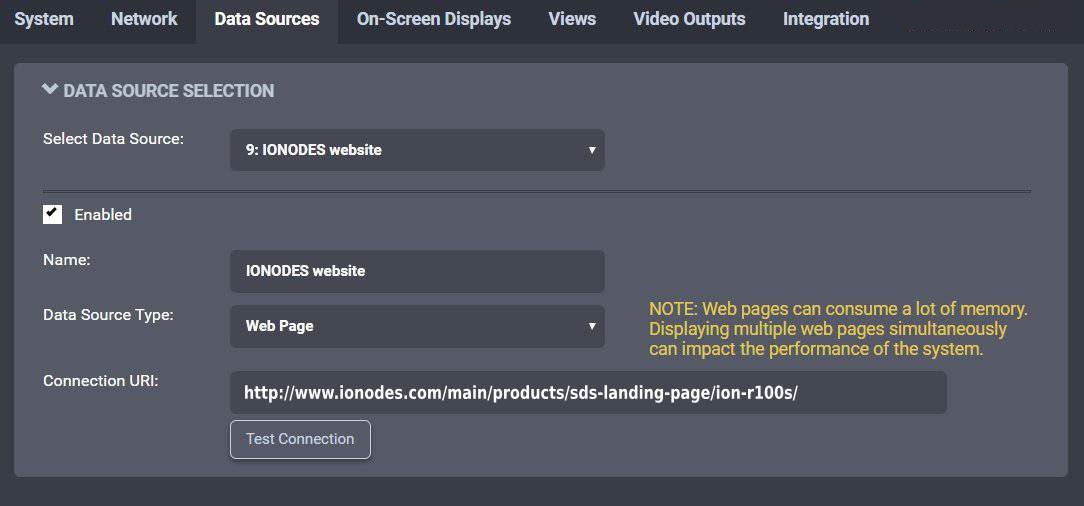
To configure a web connection, set Data Source Type to Web Page.
Type in the address of the web page in Connection URL. Type in a name (optional) for the data source, check Enabled to enable this data source and press Save at the bottom to save the new configuration.
Note
A connection to the web endpoint is established only when the data source is enabled and assigned to a view tile.
Warning
Modern web pages often include highly dynamic media content. Displaying such content requires significant resources. Displaying multiple web pages can affect video decoding performance on the ION-R300.
Image Carousel
The IONODES Secure Display Station supports a configurable image carousel data source for display on a selected video output tile.
Set Data Source Type to Image Carousel.
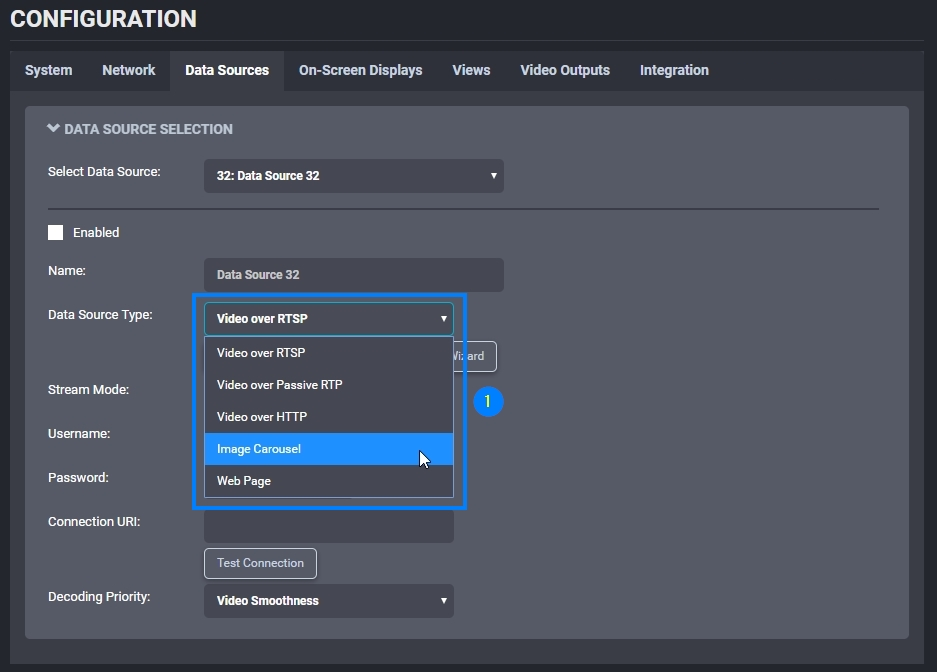
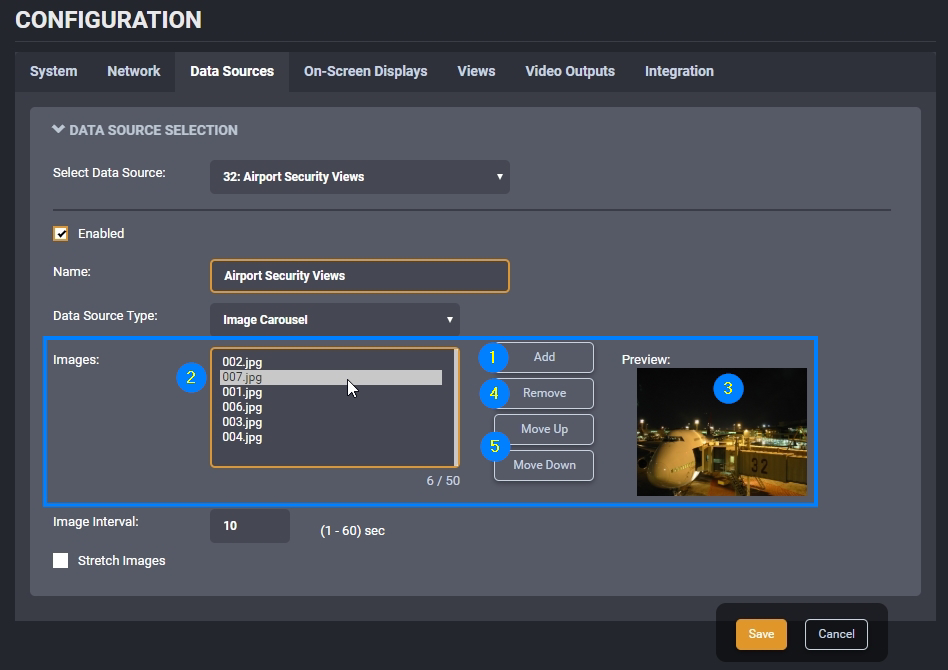
Enable the data source, optionally update the Name field, then click Add to open the Media Library dialog.
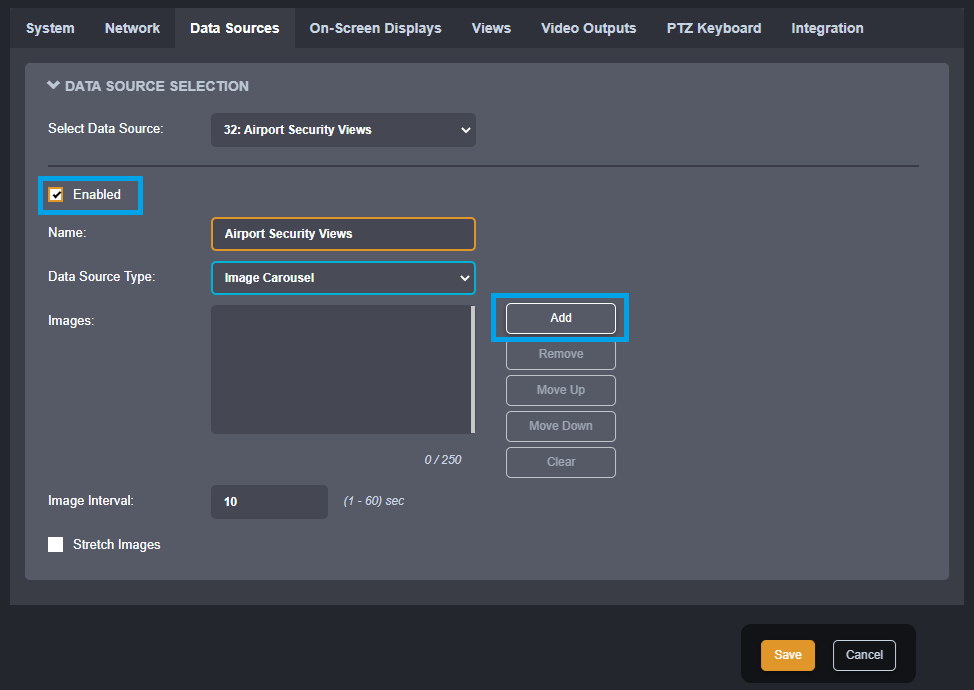
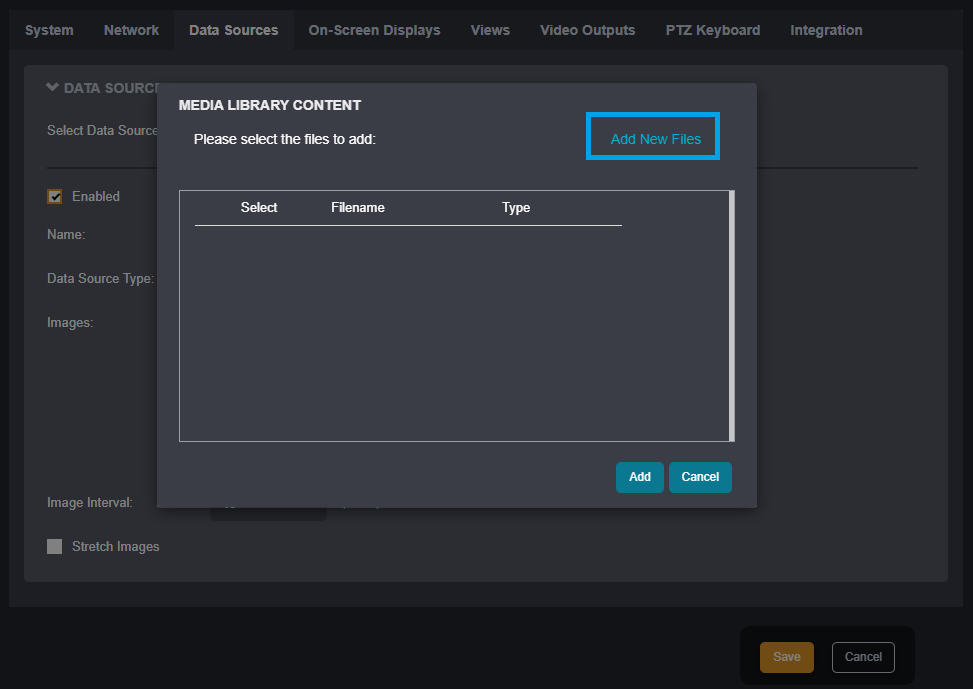
In this dialog, select media already stored on the device or use Add New Files to upload new files.
Click Add New Files to open the File Explorer dialog, navigate to the image directory, select one or more images, and click Open to upload.
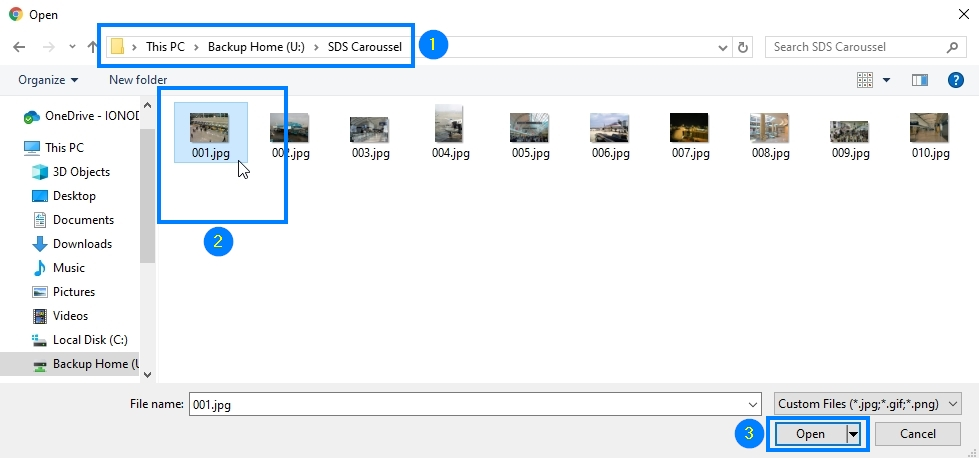
Note
Standard selection functions can be used in this step, such as holding the Ctrl key on the keyboard to select multiple images or selecting all images via the Ctrl-A keyboard shortcut, followed by the Open button to upload all selected images at once. To upload a single image, double-click it instead of clicking Open.
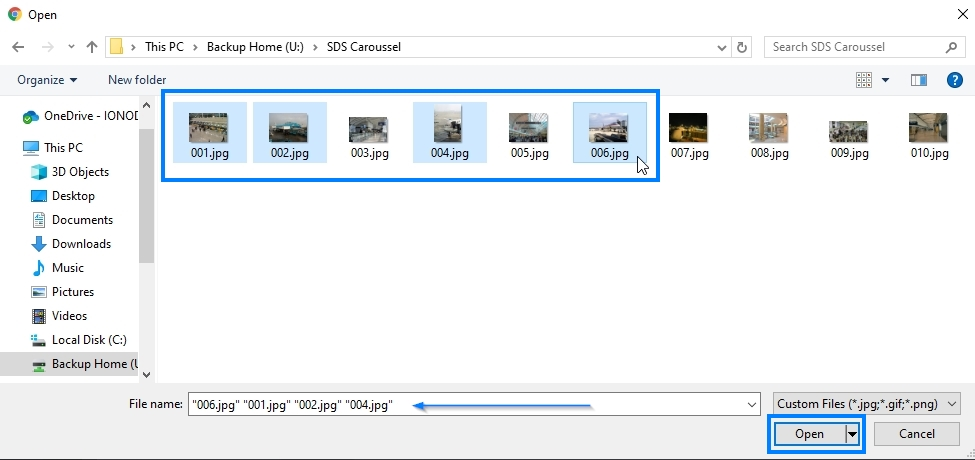
Several functions are available on the ION-R300 to manage uploaded images:
- Click Add again to upload additional images.
- Select an image in the list and:
- Preview the image
- Remove the selected image from the source list
- Re-order the selected image by clicking Move Up or Move Down
Images must be in JPG, PNG or GIF format. GIF animations are not displayed; GIF and PNG transparency is supported.
Note
Each Image Carousel data source supports a maximum of 50 images. Each image dimension must be less than 3840 pixels, and the image must contain no more than 8,294,400 pixels. No per-image file-size limit is enforced.
The Media Library supports a maximum of 250 files and 3 GB total size across all uploaded images and videos.
All uploaded images can be managed through the Media Library.
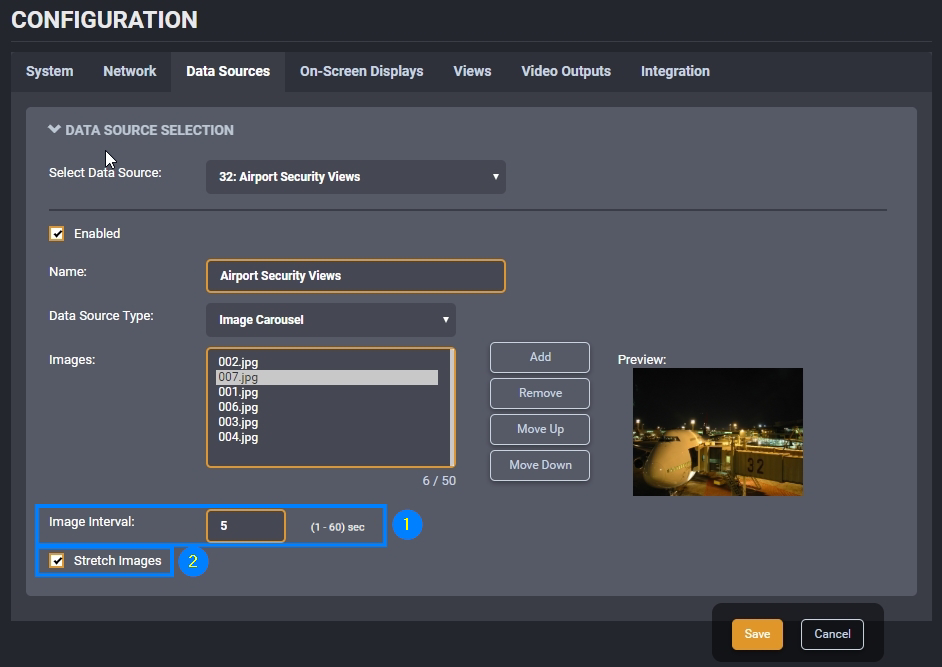
Set the image interval for the images to be displayed.
Select Stretch to fill the chosen video tile with each image. Ensure that the image aspect ratio is appropriate for the display resolution and tile size before enabling this option.
Note
When Stretch Images is checked, images will be stretched to fill the entire view tile, regardless of the images’ aspect ratio. When unchecked, images will take as much space as possible in the view tile while preserving the images’ aspect ratio.
Video File Playback
Secure Display Stations allow users to play back a selected video file within a tile, using media stored on the device.
Set Data Source Type to Video File and enable the data source.
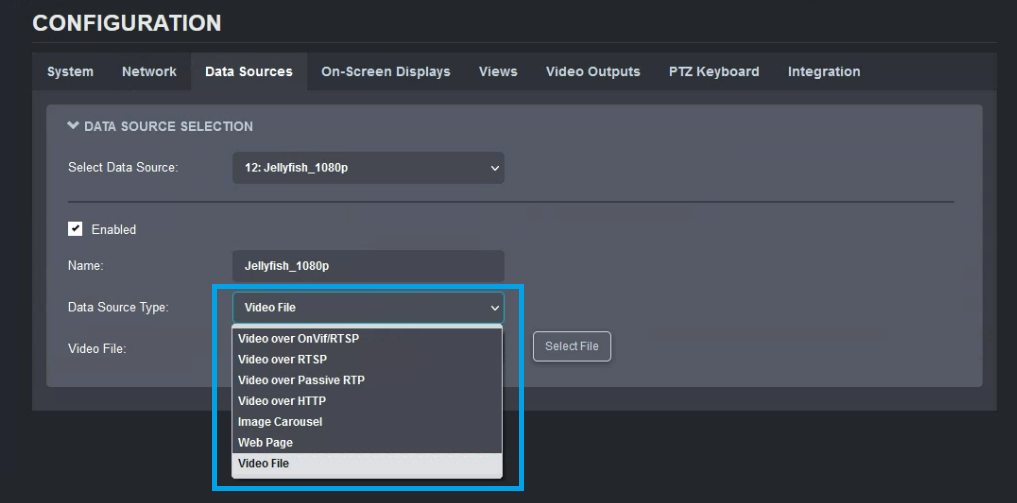
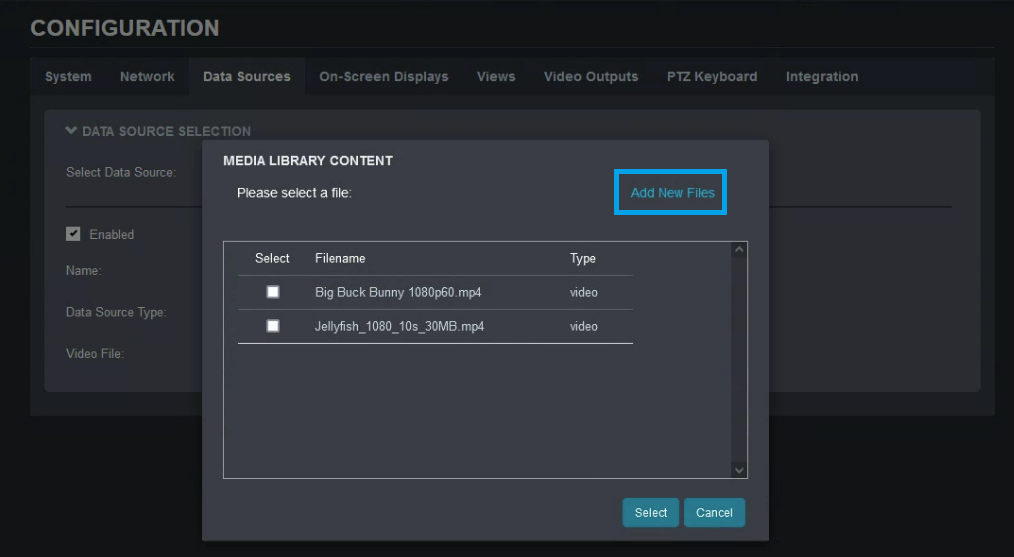
When selecting the video file, two options are available:
- Select a file that is already uploaded to the Media Library.
- Add a new file by uploading it directly to the Secure Display Station for this data source.
Note
Only *.mp4 files are supported for playback, and they must be encoded using H.264 or H.265 codecs.
Note
Video files count toward the same Media Library limits as uploaded images.